Friday, 7 January 2011

Obssessions

A bit of new year fabric eye candy...
Kona Snow, School Bus, Celery and Aqua
I am stocking up on solids and those big blocks of colour feel almost cleansing.  From Mandy at Simply Solids (UK online)- 20% discount going until 11th Jan.  I have just discovered the delights of Essex linen,  yes I know I am late to the party,  t'was ever so, but it is being added to this stack along with Kona banana.  There is more than a hint of beach in this stack, I think I just need some sun!  Yellow is going to be a key colour for me this year.  The stack reminds me of this vintage buy from a few months ago...H is for Holiday

I know it is part of being creative to be obssessive, but sometimes my head is a very strange place to be.  I keep it hidden, my public face is capable, organised, can do, a grown up- scratch underneath and I can't stop thinking about a colour, a design, a food, and lately a song.  Music is a big part of my life, partly my day job and a big emotional driver for me.  When I sew I have the radio on but it is mainly spoken word, even sport radio which is ironic as pilates and dog walking is my idea of sport.  I know all sorts of surprise details about the transfer window in football, why Australia lost the Ashes etc.  I don't listen to music much because I need immersion for that.  So, I listen with my ipod in the bath- a little unsafe but I like to live life on the edge.  I've mentioned the Villagers before, since I saw them live one song has ruled, '27 Strangers'
This did strange things to me  hearing it live and makes my head whirl with pictures.  I have lost count of how many times I have listened to this, over and over again. I have a whole mini quilt sketched out- quick cursory glance at the fastest preliminary sketch.
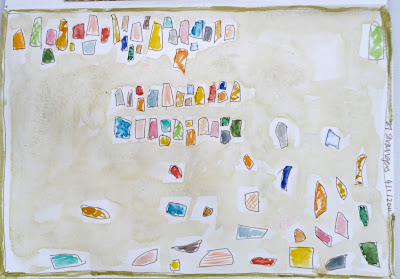
This needs more work, rearranging but it is enough to remind me what to do.  I have drawn all my life but pencils, charcoal, paint never quite worked through all my artistic endeavors.  I have found the medium in fabric- don't what to do with the results, there is only so much wall space but there is no choice, I am compelled to make this and others like it inspired by music and poetry otherwise my head will burst.  Glad to get that out...
Enough crazy talk, a big welcome to a new followers following my single binding tutorial- so glad to help, my teacher mode breaks out in tutorials!  And a huge thank you to Quiltstory who featured my quilt for Lula- have a little look over here and take a look at the other quilts featured.
Meanwhile, some homework for you... whilst listening to my ipod I scrolled down and started on a sewing theme, often bad puns involved.  What follows reflects my musical tastes, my age and my sense of houmour.
'Corduroy', Pearl Jam
'Tapestry', Carol King
'Reel around the Fountain',  The Smiths
'Pieces',  Villagers
 and suggested in comments by 'Neumaisse''Coat of Many Colours' Dolly Parton
and 'Fancy', Reba McIntire
If you think of something, leave me a comment- you know it'll make me laugh!
sib blog

Monday, 3 January 2011

Single Binding Tutorial

Quilting those smaller items- mini quilts, mug rugs, coasters, placemats etc is tricky.  Double bindings are too chunky and sewing them on by machine l doesn't seem to work out the same on these little things.   A good binding lifts your creation and a bad binding can detract from all your hard work. I am sharing all my best tips in a picture-packed tutorial  The pics show a coaster but I call it a mini quilt throughout for ease.

1.  Trim your item with a rotary cutter and rule, then zigzag round the edge.  Don't zig zag into the corners as they tend to distort- I pivot around them.  This stage is optional but it does keep the edges nice and neat.


2.  Cut your binding a scant 1 1/4" wide using a rotary cutter and rule.  Cut across the grain; selvedge to selvedge.  Unsure what scant looks like?  That's my scant 1 1/4" inch version below.  This is going to create a narrow close-fitting binding.  If this is your first time with this technique, you can cut your binding 1 1/4" wide for a big of wiggle room and not worry about the scant option. 

If you want to use bias binding (cut on the bias diagonal of the fabric rather than across the grain) for round mats or rounded corners, cut a little wider, 1 1/2"


3.  At one end of your binding, turn over the corner to make a right angle triangle and press.

4.    I normally start binding at the mid-bottom edge of the project.   Remember the join between the start and end of your binding will be here. I don't use pins when machining small items,  but if you would rather go ahead!


5.  You have to allow for joining your binding so on a really small piece like a coaster although the binding lies halfway across the bottom,  I am only going to sew the last inch towards the corner, the first bit of binding will therefore not be attached yet, just lying ready. Use a 1/4 inch seam allowance- I use my 1/4 foot to guarantee it, accuracy on this makes a big difference.  Secure at the beginning and end an stop and secure 1/4 inch before the end of the mini quilt corner.  
6.  You will need to mitre the corners.  Not sure how? See my mitred corner's tutorial here!  I attach the binding all the way round until I am within 3-6 inches of the where the binding began depending on the size of the object.  Secure your last bit of stitching at this point.
7.  Line the edges of  binding up diagonally, you will need to turn the end of the binding away from the mini quilt.  You need to make sure that the unattached binding is not too slack here or it will be too loose when you come to machine sew it.   Press the diagonal folds.
8.  Take a small needle and co-ordinating thread with a knot at the bottom and push between the  diagonal folds- see how the needle is going through at a 45 degree angle? 
9.  I folded back the left hand binding fabric here so you could see how the needle tip angled through.
10.  Push the needle back through angling the opposite way and keep this going until you have line of little hand stitches joining the binding.  You can always put in the odd back stitch for security.  I have found hand stitching more accurate for joining binding especially when there is so little room to join the two edges by machine. 
Just showing you the other side of the join here.
11.  Trim the edges to 1/4 inch and press open.  Now you can machine stitch across the last bit of unattached binding
One side of binding is attached.  
12.  With your fingers, open the binding outwards so you can see its right side and give it a good press with your iron.
Get right into the corners with the tip of the iron.  A little iron helps, I use a travel iron.
This is how it looks on the underneath side.
13.  Turn your mini quilt so the underside is facing you and along the edges (avoid the corners) turn the binding in so that the edge of the binding meets the edge of the mini quilt.  Take your time here.  Doing this bit really well will given you an even, narrow, close fitting binding.
14.  This is how it will look.  The corners are too fiddly to do with the iron, we'll do these with pins in the next step.
15.  Take the pressed folded edge of binding and line it up ever so lightly above the stitching line, pin to secure.
You can fold and overlap to get your corners nice and sharp.
It ends up looking like this.
16.  With a little needle and a thread with a quilters knot in the end, secure your thread into the mini quilt seam allowance to hide the end and we are going to hand sew the back of the binding with ladder stitch. If this is new to you there are lots of diagrams and you tube videos but it is pretty easy and the stitching is almost invisible.  I take a stitch just above the machine stitching line where the binding was first attached...
and then a stitch through the pressed fold of the binding, pull gently and repeat- that is ladder stitch!  Stitch all around the binding.
Your mini quilt/mug rug/coaster/placemat binding is complete!
This method is not super speedy but it gives me good results, I hope it works for you.  
Any queries or problems with it- email me and let me know!  

Saturday, 1 January 2011

Lesson

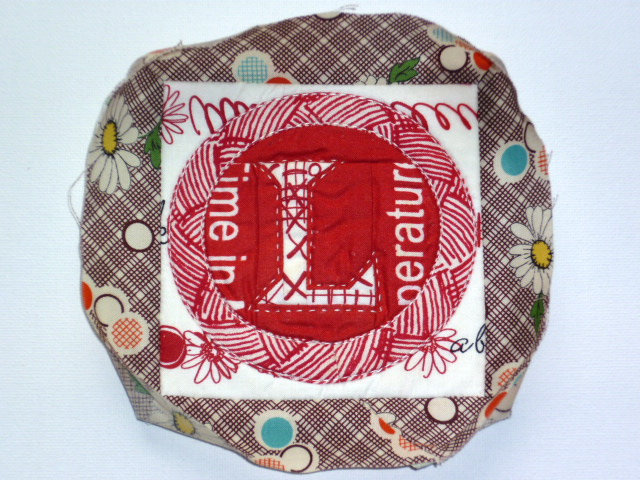
It was of course Ayumi's idea to make a set of coasters for Suzuko Koseki,  18 crafters each making a coaster, from 8 different countries.  It was like this last time you saw it but I completed it over Christmas.

It was backed, quilted and bound when I noticed a tiny mark.  I dampened it, added a tiny rub of Vanish, rinsed it and patted it dry.  When I came back to it the next day I could see a reddish glow in the corner.  
You can see a bit of the bleed, difficult to catch as the flash bleaches the colour but around the red loops and seeping into the binding is a distinct tinge of scarlet and this item is going to a fabric designer for whom I have huge admiration, I can't send her a substandard piece, even if it is her own fabric range at fault.  This, one of my favourite fabrics of all time, is the culprit.   It saddens me because I love it so much. Last night I washed each fabric I had used to make the original coaster and this one bleeds red dye and not just a little.  
Last night I remade the same thing all over again thinking there would be a post today and it would be shut Monday for bank holiday.  Post Office is shut both days as it turns out but still plenty of time to get to Japan.  Remaking was not what I had planned but time is running out for this and of course it cmae out better even if i did struggle to remember all that I did on the first one.  My original idea was a vintage type writer key but as I chose red and white it also echoes the Japanese flag.  The tiny bell is a sort of Suzuko Koseki trademark- Suzuko translates as 'bell'.  All the fabrics are by Suzuko Koseki.
A different back to the first coaster which had a vintage fabric backing but maybe this is better. I like the Made in England reference and there are a lot of button prints on the other coasters so it helps to have a family resemblance.  Check them out, they are going to make the most beautiful gift and each makes me smile at how it reflects creator's style. 
 
 I did work out some helpful hints to sew a really neat single binding for items like this so I'll put a tutorial up soon- great for mini quilts and mug rugs too.

I  am all for learning from my mistakes but it as a monumental pain in the backside.  I hate prewashing but I am going to wash all my unchecked reds with colour catcher sheets.  Lesson learnt.
sib blog

Friday, 31 December 2010

Say Hello, Wave Goodbye

My new year's eve is spent sewing, not by choice but by error.  All I can say is prewash your new fabrics- I rarely do and it has caught up with me, I have been a naughty girl and learnt my lesson the hard way.
I wave goodbye to my favourite makes of 2010- it is the top left project that has given me a whole evening of trouble, dereliction of my duties as a partner and mother etc......

Say hello to 2011- maybe a retro song to welcome it in?  Nothing like a bit of vintage, trends may come and go and I don't really care, I will always be a vintage girl- Happy New Year x  
sib blog

Thursday, 30 December 2010

Pillow Presents

Now all the recipients have their presents I can show you what I made, starting with cushions/pillows.  This one is for my brother.  There are lots of little clues for him in the fabric . Iconic brands- he is a graphic designer, Peanuts Dr fabric- he has had a lot of  trips for allergies this year but is all sorted now
ironic references to coolness- he lives in London
random words and mispelt Japanese London fabric
Food and lego- a fine combination!

Something a bit calmer for my sister, she is a poor sleeper so this is a intended as an aid, a balm to sleepness nights.  The fabrics relate to the forest surrounding sleeping beauty so a bit of Joel Dewberry Herringbone  Modern Meadow , some dandelion clock seeds from V and A, a bit of vintage orange, some Lecien Folklore tucked away in the meadow and Suzuko Koseki at the very edge.
I stamped the linen and heat set it with an iron- the hush label came from a scarf.
 Sweet dreams...
And the tiniest was a little mini log cabin lavender bag for my swap with Ingrid, I thought she would like the little bird and its fruity garden.

sib blog

Tuesday, 28 December 2010

I hope you had the best time you could have over Christmas.  Some of my lovely goodies below...
The bag was from Damian and custom made by the very talented Mia.  The fox reminds me of Lottie and the whole bag makes me smile.  She even included a little foxy keyring.  Mia sent me the beautiful Snowman coaster/mug rug as a pressie too as a thank you for taking part in her advent blog makes- she is such a sweetie x
This little bundle is from Lula- she knows me too well.  The compass and protractor are because I am always cadging these things off her when I am in the middle of a quilting sewing idea.  A compass with its own pencil leads- I love precision stationery!  Ayumi knows this too- she sent me a surprise gift which just reached me just in time to go under the tree.  Cooking cute writing stuff and an amazing Martha Stewart stamp set with loads of letters and gridded mounts, circle ones too- stamping and typography heaven.  I have so many plans for this, she is so generous x 
Our Christmas day was good but lots of family and extended family is a bit exhausting and I feel a little haunted by the ghosts of not so good Christmas' past so I am often a little tense.  We still had snow which made for a beautiful post lunch dog walk.

Boxing day was wonderful, just me, D, Lula, my brother and mum.  I do the food and drinks- soup, bread, crisps,olives, rocky road, fruit cake plus cocktails and juice.  Eating, drinking and playing board games- 221b Baker Street .  Have you played it?  A great game for adults and older children- relaxing, thoughtful, quiet and funny- although that could've been the participants...
sib blog