Showing posts with label Christmas. Show all posts

Friday, 16 December 2016

Christmas Mellow Music Playlist

As well as sewing and fabric, music plays a huge part in my life, least of all in my day job - I've just finished a week of Christmas parties for 0-4 year olds, all jolly good fun!  So, as promised, here's my Christmas playlist recommendations for mellow Christmas sounds.  Sources include, Amazon, iTunes, Spotify and YouTube.   I add to this each year and my husband recently found the Fiona Apple and Tracey Chapman tracks, both wonderful.  I absolutely recommend a Bose SoundLink Bluetooth speaker if you are looking for easy to use, great sounding new kit, but I've played many of these tracks thorough a tablet speaker or just listened on my desktop computer and still enjoyed them.


A big thank you to Emily who sent me some of her piano tracks, a lovely listen.   There's nothing like music to help you relax and enjoy the season. 

Wednesday, 16 November 2011

Candy Cane Love

Today I nervously put my next foundation paper piecing pattern on sale now at Etsy- Candy Cane Love. This is unashamedly Christmassy.  I love red and white, especially at Christmas and the candy cane stood out for me as the pattern I wanted to make for Christmas sewing.  
This pattern is intermediate level- it is a little harder than Winter Woolies which is a beginner level pattern.  There are some very small pieces to make the cane curve and enlarging the blocks would make them easier to work with if you find little bits a challenge. You get a 15 page PDF document to download,  pattern pieces and instructions to make 3 candy cane blocks as well as pattern maps to show how all the pieces fit together, photos, pictures and general paper piecing guidelines and helpful hints. There are two rectangle mirror image canes that can be sewn together to make the candy cane heart in the mini tote bag.  You could also use these separately- I think they would work well in a line of three, maybe on a table runner.  I used my tomato reds to make the canes for the candy cane heart and stamped with versacraft ink in the centre.  I have posted a free tutorial to make the mini tote bag here!
In addition to the two rectangle cane blocks, there is a square cane block.  I used cherry reds for this cane-there is a lot of red in my stash!  Amy has been invaluable in her pattern testing for me for the second time- I owe her big time!  She used one of the rectangle cane blocks for her beautiful Christmas linen stocking here!  The sweetie fabric is the most perfect match.
Now I can draw in photoshop, I made some improvements to my pattern formats.  All the pattern pieces for each cane are on a single page so that you can enlarge them all in one go to make bigger blocks.  The blocks I made up are 6"(square block) and 6.5" (rectangle) tall- finished size.  Photocopying by 200% would produce quilt size blocks of 12" and 13" and there is room around the canes to trim the blocks if required.  I also put in alignment marks to match the sections up- I found this really helpful.  I have put in a cropped pic below so you can see how the marks work.    You can see how the pattern pieces have a little colour too so to help you know which bit is which!  They are pastel shades on the pattern pieces and will print equally well in black and white- that is how I use them, or colour without using all your printing ink up!
This is the square block in a potholder, perfect for all the Christmas cooking.  I 'll post more about this one tomorrow.
I hope you like it!
sib blog

Tuesday, 4 October 2011

Christmas- not yet

Just finished, ready for Christmas in Hawaii, my Christmas Ringo Pie bee block-an advent tree for Amber.  I found this wooden tree on Flickr and that was my starting point.
The bordered squares are 1.5 inches.  I stamped the words- a line from White Christmas using Versacraft ink as it sets permanently onto the fabric.
The background fabric and stamped squares are Kona Snow.  I have very little Christmas fabric so I dived into the red and green in my vintage and new fabrics so it is an eclectic mix.
You can see the other Christmas blocks which have rolled in so far here as well as the first blocks from Amy's camera theme too here and here.
It might be a while till Christmas but it is the start of stitching time- I am hoping to get some paper pieced patterns ready for sale in the next 2 weeks with Christmas designs ready for stockings, cushions etc.  Keeps me busy x  
sib blog

Tuesday, 28 December 2010

I hope you had the best time you could have over Christmas.  Some of my lovely goodies below...
The bag was from Damian and custom made by the very talented Mia.  The fox reminds me of Lottie and the whole bag makes me smile.  She even included a little foxy keyring.  Mia sent me the beautiful Snowman coaster/mug rug as a pressie too as a thank you for taking part in her advent blog makes- she is such a sweetie x
This little bundle is from Lula- she knows me too well.  The compass and protractor are because I am always cadging these things off her when I am in the middle of a quilting sewing idea.  A compass with its own pencil leads- I love precision stationery!  Ayumi knows this too- she sent me a surprise gift which just reached me just in time to go under the tree.  Cooking cute writing stuff and an amazing Martha Stewart stamp set with loads of letters and gridded mounts, circle ones too- stamping and typography heaven.  I have so many plans for this, she is so generous x 
Our Christmas day was good but lots of family and extended family is a bit exhausting and I feel a little haunted by the ghosts of not so good Christmas' past so I am often a little tense.  We still had snow which made for a beautiful post lunch dog walk.

Boxing day was wonderful, just me, D, Lula, my brother and mum.  I do the food and drinks- soup, bread, crisps,olives, rocky road, fruit cake plus cocktails and juice.  Eating, drinking and playing board games- 221b Baker Street .  Have you played it?  A great game for adults and older children- relaxing, thoughtful, quiet and funny- although that could've been the participants...
sib blog

Tuesday, 21 December 2010

Shortest day, last quilt of 2010

 Love hate love hate love love love   
 - is how my relationship with this quilt has been-finally finished, hurrah!  And I admit to being very pleased with it, although not as pleased as Lula is which the best thing as it is for her.  She refused to let me drape it artfully over a snowy fence, that can wait for another time, so bedroom pics for the moment.  
The germ of this quilt started last year when Manda McGregory included a little Urban Chiks Swell Moda charm pack baby quilt in an early edition of Sewhip, and I bought the charm packs and a jelly roll from USA after searching for them feverishly online.  I mixed with a little Cath Kidston, Katie Jump Rope, Old Laura Ashley fabrics (the Cath Kidston figure of  1970s and 1980s), vintage prints and the placement of large applique motifs inspired by this quilt (Material Obsession)
Lula chose her favourite themes- ice cream, cup cake etc and I made these the feature blocks.  She helped me layout the charm squares to avoid repetition.  The quilt was made in six sections, each is quilted and then joined to the next section with narrow strips- quilt-as-you-go style.  This Happy Zombie tutorial shows the technique but I machined instead of hand sewing when finshing the back strips.  The binding- attaching this was driving me nuts this morning, it took forever- is pieced red and pink strips from the jelly roll.  I use Rita- Red Pepper Quilts machine binding method but I start attaching on the back and so my final line of stitching on the front.
You can see her pillow case and a bit of wall paper- both Cath Kidston, that the same print is repeated in the quilt here and there.
Each time I embark on a quilt I forget how long it takes me to finish one, I refilled the bobbin four times this morning.
Quick view of the back- not too exciting, all old Laura Ashley prints, the largest part form an enormous circular table cloth I picked up at the boot sale.  
A little stamped label.  I asked if she would prefer 'Mum' or 'Mummy'- you can see her choice x
You can see another proud mummy quilt at Leila's blog Where the Orchid's Grow.  She beat me and finished yesterday!  It made me laugh when I saw her pic, I felt the same need to get mine done for Christmas, and the extra cold weather driving me on.  I made 4 quilts this year, it seems paltry compared to some amazing mosaics I've seen recently but I made a whole load of smaller stuff and each quilt is a labour of love and a labour of plain old hard work.
I love making clothes and small stuff but the quilting is intensely rewarding, especially when finished!   My next biggish project- a baby quilt for a friend- baby due Feb.
 This is my last entry before Christmas so a vintage pic of seasonal good wishes on the shortest day of the year and a big thank you to all of you who read,  comment and email- I am truly touched when you do so!
Have a lovely Christmas, wherever you are and however you choose to celebrate x

sib blog

Saturday, 18 December 2010

Gifts

The view at 8.00am, wonderful light.
I am lucky, I have had some lovely packages through the post, all as a result of blogging and Flickr friendships.  Sardaana from Austria offered a swap- I sent her some Suzuko Koseki 'recommended' fabrics and some Cath Kidston prints plus extras (can't show as my parcel to her has yet to get to her) and she sent me Lecien Kitchen prints- I have this in turquoise already, one of my favs- and Suzuko Koseki buttons print.  Thank you Sardaana xxx. She also added a tiny bias tape maker, nice little gadget- I am going to try this later.  Sardaana has the most beautiful shop in Salzburg which I just know I will get to visit one day.  
Ingrid of Ingthings sent me a surprise swap- I have sent hers, again postal service has slowed to a grind here, I hope it gets to her soon.  She sent me these vintage goodies.
The crane, starts and winter card are already on our tree.  And she included these wonderful fabrics and textiles too, wonderful, thank you lovely and always generous Ingrid x
 I won a little giveaway a couple of weeks again and it arrived yesterday, a cute little selvedge star decoration.  Thankyou x to Diane and Nancy- check out Nancy's etsy shop here.
And amidst making family Christmas gifts too secret to show to spying family eyes, I am making a coaster for Suzuko Koseki as part of Ayumi's generous idea, 18 crafers from 8 different countries, 18 coasters.  This was inspired by vintage type writer keys, paper pieced- it needs a square background and quilting so a way to go yet.   At the moment less than 4 inches across to give a bit of scale.  Check out the others here, inspiring stuff!  Thanks to Ayumi too, I have added a great little device to make blog entries print friendly, very useful for tutorials- click here to add it to your website/blog.

sib blog

Tuesday, 14 December 2010

Old and New

I haven't posted much vintage stuff recently and I have been bringing out a few favourites for Christmas so I thought I would share.   I have liked old stuff since I was little.  I remember going to what were then called flea markets.  The name perplexed me even then, I do remember wondering if some of the stuff had fleas as the venues and some of the stock were dark and dingy places.  But, there was always the chance of finding treasure.  These trips were from the age of 8 or 9 with my dad.  He was a frequenter of junk and charity shops, partly because he is a cheapskate and partly because he is a collector too, it must be genetic.  Vintage style wasn't the rage in the late 1970s and if your clothes came from a charity shop you kept that very much to yourself.   I used to ache for the old china faced dolls but they were way out the range of my pocket money.  
I did buy this back then for pennies.  It usually stores precious little paper memories- a select bunch of old tickets and cards but the robin lends itself to Christmas.  
This book is a little ex school (Oliver and Boyd) book.  It has the most wonderful simple pictures so it always comes out at Christmas to rest on my cluttered shelves
I have a lot of cookie cutters around as well, they make easy decorations.  I love the stars in the pic below surrounded by circles, and Mary with her blanket.
I don't just bring out the old.  This book is new, great title, just on the right side of a pun.  It is from one of my music class mums who has known me a long time!  Thank you to Ma x x  If you are a knitter it is worth buying, it has funny and creative ideas and it uses the characters to tell the story too, very cute.
And to offset the drama of X factor and over sentimentalised  singing, take a look at this version of Your Song from Green Wing, thanks Kathy who reminded me of this, it gets me everytime :D
sib blog

Monday, 6 December 2010

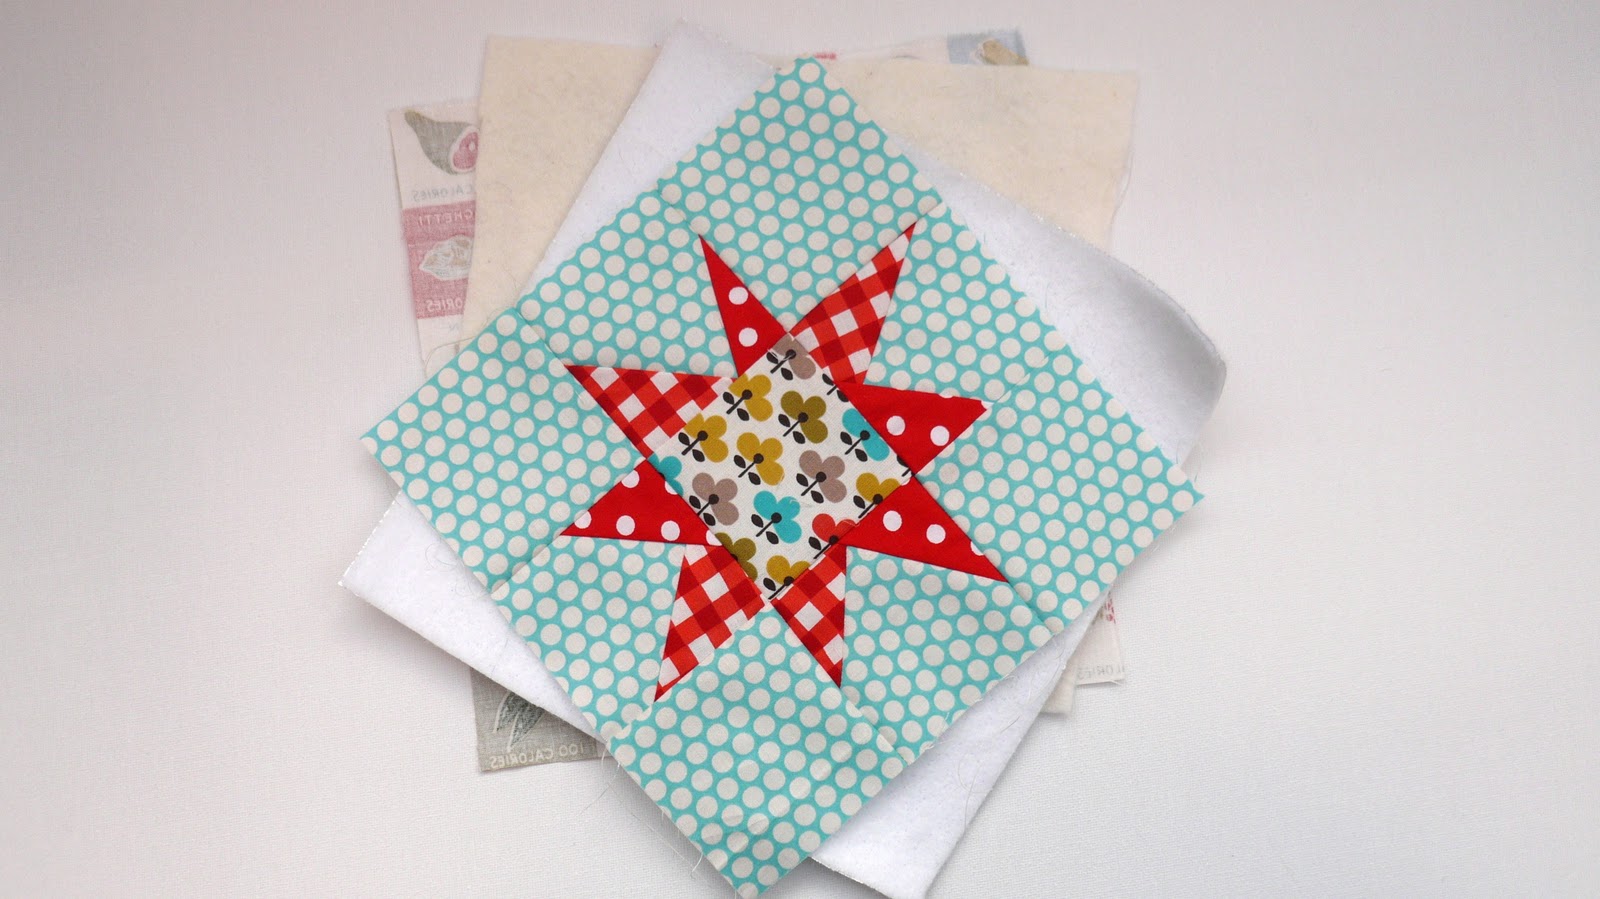
Starbright pot holder/mug rug

A big thank you to Mia for hosting her December Christmas making special at Handmade by Mia, if you haven't visited yet, take a look.  My make is today!  This post is extra exciting for me as it is a threeway post- here, linking to Mia and on Kate's blog M is for Make and involves contributions from other bloggers along the way so think of it as a collaborative effort! It is a quick and easy tutorial for a Starbright pot holder/mug rug- it could be either- and a quick gift for Christmas.  For the puzzled amongst you, a mug rug is just an oversized coaster, big enough for a cup of your favouite hot drink with room for a snack on the side.
  If you haven't made a wonky star before, it is much easier than you would think.  I went for Christmas colours rather than Christmas themed fabrics so it can be used all year round whilst giving a bit of festive cheer now.  You can easily make several of these out of the generous fabric quantities below.

To make your Star Pot holder/mug rug you will need:
1/4 yard fabric for background
1/4 yard contrasting fabric for triangles- or scraps
Contrasting scrap for centre square
1/4 Fabric for backing
1/4 yard of insulbrite thermal padding (Optional) 
1/4 yard cotton batting (or less if using insulbrite as well)
1/4 yard fabric for binding or  44" ready made bias tape
Ribbon or tape for a hanging loop, about 4" will be ample
(Finished holder/rug will be approx. 8" square)

Cut background fabric into 8 squares, each 3 1/2" square
Cut centre fabric into 1 square, 3 1/2" square
Cut triangle fabrics into 4 squares, 4 1/2 inches" and then stack the squares and cut along the diagonal to make 8 right angled triangles

To make the star follow Victoria's wonderful tutorial  or reference Gwen Marston's Liberated Quilting 2 
Place your completed star over your backing fabric as a guide and cut out a back piece slightly bigger that the top.  Repeat for the batting.  I used a layer of insulbrite and a layer of cotton batting. You could use 2 or 3 layers of cotton batting instead of a layer of insulbrite.  Make your quilt sandwich- backing fabric right side down, cotton batting, insulbrite shiny side up, star square right side up.  
As this is quite small I didn't spray baste, tack or pin but if you want to go ahead.
I used a Hera tool to make a crease corner to corner and then quilted from that point.  I used a stitch length of 3 and the walking foot as a line guide. 
I went for quite a dense textured pattern but do whatever you fancy.
Trim the edges making everything nice and square.  Before I add binding I always zig zag around the edges of any quilted project, mini size or full size.
Now is the time to add a hanging loop. Stitch in the 1/4" seam allowance and secure with straight  stitch and zig zag. Make sure the loop is pointing inwards out of the way of where the binding will go.
You could add a label or decorative tape as well- festive message maybe?
I use a single binding on small projects like this to.  Cut your binding strips 1 1/4 " wide.  Straight grain is fine, there are no curved edges so it doesn't need to be bias cut.   Trim the start of the binding at a 45 degree angle- it will make life easier later.
Make sure your hanging loop is pinned down and tucked out of the way.  A good finish to your binding  will lift the whole project,  so before you attach it, trim off all stray threads, cut the tips off the corners of the quilted square- just the tiniest amount, it will reduce the bulk on the binding corners.
I found a very helpful single binding tutorial here by Rachel at Contented.  She has gone a bit wider with the binding at 1 1/2".  I like mine tighter so I opted for 1 1/4".   Take your time, use your iron on the corners, keep your seam to 1/4" and look at my tutorial for mitred corners if you find these tricky.  Rachel is adding this to her binding tutorial as well.
You can stitch your hanging loop on to the finished binding or leave it as it is.  
 A useful little  present or something to hang up and keep for yourself!
Fabrics: Green dots (binding) and aqua dots- Kei Honeycomb
Centre Square- Ellie in Amber- Michael Miller- all available from Kate at M is for Make
Red gingham print- Farmers Market Sandi Henderson, Red/white dots- local fabric store and Kitchen print  Elsie's Pantry Windham Fabrics- from my stash
Who doesn't appreciate a little handmade, homemade love?
Keep checking Mia's blog for more December makes x And Kate's blog for fabric loveliness x
sib blog