Wednesday 30 March 2016

March at Eternal Maker

Time for my monthly visit to Eternal Maker and a nine-patch photo collage selection of quilting and dressmaking fabrics that have caught my eye this month.


(Items organised in three rows and numbered left to right)

1.  Blend Fabrics Daydream Green Faraway Forest by Lizzie Mackay   Beautiful dreamy monochrome design- see the other pastel colours of this print here.

2.  Studio E Small Talk Text Sewing themed words text print fabric.  

3.  Makower Town Riverbank This design works like a border print so perfect for a gathered skirt formed of rectangles so the riverbank buildings and painterly work in horizontal bands around a skirt.  This could work well in a quilt too. 

4.  Riley Blake Lovebugs Envelopes This is such a cute fabric and could work as a feature or as background in a quilt.  It would be lovely for a little girl's dress too. See the rest of the Lovebugs collection here.

5.  Riley Blake Navy Polka Flower By Melly and Me a clever new take on the classic navy/off white polka dot design.

6.  Riley Blake Lovebugs Text This would make a very special quilt backing fabric.  Love love love all the way!  See the rest of the Lovebugs collection here.

7.  Riley Blake Idle Winds Jersey/knit fabric 95% cotton/5% spandex.  The addition of spandex gives this knit fabric good recovery so tops and legging won't bag out at the knees and elbows.  Good weight for dresses too.

8.  Studio E Small Talk Symbols  Brilliant low volume print!

9. Hokkoh Grey Fox Scallop Pincord.  A fine soft corduroy fabric suitable for clothing, craft or quilting. 
sib blog

MiY Longley Cardigan with Knit/Bias Band Neck Finish Tutorial


 I've got to know Wendy Ward  through Instagram, especially sewing photo events like #miymarch16 when you post a picture each day following a list of sewing themes.  She's got a long background in the industry and I have huge respect for her work. She explains the basics of sewing so well- see this example on sewing machine settings from her blog - and is an industrious and independent spirit writing books as well as regular features in sewing magazines, running workshops and designing her pattern line.  I got in touch with her recently for my Sewing World column and when we were emailing each other she asked if I'd like to try a pattern and review it here.  I chose the Longley Cardigan and here it is!


Wendy's patterns come in a bag and with a detailed A4 size instruction booklet.  The pattern pieces are printed on large paper- copy shop style.  For this style I checked my bust measurement which fell smack in the middle of the small range and cut the pieces out of paper without tracing- I know living life on the edge.


It is a beginner friendly pattern- a page of the pattern is dedicated to information about knitted fabrics- their characteristics and how to sew them.   On the pattern pieces, the seam edges are given letters and these are referred to in the instructions.  There are lots of diagrams to support the written instructions and the Longley Cardi can be made using an overlocker or on a standard sewing machine.  I used a mix of a Brother 1034d overlocker and my Bernina 830 record with a walking foot.


I made the cardigan from a lovely quality draped cotton loopback medium weight fabric from Ditto Fabrics.  I've bought a selection of jersey fabrics from Ditto over the years and they have always been of very good quality and this was no exception- sadly it has sold out for the moment.  When sewing a thicker knit fabric I usually refer to this very helpful Indie Sew Bulky Knits blog post and I used the settings specified as that machine matches mine!  On my sewing machine I use a Bernina walking foot and a 90 ballpoint needle.


The pattern is clear and easy to follow.   The cutting plans are accurate and there is relatively little fabric wastage and the fabric quantities specified were perforce.  I used a knit that was over 150cm wide and it took 2 metres (that width/quantity applies to all three sizes).  The only thing I changed on the pattern was not adding the sleeve cuffs.  I read Rae's post and also Anna's review before I sewed it up so I knew the sleeves would be on the long side and so I turned up the sleeve ends by 1 ¼" and sewed a double needle hem using this method.


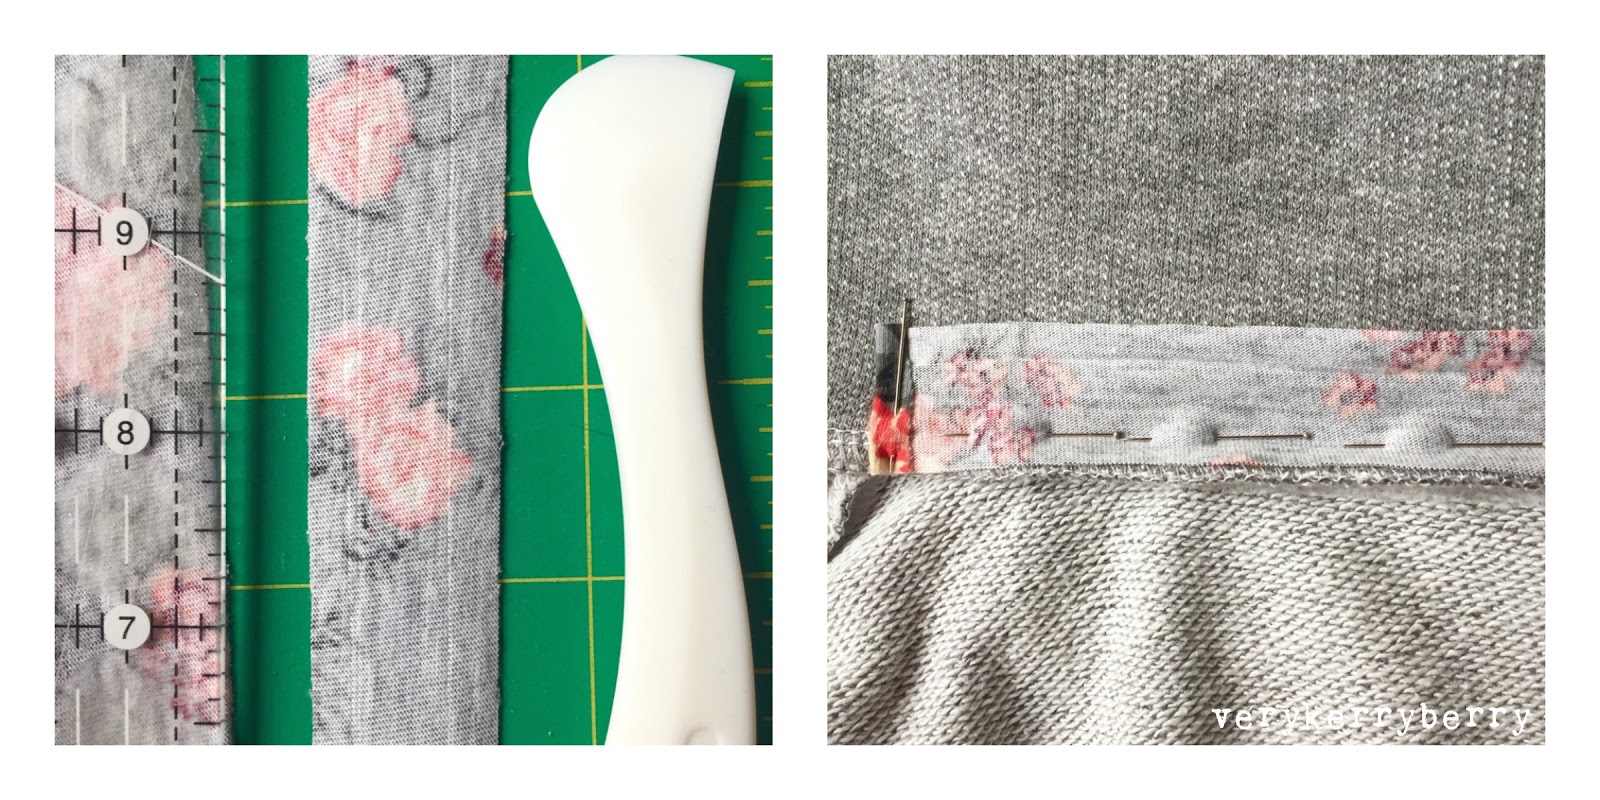
I added a few little extra touches that are decorative and have a little function including adding a strip of fabric over the back neckband seam.  This is a ready-to-wear style finish that you see in sweatshirts and hoodies.  It makes for a smooth neck and stops the seam flipping up after it's been pressed down.   I used some Girl Charlee floral jersey that I had left over, it has a small amount of stretch. You could use twill tape or hem tape


Adding a Bias Neck Strip
  • Cut a 1 ⅛" width 14" strip of jersey or bias fabric.
  • With the fabric strip wrong side up, using a Hera marker or smooth bladed knife and a ruler, make a crease along the length of the fabric ¼" from each edge.  Fold and press the short edges of the strip in  by ¼" in 
  • Place the fabric strip along the neck seam (this should be pressed downwards).  The crease of the strip will be lying against the seam line. Pin in place.
  • Stitch along the crease using a slight zig zag to allow for a small amount of stretch.   The start and end of the strip will be folded over.   At the end of the stitching, trim the strip so there's an extra ¼" to fold inwards and stitch over it.  My stitch settings were 0.5 width and 3 length.  Flip the fabric over the stitching and press downwards. 
  • Fold the long raw edge so it tucks under the neck seam and pin into place. 
  • Starting at the short edge and pivoting at the corners, sew along the bottom edge of the strip.
I added some top stitching along the shoulder seams, the front neck band edges and the hem band just using a long straight stitch.  These aren't areas that need to stretch and even though I had pressed everything I wanted the seams to stay firmly down plus I liked the look of the stitching.  The fabric is such great quality and it didn't distort or go wavy-  on a lighter weight cotton/lycra jersey it may not have worked so well!

spot the stray thread!  Perils of a dressmaker in photoshoot...
I love the result.  I've worn it every days since I completed it on Sunday,  Even with the arrival of Spring, I know I need long sleeves for many more months and even well into the summer.  The Longley Cardi is perfect for keeping warm working from home, wearing to yoga and pilates as an extra layer, throwing on as a jacket when the sun's out.  My daughter has already put her order in so a second is definitely on the cards- I just need to find the right fabric for her.  I think it would work well in a Ponte Roma too with a smarter and more structured jacket sort of look.  Recommended!

Stats:
Size Small
2m of 160cm wide fabric
Changes- removed cuffs, turned up sleeve ends by 1 ¼".  

Monday 28 March 2016

Farmer's Wife QAL Blocks 55 & 56: Malvina & Marcella

Welcome back to another Monday and two more farmer's wife blocks in the Farmer's Wife Quilt Along .  Erica from Crafty Blossom returns with a guest post for block 55, Malvina (p.214, letter p.121).  I did this block as a half-block hence it is a triangle rather than a square.  I plan to make a queen quilt following the layout suggested by Laurie in the book and I will need eight half-blocks, this is my second.


Fabric credits:


Block 56, Marcella ( p.215, letter p.80) is a straightforward block with only two sections to join together if you are foundation paper piecing.   I pre-cut my fabric so the piecing was quick to do.  I used this fabric selection before on block 23 Charlotte and I liked it so much this seemed like a good chance to repeat and echo it in the finished quilt.


Fabric credits:
Riley Blake Ardently Austen- Text Black
Penny Rose Fabrics Hope Chest Blossom Yellow
Penny Rose Fabrics Hope Chest Blossom Teal
{Please note:  I have linked to my sponsors for fabrics bought from them and elsewhere for anything that has come from other shops}

Rotary Cutting Dimensions 
Half Square Triangles: cut (1) 3 ½" square in cream, (2) in yellow and (1) in teal.  Sub-cut each square in half diagonally to make 2 half square triangles from each square (2 cream, 4 yellow, 2 teal) 
Centre Strip; cut (1) 3" x 10" rectangle in cream

Top tips for this block
  • Pre-cut all pieces
  • Use a water based glue stick. I use Sewline, to stick the first piece of each section to the paper
  • Chain piece sections where possible
  • Press the joining seam towards the centre strip
There's a sweet little reminiscence of childhood tea parties to read in the farmer's wife letter on page 80.

Remember you can:
  • Hashtag  #fw1930sqal on Instagram and add photos to the Flickr group if you like to share there.  
  • For individual blocks, you can use #Malvinablock and #Marcellablock on Instagram, Fat Quarter Shop and Angie are using these hash tags, #fw55malvina,  #fw56marcella, I'm using both hashtag systems.
  • You can also copy and paste links to any blog posts you do on these blocks in the comments or tag me on Instagram and I'd love to visit and take a look. 
Jo from My Bear Paw is back as guest blogger next Monday.

sib blog

Monday 21 March 2016

Farmer's Wife QAL Blocks 53 and 54: Lucy and Magnolia

We are well over half way through the Farmer's Wife blocks in the Farmer's Wife Quilt Along and so we start this week with block 53, Lucy (p.212, letter p.75).  There's a lot to to like in this block - I am definitely saving this design for future reference as it is one that I want to explore further.   I combined a variety of piecing methods for the construction.


Fabric credits:

For this block I rotary cut the half square triangles that make the corners of this 9-patch and I made them a little bigger than the book instructions.  Then, once they were pieced together and the seams pressed open, I trimmed them to 2 ½" square. The centre square was rotary cut following the book.  I foundation paper pieced the on-point 4-patch blocks adding larger triangles to the corners and trimming the whole square to size- like I did with the Lola block.  In this picture you can see the different construction elements at various construction stages.


Rotary Cutting Dimensions 
Small squares: cut (8) 1 ½" squares (4 in one colour, 4 in another)
(For all other rotary cutting, follow the book instructions and cut  at least ¼" larger if using for foundation paper piecing)

Top tips for this block
  • Pre-cut all pieces
  • Use a water based glue stick. I use Sewline, to stick the first piece of each section
  • Chain piece sections where possible
  • Mix rotary cutting and piecing with foundation piecing. 
  • Once the squares are complete, this block comes together like a nine-patch
  • Press the final section seams open.

Fiona of Poppy Makes is back this week to share her Farmer's Wife QAL block making experiences  making block 54 Magnolia ( p.213, letter p.36).   Her post will be up this evening.   Here's my version, I am slightly wishing my floral fabric was a little darker for more contrast but ho hum.


Fabric credits:
{Please note:  I have linked to my sponsors for fabrics bought from them and elsewhere for anything that has come from other shops}

Remember you can:
  • Hashtag  #fw1930sqal on Instagram and add photos to the Flickr group if you like to share there.  
  • For individual blocks, you can use #Lucyblock and #Magnoliablock on Instagram, Fat Quarter Shop and Angie are using these hash tags, #fw53lucy,  #fw54magnolia, I'm using both hashtag systems.
  • You can also copy and paste links to any blog posts you do on these blocks in the comments or tag me on Instagram and I'd love to visit and take a look. 
Erica from Crafty Blossom returns as guest blogger next week.

sib blog

Sunday 20 March 2016

Take nine...March at Plush Addict

Time for my monthly visit to Plush Addict.   For this month's nine choices  I've picked a mix of quilting cottons, dressmaking fabrics and one useful choice for any sewist.  My colours have veered towards a spring-like pink/aqua/neturals palette,  despite the fact that it's been grey and cold all day in my little city!

(Items organised in three rows and numbered left to right)

1. Sarah Jane Pockade Summer (Sommer Collection).  Plush Addict have some of the lighter colour way from this winning and very popular collection.

2. Cotton Lawn- Mint Spot.  This looks like a good choice for dressmaking- shirts and tops.   It's a wide width at 145cm so good value too for a silky cotton lawn.

3.  Michael Miller Arrows Metallic in Bright White. I thought this print worked well with the other spring quilting cottons I'd picked and a little fussy cutting could make great directional use of the arrows too.  Other prints and colours from the same range are here. 

4.  100% pink Silk Organza (comes in other colours)  I bought half a metre of this recently after reading Karen's blog post on making a pressing cloth.   It's excellent stuff, it resists the heat and is sheer so you can see what you are pressing.  Well worth the money and half a metre will make two pressing cloths (or one massive one!).


5.  Radiant Girl FQ bundle: 5 prints and two Kona solids.  A lovely spring mix of prints. 

6.  Ponte Roma in Oatmeal.  Perfect weight for a spring jacket like a Grainline Morris Blazer.  Ponte is a double knit, stable fabric and the small amount of stretch makes such a differernce for comfort and  wear.  Lots of High Street shops sell Ponte Roma jackets and blazers.  

7.  Robert Kaufman Whatever the Weather - Raindrops Rainbow.   Rain themed prints are popular at the moment (maybe it's the British obsession with weather?). There's this range -more prints here, and also Michael Miller's Pitter Patter selection. 

8.  Michael Miller Arrow Flight Plucked Coin. A very pretty selection of colours in this print.  

9.   Radiant Girl Rabbits & Hearts on pink by Lecien I couldn't resist this print for Easter  (see more Radiant Girl prints in pic 5)

sib blog

Friday 18 March 2016

More Splendid Sampler

Busy, busy, busy.  Work, home and some difficult stuff involving a relative with a likely Alzheimer's diagnosis and trying to co-ordinate assistance from many miles away.  I've been squeezing in the occasional The Splendid Sampler blocks although these were sewn a little while ago- there might be a hiatus in the next few weeks...click the links to find the designers, tutorials and more details.


sib blog

Monday 14 March 2016

Farmer's Wife QAL Blocks 51 and 52: Lily & Lola

This week we are looking at blocks 51 and 52 in the Farmer's Wife Quilt Along.  Block 51, Lily (p.210, letter p.34) and Charise is back with a guest post on this block and some very pretty fabric choices.   If you plan to follow the quilt layout suggested in the book, you could consider Lily as a half-block option for the top or bottom edges - see this post for more info.   Here's my version- I know it looks weird in this format, like something is missing!  It took ages and was tricky- there are a lot of sections even though I only did half of the block!  I pressed each  section seam open.


Fabric credits:
Judie Rotherham, Grace in a pickle (Yellow)


In contrast, block 52( p.211, letter p.15) is quick to sew.  I pre-cut larger pieces (dimensions below) and foundation pieced.


Fabric credits:
Kona Carnation
{Please note:  I have linked to my sponsors on items bought through them and elsewhere for anything that has come from other shops}

Rotary Cutting Dimensions 
(cutting approx. ¼" larger for foundation piecing)
A1, B1, A3, B3: cut (4) 1 ½" squares
A2, B2, C3, D3: cut (4) 1 ½" x 3 ¾" rectangles
C1, C2, D1, D2: cut (4) 2 ¼" squares (2 each in contrasting colours)
A4, B4, E1, F1: cut (2) 4 ¼" squares squares; sub-cut each square diagonally to make a total of 4 half square triangles

Top tips for this block
  • Pre-cut all pieces
  • Use a water based glue stick. I use Sewline, to stick the first piece of each section
  • Chain piece sections in pairs 
  • Add triangles E and F without paper.  It helps to find the centre of the diagonal of each triangle and make a finger press crease so it can be centred with the 4-patch square the middle as it joins on to the block.  Trim the blocks to 6 ½" after both half-square triangles have been added. 

Remember you can:
  • Hashtag  #fw1930sqal on Instagram and add photos to the Flickr group if you like to share there.  
  • For individual blocks, you can use #Lilyblock and #Lolablock on Instagram, Fat Quarter Shop and Angie are using these hash tags, #fw51lily,  #fw52lola, I'm using both hashtag systems.
  • You can also copy and paste links to any blog posts you do on these blocks in the comments and I'd love to visit and take a look. 
  Fiona from Poppy Makes is back as guest blogger next Monday.

sib blog

Thursday 10 March 2016

Nine Patch: March at Village Haberdashery

I thought I'd try a new presentational style for my monthly sponsor posts to make them a bit punchier - blog reading is definitely a faster activity for many.  I'm picking nine items from each shop, making a nine-patch style image and then listing details below for those that want to follow up on additional information, links etc.  I'm starting with Village Haberdashery... 


(Items organised in three rows and numbered left to right)

1.  Dritz Ezy-Hem Gauge:  a great piece of kit for dressmakers or anyone who regular needs to turn a hem to a specific length.  It's a metal gauge on which fabric is folded and presses to the desired hem size.  It has curved and straight edges as well as metric and imperial measurements.  First time I've seen them on sale in UK, I had to get mine from a friend in USA. 

2.  In Theory Wavelength in Gold: one of the new prints from the In Theory organic barkcloth fabric range from Jessica Jones. The weight is heavy, like curtains but it also has a softness so it's good for interiors (curtains/cushions) or clothing with structure (jackets/dresses/skirts).  I plan to make a sticky out A-line skirt with pockets.  This seems to be the hottest print.  Find others here

3.  Riley Blake, Farm Girl Cherry Pie: I love cherries and so it's hard to resist the cherry print. 

4.  Hokkoh, Linen Trees in Mustard and Pink: a cotton/linen blend, good for bags and cushions. 

5.  Washi Tape-Ruler.  There's a tape section in the new Craft Supplies department.  I love sewing 
themed washi tape, perfect for destash parcels!  This is one of my favourites. 

6.  Pikku Saari- Saaristo in Lemon: larger scale pattern on cotton/linen blend.  Other gorgeous prints from same company here.  

7.  Park Life Hyde Park in Multi- Elizabeth Olwen for Cloud 9.  Pretty floral/nature painterly collections  all featuring swans seem to be multiplying at the moment- see Sommer, Spring Walk and  the forthcoming Swan Lake.  I can't help but fall for them all!  The Full collection of Park Life can be found here. 

8.  Muddy Works-Eucalyptus in Mustard: gorgeous floral print on a soft drapey cotton sateen, perfect dressmaking fabric. 

9.  Olfa Self Healing Cutting Mat, 18" x 24" (metric on reverse). Cutting mats are usually a green colour, who wouldn't love a pink one? 

sib blog

Monday 7 March 2016

Farmer's Wife QAL blocks 49 and 50: Katherine and Lady

Welcome back to the half-way point for block construction in the Farmer's Wife Quilt Along.  First [ this week is Katherine (p.208, letter p.28):and Sarah from Pretty Fabrics and Trims has written a guest post on this block on her blog.  I loved sewing this block.  I foundation paper pieced as usual, it's a fast block to make with only two sections to join together!  Here's my version.


Fabric credits:


For block 50, Lady (209, letter p.142),  I used a mix of foundation piecing and rotary cutting.     I foundation pieced the corner sections A, C, D and E  (adding ¼"- ½" to each of the rotary cutting dimensions allows for this) and rotary cut the large rectangles and centre squares at the correct size and pieced that section without paper.


Fabric credits:
Kona Carnation
Ayumi Mills for Kokka Lighthearted Kitchen Floral in turquoise
{Please note:  I have linked to my sponsors on items bought through them and elsewhere for anything that has come from other shops}

Rotary Cutting Dimensions 
(cutting ¼" larger for foundation piecing)
A1, C1, D1, E1: cut (4) 1 ½" squares
A4, C4, D4, E4: cut (4) 1 ½" x 2 ¼" rectangles
A2, C2, D2, E2: cut (2) 2" squares, subcut each square diagonally to make a total of 4 half square triangles
A3, C3 D3, E3: cut (2) 2" squares, subcut each square diagonally to make a total of 4 half square triangles
 For A6, B1, B2, B3, C6- refer to CD for exact rotary cutting dimensions


Top tips for this block
  • Pre-cut all pieces
  • Use a water based glue stick. I use Sewline, to stick the first piece of each section
  • Chain piece sections A, C, D and E 
  • Press section seams towards the centre square
Remember you can:
  • Hashtag  #fw1930sqal on Instagram and add photos to the Flickr group if you like to share there.  
  • For individual blocks, you can use #katherineblock and #ladyblock on Instagram, Fat Quarter Shop and Angie are using these hash tags, #fw49katherine,  #fw50lady, I'm using both hashtag systems.
  • You can also copy and paste links to any blog posts you do on these blocks in the comments and I'd love to visit and take a look. 
If you've been sewing along, congratulations for making it to the 50 block point!  Only 49 to go and you already have an impressive stack of blocks made over the last few months!  Next week, Charise returns as guest blogger.

sib blog

Thursday 3 March 2016

The Splendid Stitch Blocks 4, 5 and 6

For those of you taking part in The Splendid Sampler project, how are you getting on?  I'm dipping in and out of the blocks as time allows.  I loved Jen Kingwell's Happy Happy block.  I used Perfect Circles and the appliqué technique that Charise covered in detail here:


Those tiny circles took a while but I do like the end effect.  I ended up with two versions of the Simple Simon block (designed by Celine Perkins) as I was't totally sure of my choices.  I'm still not sure I got it quite how I wanted but I guess they'll both end up in the final quilt:


I am enjoying the range of blocks from straightforward rotary piecing, through to appliqué and embroidery.  It's good to mix it up a bit and I always like the chance to challenge myself- although I felt at home foundation paper piecing a 6 inch block with Natalia Bonner's Focal Point design.


If you feel you've missed anything, Pat and Jane have a very useful catch-up post with lots of handy links. Which techniques are you enjoying so far?

sib blog