Showing posts with label Farmers wide 1930s quilt along. Show all posts

Monday, 9 May 2016

Farmer's Wife QAL Blocks 67 and 68: Mrs Brown and Mrs Fay

Over two thirds of the way in now and here are the next two blocks in the Farmer's Wife 1930s QAL.  Block 67, Mrs Brown (p. 226, letter 103) is a nine-patch style block with economy squares and half square triangles.  Charise is guest posting for this one so click on over to Charise Creates to see what she's done with this block- it's a great candidate for fussy cutting!   Here's my version:


Fabric credits:

{Please note:  On both blocks I have linked to my sponsors for fabric bought through them and elsewhere for anything that has come from other shops}

One of my cats ended up wandering in a different direction, my daughter has already called it 'spider cat'. 

Block 68, Mrs Fay (p. 227, letter 124) is a challenging block to sew by machine.  There are Y seams galore and you will definitely need a seam ripper as a constant companion.  Hand piecing the block is easier than machine piecing.


Fabric credits:

How to sew a block with Y seams: Step-by-step
Y seams are inset seams that are used when a section or shape needs to be set into a quilt block.    They occur at a place where three seams and three fabric pieces come together at a single point creating a Y shape.   At the point where there is a Y seam, instead of a continuous seam that extends into the seam allowance,  a Y seam instead requires the seams to be sewn precisely on the seam line and not in the seam allowance.   In English paper piecing or when hand piecing, it is standard practice to sew only the seam lines, leaving the seam allowances mobile/floating so they aren't stitched down and can be pressed in any direction when the block is complete.  Before I started sewing this block, I identified the Y seams as they come in two stages of making the block.  This block is made of a central square and eight sections fit around the square. The sections are made of smaller sections (shown in yellow and blue below) and contain a Y seam where they are sewn together.

1.  To be aware where the Y seams were, when preparing the foundation paper piecing templates, circled each Y seam.  Remember other prep such as colour coding and pre creasing all the seam lines with a Hera marker and ruler.


2.  I recommend  pre-cutting all the pieces before starting sewing.  Rotary cutting instructions are given for the squares and the triangles.  Cut the centre square to the exact size, cut all the other shapes at least ¼" larger. For the diamond shape, I used a freezer paper template using this method.  


3.  The sections comprised of square/half square triangle can be sewn in the usual way.  The section with the Y seam needs to be sewn so that the seam stops securely where the Y seam will be and doesn't extend into the seam allowance.  This needs to be done very precisely:  I count three stitches forwards and backwards at this point,  it also helps to hand crank your machine needle where these precise seams start or finish.  


4.  Then trim all the sections, use scissors for the inward edges next to the Y seam.  On the reverse, peel back the paper and add ¼" seam allowances around all the edges with a soft pencil.  To sew the sections together, pin as shown in the pic below, matching seam points precisely.  Sew from the outside edge to the Y seam, stop and secure the seam. Again precision is key, one stitch over will mess up your Y seam.  A top tip to remember is that there should only ever be two layers of fabric being sewn at the seam point of a Y seam, so make sure that no extra layers get caught in the stitches. 


To sew the next seam, ensure A3 paper is torn off so the seam can flip over.  Adjust and pin your fabric edges checking that the penciled seam allowances meet exactly.  The Y seam starts and is secured precisely where the previous seam ended, and is then sewn to the end.   Press. 


Repeat until all the sections are joined in this way.  These are then paired together (the seams will nest) to make an isosceles trapezoid.   Make four of these in total.  Now for more Y seams, you can see them identified by stars in the diagram below. 

Sewing the trapezoid sections to the centre square is just like sewing a spool block.   To join the first trapezoid to the centre square check that both have seam allowances marked in pencil on the reverse. Match seam allowances precisely and pin together.   
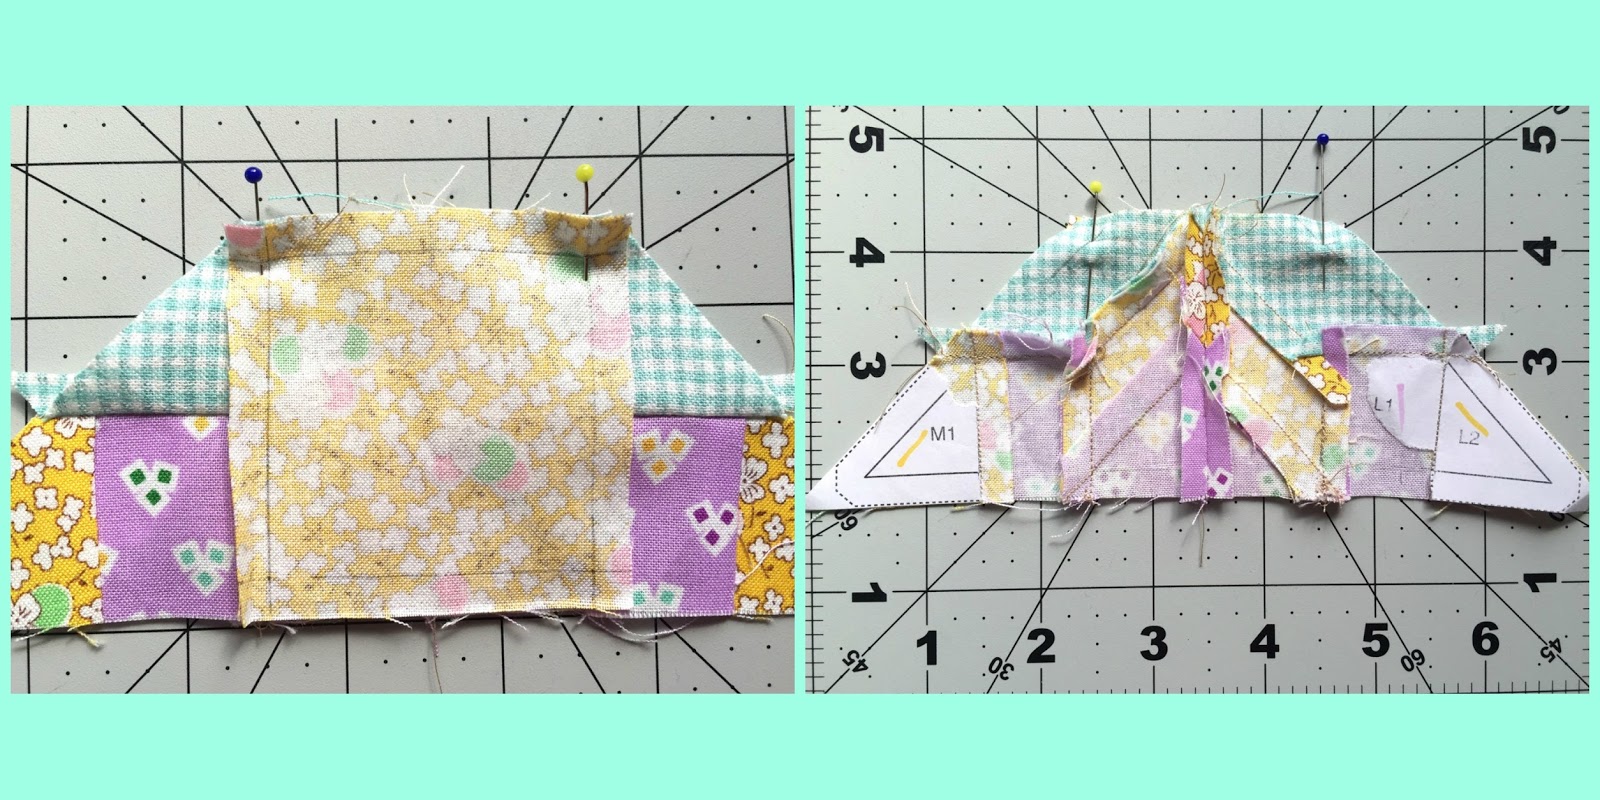

With the square on top, sew along the seam line securing at the beginning and end and not letting any extra stitches go into the seam allowance.  Repeat with the opposite trapezoid.  I don't press at this point, I just smooth the fabric with my fingers.   Now sew the remaining trapezoids to the remaining outer edges of the square.  The square should end up with what looks like a continuous seam in a square shape but is instead four straight seams.  The diagonal edges are not yet sewn together at this point.


To join the diagonals, ensure that seam allowances are marked in pencil on the reverse.  Pin the centre point of the seam where the diamond points meed square shape is formed in the block and baste with a few machine stitches.  


With this point accurately basted, pin the top and bottom edges of the seam and starting at the centre square, ensure there are only two layers of fabric under the needle, start and secure the seam and sew to the outer corner.   Repeat this process on the remaining three diagonal seams.   Now press the diagonal seams open and press the rest of the block on the reverse and right side, using starch to help flatten bumpy seams.   When it comes to pressing seams,  I go with what feels right- whatever reduces bulk the best or doesn't show through.  It needs to be considered according to block and fabric, for me there are no hard and fast rules.


It is a punishing block and took me hours and a lot of unpicking to do as I aimed to get everything just right.  Y seams are tricky and this is a small block with little pieces so it is undeniably challenging even for an experienced Y seam piecer.  If you completed it, well done and if it beat you or you didn't dare start, it can be substituted with a block of your choice. 

Top tips for foundation piecing this block
  • Pre-cut all pieces
  • Mark Y seam points on paper pattern pieces.
  • Use a water based glue stick. I use Sewline, to stick the first piece of each section
  • Chain piece where possible 
  • Mark in seam allowance around edge of each section 
  • Flatten seams with Flatter or similar light starch spray
Remember you can:
  • Hashtag  #fw1930sqal on Instagram and add photos to the Flickr group if you like to share there.  
  • For individual blocks, you can use #MrsBrownblock and #MrsFayblock on Instagram, Fat Quarter Shop and Angie are using these hash tags, #fw67MrsBrown,  #fw68MrsFay - I'm using both hashtag systems.
  • You can also copy and paste links to any blog posts you do on these blocks in the comments and I'd love to visit and take a look. 
Melinda is back as a guest blogger next week and I'm looking forward to slightly easier blocks!

sib blog

Monday, 14 March 2016

Farmer's Wife QAL Blocks 51 and 52: Lily & Lola

This week we are looking at blocks 51 and 52 in the Farmer's Wife Quilt Along.  Block 51, Lily (p.210, letter p.34) and Charise is back with a guest post on this block and some very pretty fabric choices.   If you plan to follow the quilt layout suggested in the book, you could consider Lily as a half-block option for the top or bottom edges - see this post for more info.   Here's my version- I know it looks weird in this format, like something is missing!  It took ages and was tricky- there are a lot of sections even though I only did half of the block!  I pressed each  section seam open.


Fabric credits:
Judie Rotherham, Grace in a pickle (Yellow)


In contrast, block 52( p.211, letter p.15) is quick to sew.  I pre-cut larger pieces (dimensions below) and foundation pieced.


Fabric credits:
Kona Carnation
{Please note:  I have linked to my sponsors on items bought through them and elsewhere for anything that has come from other shops}

Rotary Cutting Dimensions 
(cutting approx. ¼" larger for foundation piecing)
A1, B1, A3, B3: cut (4) 1 ½" squares
A2, B2, C3, D3: cut (4) 1 ½" x 3 ¾" rectangles
C1, C2, D1, D2: cut (4) 2 ¼" squares (2 each in contrasting colours)
A4, B4, E1, F1: cut (2) 4 ¼" squares squares; sub-cut each square diagonally to make a total of 4 half square triangles

Top tips for this block
  • Pre-cut all pieces
  • Use a water based glue stick. I use Sewline, to stick the first piece of each section
  • Chain piece sections in pairs 
  • Add triangles E and F without paper.  It helps to find the centre of the diagonal of each triangle and make a finger press crease so it can be centred with the 4-patch square the middle as it joins on to the block.  Trim the blocks to 6 ½" after both half-square triangles have been added. 

Remember you can:
  • Hashtag  #fw1930sqal on Instagram and add photos to the Flickr group if you like to share there.  
  • For individual blocks, you can use #Lilyblock and #Lolablock on Instagram, Fat Quarter Shop and Angie are using these hash tags, #fw51lily,  #fw52lola, I'm using both hashtag systems.
  • You can also copy and paste links to any blog posts you do on these blocks in the comments and I'd love to visit and take a look. 
  Fiona from Poppy Makes is back as guest blogger next Monday.

sib blog

Saturday, 29 August 2015

Farmer's Wife 1930s Quilt-along: Guest Bloggers and Quilt Along Details

I hope everyone's has a copy of The Farmer's Wife 1930s Sampler Quilt book or has one on it's way.  There is more than one quilt along so they are out of stock in some of the more familiar online stores, good luck!  It should look like this:


The blocks from this book are a different selection from the 1920s Farmer's Wife book with the brown cover.  You could mix the two together but this quilt is for this book.  Some of the blocks are hard:  have a flick through the book to prepare yourself!  It is a great way to build skills but it would be a mighty challenge for a beginner.  Guest bloggers have chosen their blocks and we will be working through the book in alphabetical and numerical order which will give a total mix of skills and challenge levels.  Here are the lovely guest bloggers, many of whom I have known for years, with their blogs and Instagram account links, I feel very lucky to have them all contributing.

Jo Avery  My Bear Paw  @mybearpaw
Ayumi  Pink Penguin  @ayumills 
Chase  Quarter Inch Mark  @quarterinchmark

They are a multi talented bunch and are going to be able to cover many techniques from foundation paper piecing to English paper piecing, hand piecing, templates, fussy cutting and more.  Some are going to post several times, others are doing just one or two posts and they all have a plethora of tips to share.  So you know what to expect, here are some of the things that will or will not be happening in the quilt-along:

We will...
  • share tips e.g. how big to cut some of your fabric pieces for foundation paper piecing.
  • share techniques e.g. the guest bloggers include expert quilters, hand piecers, English paper piecers and foundation piecing wizards!
  • share ideas e.g.simplifying a block by reducing the number of pieces.
  • share fabric and colour ideas.
  • share thoughts on the book and the letters.
  • note any errors and welcome you to do the same.  There will be an errata page here so if spot a mistake, please leave a comment there to flag it up.  Laurie Aaron Hird has already been in touch to tell me about one error and I've spotted the odd mislabelling.
  • respect the author and the book copyright.
We will not...
  • cover every construction method each week which means that we won't pick up every pitfall, errata etc.  The book offers three main methods of piecing: templates, foundation piecing and some rotary cutting.  The rotary cutting is few and far between so don't rely on that as a sole method.   I intend to foundation paper piece all the blocks so my tips will relate to that.
  • Break copyright and give measurements of particular pieces, e.g. for rotary cutting, even when those instructions have not been given in the book.  I can give cutting details for foundation paper piecing as these are approximations.
  • be teaching the basics of how to foundation paper piece each block.  If you want to use this technique and have no experience of it, many of these blocks are very challenging so start with something easier!  Find many  tutorial links here.  The same applies to the other construction methods.  Tips and tricks yes but step-by-step descriptions for each block could start to threaten author copyright.

On the first post of each month,  I'll post a four week schedule so you know what's coming up for the month ahead.  I have a couple of introductory posts planned:

  • Wednesday 2nd September: Fabrics: colours, ideas and shops plus and extra guest post from Melinda of Quirky Granola Girl.
  • Wednesday 9th September: Equipment ideas and recommendations
This is an unsponsored quilt along so the shops and recommendations are just personal recommendations and the emphasis is on using fabrics of your choice - you don't have to use 1930s prints-  and keeping your equipment simple.

All go with the blocks from Monday 14th September.   Each Monday I will write a blog post about one block and link to the guest blogger who will write about the other block.   I will use inlinkz at the end of a post so there will be an option for you to add a text link to your block.  I am also going to try a little vlogging to introduce the week's blocks with Periscope.  I plan to do this on Monday afternoon, around 2.30pm GMT each week. Persicope broadcasts are only available for 24 hours after going live.  Read more about Periscope here and here. I am @verykb on Periscope.  If you follow my twitter feed of the same name you will see when a Periscope is going live or download the Periscope app for free and follow me there!


If you are new to quilt-alongs,  the level of participation is up to you. Quilt-alongs are all about providing encouragement to all those taking part and spur each other on.  It gives us a sense of community to a pursuit that most of us do alone.  Sharing your progress is a popular part of a quilt along so this could be on Instagram with the hashtag #fw1930sqal, in the Flickr group or on your own blog.   Find the blog buttons here.  You might make all the blocks, or maybe just a few but we'll be here every Monday until next September with our thoughts on the two blocks from the book!

Saturday, 8 August 2015

Cataloguing Kona Solids

I plan to use a lot of Kona solid fabrics in my Farmers Wife 1930s quilt-along blocks and when I looked at the piles of fat quarters and half yard I had piled in to a drawer I realised I needed a system.  I do have an old Kona card from years back - many new colours have been introduced since then - they are a bit of an investment but there's no denying they are also very useful.  Plush Addict currently have one on offer if you are looking...


Many fabric shops will add an identifying sticker label to solid fabrics which is a great help.   I don't like to leave these on the fabric though for fear of a sticky mark so I write the colour name on the selvedge at both ends using a Pigma Micron fine permanent maker.  When I use the fabric, I try and keep this bit of selvedge attached.


To stop myself buying duplicates, I started a spreadsheet in XL with the official colour name, my own description if needed, how much I had, plus a column at the end to tick if I wanted more.


It makes me feel organised in an otherwise slightly chaotic crafty space!  
Thank you for the amazing response to the #fw1930sqal announcement.  I have a lovely group of guest bloggers who will inspire you with their blocks and share their different skills, techniques and fabric choices.  You do not need to use 1930s style fabrics -  you can use whatever you like!  If you have an a  system for cataloguing your solid fabrics, please share!

sib blog