Showing posts with label #fw1930sqal. Show all posts

Monday, 22 August 2016

Farmer's Wife Quilt-Along blocks 95 and 96, Sylvia and Tirzah

Almost complete with the Farmer's Wife 1930s QAL and time for blocks 95 and 96.    Block 95 is Sylvia (p.254, letter p.18)  and Charise  from Charise Creates has written her final guest post for this one.  Here's my version:


Fabric Credits
Kona Corn
Penny Rose Fabrics Hope Chest 2 Floral Blooms
Ayumi Takahashi for Kokka, Kitchen print floral from Lighthearted

Tirzah, Block 96 ( p. 255, letter p.86) looked a little tight or dense from the block photo in the book so I used a pattern rather than a solid colour to break it up a little and added a bit of fussy cutting so it now looks like cats in various playpens.  I didn't know Tirzah as a name so I looked it up and Wiki informed me it is a Hebrew word and meaning, "she is my delight".


Pink floral- gift from a friend

{For both blocks, I link to sponsor shops for fabric bought from them and elsewhere for other fabrics}

The letter is worth a read.  It starts with a familiar description of a less than immaculate house but the reason for a little untidiness goes beyond a desire to sew or even help on the farm.  It's a touching read and a timeless message to enjoy home and family above all else.

Rotary Cutting 
These are for foundation piecing so are cut larger than needed.  
  • Green centre square: cut (1) 2 ¾" square
  • Green rectangles: cut (4) 1 ⅝" x 2 ¾"  rectangles 
  • Green half-square triangles:  cut (8) 2" squares; subcut each square in half along the diagonal to yield 16 HSTs in total
  • Narrow pink rectangles for A1,2,5,7, F1,3, G1,3 : cut (8) 1 ¼" x 2 ¾"  rectangles  
  • Pink rectangles for B4, C4, D4, E4:  cut (4) 1 ⅜" x 4" rectangles 
  • Small pink rectangles for B2, C2, D2, E2 H2, I2, J2, K: cut (8) 1 ⅜" x 2" rectangles

Top Tips for Foundation Piecing this Block
  • Pre cut all pieces
  • Use a water based glue stick e.g. Sewline, to stick the first piece of fabric on each section
  • Chain piece where possible
  • Use an index card or a Dritz seam guide to fold the paper back when trimming excess
  • Nest Seams where possible
  • Press final section seams open
No nine-patch blocks this week.  I need some time to check how many I need and how big the final quilt will be so I'll leave that until the Farmer's Wife 1930s QAL blocks are complete.  Meanwhile, 
Don't forget to share your blocks or leave me a link in the comments so I can see where you are.  I know the QAL is coming to an end but you may be working on a block from earlier on and I'd love to see.
Jo from A Life in Lists returns for the last guest blogger post next Monday.   
SaveSave
SaveSave
SaveSaveSaveSaveSaveSave
SaveSave
SaveSave
SaveSaveSaveSave
SaveSave
SaveSave
SaveSaveSaveSaveSaveSaveSaveSave
SaveSave

Monday, 15 August 2016

Farmer's Wife 1930s Quilt Along Blocks 93 and 94, Starlight and Susannah

Moving ever closer to the end goal of 99 blocks in the Farmer's Wife 1930s QAL. and here are blocks 93 and 94.    Starlight, (p.252, letter p.72)  is a straightforward block to foundation piece.


Fabric Credits
Kona Candy Green
Toychest Florals Pink Pressed Flowers
Ayumi Takahashi for Kokka, Kitchen print (blue colour way) from Lighthearted
Lecien blue pinhead dot

I rotary cut the squares, half-square triangles and rectangles for the large green triangles using the dimensions below.  For the outer shapes, I used freezer paper templates to pre-cut the shapes before foundation paper piecing - see here and here for the technique.

Rotary Cutting 
These are for foundation piecing so are cut larger than needed.  Quantities given are for foundation piecing the whole block  but you can try the nine patch and strip piecing method above for some parts of the sections.
  • Blue squares: cut (4) 2 ¼" squares
  • Green square (these will be trimmed to the pointed shape during the piecing process) : cut (4) 2 ¼" squares
  • Centre square: cut (1) 2 ¼" square.  To fussy cut, trim to exact square size plus ¼" seam allowances
  • Half-square triangles : cut (4) 1 ¾" squares; subcut each square in half along the diagonal to yield 8 HSTs in total
  • Green triangles: cut (4) 2 ¼" x 3" rectangles (these will be trimmed to the pointed shape during the piecing process)
Top Tips for Foundation Piecing this Block
  • Pre cut all pieces
  • Use a water based glue stick e.g. Sewline, to stick the first piece of fabric on each section
  • Chain piece where possible
  • Use an index card or a Dritz seam guide to fold the paper back when trimming excess
  • Nest Seams where possible
  • Press section seams to the side
Block 94, Susannah, (p.253, letter p110) is a delight to piece.  It can be foundation pieced or rotary cut- I chose the latter technique for this one.

Violet scattered floral- unknown repro
Blue Grid- gift from a friend

{For both blocks, I link to sponsor shops for fabric bought from them and elsewhere for other fabrics}
This block is so dynamic on point, I really like it!  Fiona from Poppy Makes is guest posting with thoughts on this block and the quilt along, click here to visit. 
I have a further new nine-patch blocks for  my collection.


Charise returns for her final time as a guest blogger next Monday.  See you Monday x 
SaveSave
SaveSave
SaveSaveSaveSaveSaveSave
SaveSave
SaveSave
SaveSaveSaveSave
SaveSave
SaveSave
SaveSaveSaveSaveSaveSaveSaveSave

Monday, 8 August 2016

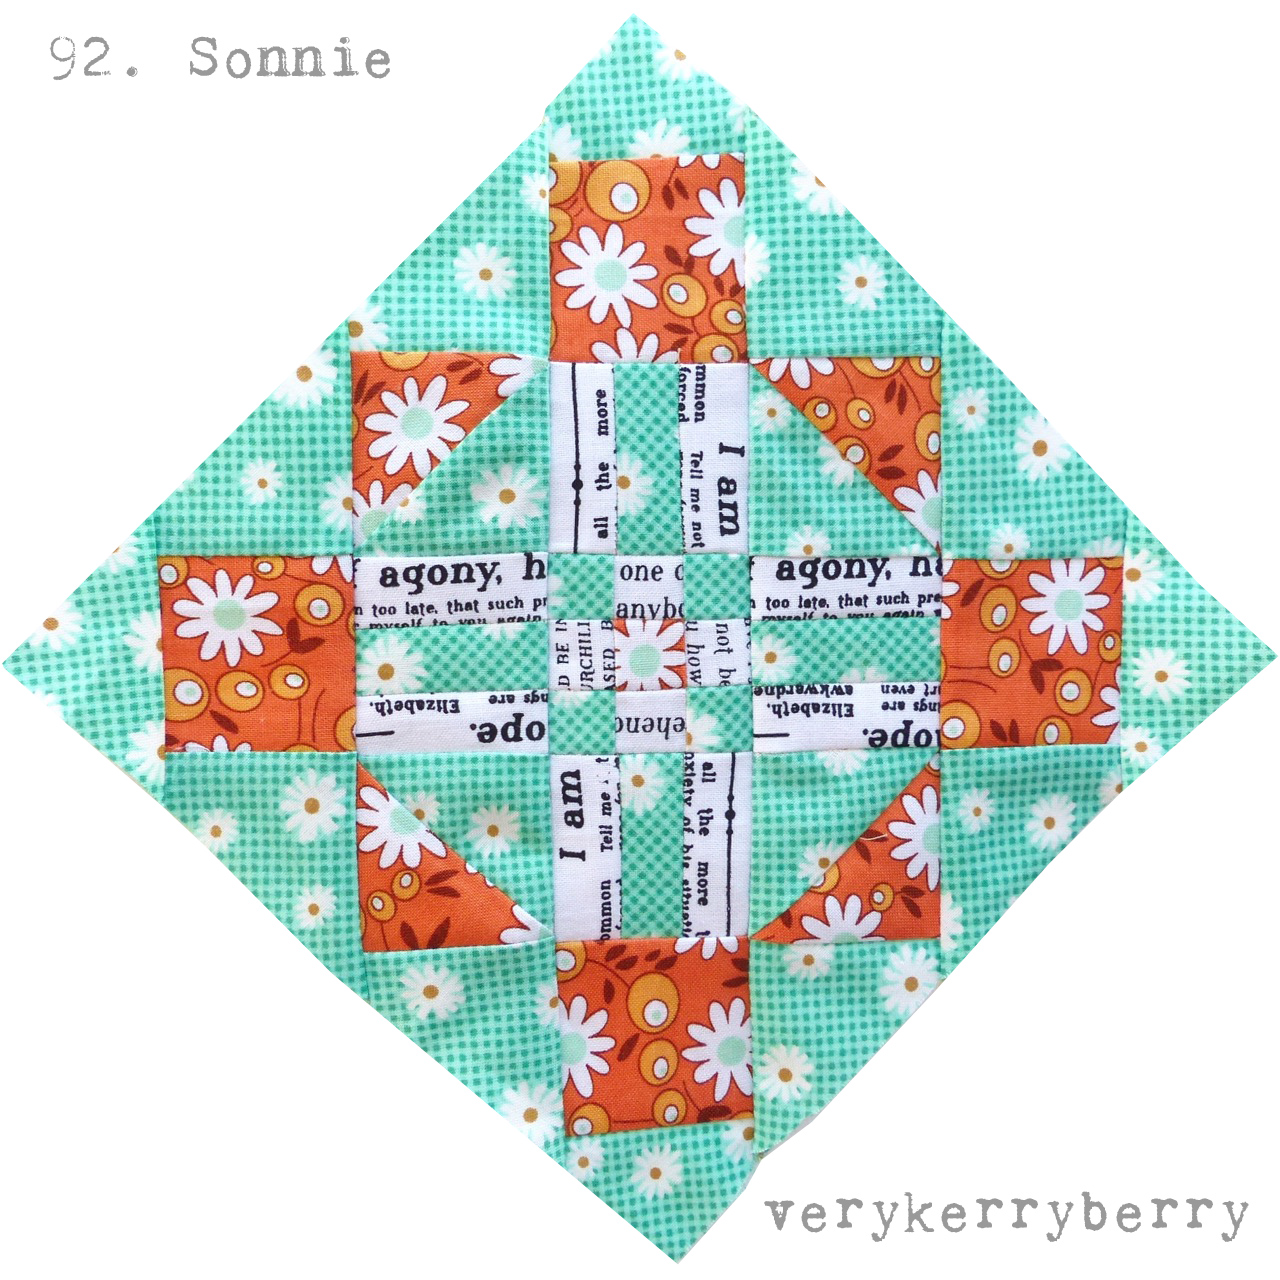
Farmer's Wife 1930s Quilt Along Blocks 91 and 92 Sarah and Sonnie

Time for blocks 92 and 93, Sarah and Sonnie in the Farmer's Wife 1930s QAL.  I've had sore hands this week so I've been looking for shortcuts and for Sarah (p.250, letter p.78) I rotary pieced the whole block rather than foundation paper piecing.  If you want any help calculating flying geese or with different half-square triangle methods, you can refer to my Making a Quilt series for Sewing Directory.   Justine returns for her last guest post and you can read her thoughts on this block, and the quilt along here.


Fabric Credits
Kona Citrus
Riley Blake Fancy and Fabulous, Breath in mint
Heather Ross for Windham, Tiger Lily Roses in Blush


I managed to rotary piece part of the next block, Sonnie, (p.251, letter p139) whilst foundation piecing the rest, details below.   There is a brief letter for this block but a sweet one none these, the expression "her sands have run" about the woman's mother  having died is so evocative.

Fabric Credits
Riley Blake Ardently Austen (the white/black colour way is sold out)
Lori Holt for Riley Blake Flower Patch, Flower Berries in Orange 
Green daisy dotty- gift from a friend

{For both blocks, I link to sponsor shops for fabric bought from them and elsewhere for other fabrics}

Strip piecing
It is possible to  make the centre square of this block as a mini nine-patch.  I measured the squares from the foundation pattern piecing; they are not a regular measurement I had to cut scant but it worked.  I did the same for the rectangle blocks, you do need to be quite precise but it worked well for me.

Rotary Cutting 
These are for foundation piecing so are cut larger than needed.  Quantities given are for foundation piecing the whole block  but you can try the nine patch and strip piecing method above for some parts of the sections.
  • Mint Small half-square triangles (block corners) : cut (2) 2 ⅛" squares, subcut each square in half diagonally to yield 4 HSTs
  • Mint large quarter-square triangles (block corners) : cut (3) 3 ½" squares, subcut each square along both diagonals to yield 12 QSTs in total
  • Mint small squares: cut (4) 1 ⅛" squares
  • Mint rectangles: cut (4) 1 ⅛"  x 2 ⅛" rectangles
  • Orange large quarter-square triangles (block corners) : cut (1) 3 ½" squares, subcut each square along both diagonals to yield 4 QSTs in total
  • Orange large squares: cut (4) 2 ⅛" squares
  • Orange small squares: cut (1) 1 ⅛" squares
  • White small squares: cut (4) 1 ⅛" squares
  • White rectangles: cut (8) 1 ⅛"  x 2 ⅛" rectangles
Top Tips for Foundation Piecing this Block
  • Pre cut all pieces
  • Use a water based glue stick e.g. Sewline, to stick the first piece of fabric on each section
  • Chain piece where possible
  • Use an index card or a Dritz seam guide to fold the paper back when trimming excess
Here are two new nine-patch blocks for  my collection,  I'm making an equal number of each gingham colour  so I was balancing out the jade/turquoise this week.  There are 24  in total and I'll start working out how many I need for the quilt I have planned in my head.


  • You can share your farmer's wife quilt blocks with the hashtags #fw1930sqal and for these blocks either #Sarahblock or #Sonnieblock as well as #fw91Sarah, #fw92Sonnie
  • If you want me to take a look at your blocks, tag me on Instagram, I'm @verykerryberry or comment here and paste in a link to your blog
  • There's a Flickr group you can add to here.  All my Farmer's Wife 1930s blocks can be seen in this album and my 9-patch blocks in this album. 
Fiona is back for the final time as a guest blogger next Monday.  See you again next Monday x 
SaveSave
SaveSave
SaveSaveSaveSaveSaveSave
SaveSave
SaveSave
SaveSaveSaveSave
SaveSave
SaveSave

Monday, 25 July 2016

Farmer's Wife Quilt Along, Blocks 87 and 88: Prudence and Rosemary

Another Monday and two new blocks in the Farmer's Wife quilt-along.  These are both quite time consuming blocks.  Number 87, Prudence(p.246, letter p.58) took me forever and I'm not sure the yellow on the larger triangle sections  works that well but I have no plans to repeat it!  Charise is guest blogging on this block and you can read all about Y seams and her approach to Prudence here.


Fabric Credits
Kona Buttercup
Kona Carnation
Ayumi Takahasi for Kokka, Lighthearted, Kitchen floral

Block 88, Rosemary (p.247, letter 104) takes a while to construct but it is well thought through with lots of nesting seam intersections when the sections are put together.


Fabric Credits
Kona Corn
Kona Melon
Heather Ross for Wyndham, Tiger Lily, brown butterflies
Darlene Zimmerman Mother's Melodies Chocolate spot

{For both blocks, I link to sponsor shops for fabric bought from them and elsewhere for other fabrics}


Rotary Cutting 
These are for foundation piecing so are cut larger than needed 
  • Yellow centre square: cut (1) 1¾" square
  • Yellow small squares: cut (4) 1 ⅜" square 
  • Yellow quarter square triangles: cut (1) 3" square; sub-cut each square into quarters along the diagonals to yield 4 QSTs
  • Brown butterflies A  1, B1, C1, D1: Cut (4) 1 ⅞" x 3 ¼" rectangles
  • Brown butterflies half square triangles: cut (4) 3 ¼" squares; sub-cut  each square in half along the diagonal to yield 8 HSTs
  • Melon half square triangles: cut (4) 3 ¼" squares; sub-cut  each square in half along the diagonal to yield 8 HSTs
  • Melon small rectangles: cut (8) 1 ¼" rectangles
  • Brown grid small rectangles: cut (8) 1 ¼" rectangles
  • Brown grid quarter square triangles: cut (2) 3" square; sub-cut each square into quarters along the diagonals to yield 8 QSTs
Top Tips for Foundation Piecing this Block
  • Pre cut all pieces
  • Use a water based glue stick e.g. Sewline, to stick the first piece of fabric on each section
  • Chain piece where possible;  there are lots of repeated sections
  • For F1, G1, H1 and E1, add a larger than needed triangle lining up the pint of the triangle with the centre seam between the first two sections. When you trim the new section to size use the paper on the rest of the sections as a guide line for your quilt ruler.  The 45 degree line should line up on the seam between the first two sections

I love how this block turned out,  I used some of my favourite fabrics and colours and I like the bird/plane shapes!

I've added two more nine-patch blocks  my collection, (you can see the original idea for this quilt in that link) 19 in total so far.


  • You can share your farmer's wife quilt blocks with the hashtags #fw1930sqal and for these blocks either #Prudenceblock or #Rosemaryblock as well as #fw87Prudence, #fw88Rosemary
  • If you want me to take a look at your blocks, tag me on Instagram, I'm @verykerryberry or comment here and paste in a link to your blog
  • There's a Flickr group you can add to here.  All my Farmer's Wife 1930s blocks can be seen in this album and my 9-patch blocks in this album. 
Jo Avery is back as a guest blogger next Monday.  See you next week x 
SaveSave
SaveSave
SaveSaveSaveSaveSaveSave
SaveSave
SaveSave
SaveSaveSaveSave

Monday, 4 July 2016

The Farmer's Wife 1930s Quilt Along, blocks 81 and 82, Peony and Pharlemia

Back for another week in the Farmer's Wife quilt-along and it's time to rise to the challenge of Y seams (block 81, Peony p. 240, letter p. 145)- or redesign blocks to avoid them (block 82, Pharlemia, p.241, letter p.38).    Peony caught me out a little bit, I was short on time and rushed in just expecting the partial seams around the middle square, but no, there's Y seams galore!  Jo Avery is guest posting on this block and she has English Paper Pieced this block which makes the construction a little easier- see her post here.   For those of you who are foundation paper piecing, it is possible to reduce the number of pieces slightly- I made the very small half square triangles E3/4, F3/4, G3/4, H3/4 each into a single triangle as it in no way affects the construction and makes more sense.  Otherwise, it is a question of sewing slowly and marking seam allowances on any pieces that you remove the paper from so that you can pin together accurately.  For a detailed post on Y-seams see here.  McCall's Quilting have a handy video on partial seams.


Fabric Credits
Penny Rose Hope Chest in Blossom Yellow and Teal
Kona White
Riley Blake, Ardently Austen text print.

By the time I got to Pharlemia block, I decided to redraw it to avoid the Y seams. You can chose to follow the original block in the book or download the Y seam free version for foundation paper piecing here.  As usual, ensure printing is at 100% and not to scale.  Sometimes PDFs are marginally smaller or bigger due to different computers/printers etc.  The pattern should be 6" square. 


Fabric Credits
Moda Solids Peacock (I think!)
Moda Garden Project, Vintage floral pear yellow
Unknown feedback repro floral.

{For both blocks, I link to sponsor shops for fabric bought from them and elsewhere for other fabrics}

If you do want to follow the book version, Amanda Weatherill on IG(@thepatchsmith) had some  great tips on joining the sections, she made the block back in January so you'll have to go back in her feed.

If you are using the no Y seams version, you need to separate your pattern into 11 sections by cutting along the blue lines.  No seam allowances are included as I don't have that sort of design software so you will have to allow for these on the outer edge of each section when adding the fabrics.

Rotary Cutting - based on no Y seams pattern
These are for foundation piecing so are cut larger than needed with any exceptions noted below.
  • Yellow large half-square triangles: cut (2) 3" squares; sub-cut each square in half along the diagonal to yield 4 HSTs
  • Violet Centre sq: Cut (1) 3 ½" square
  • Violet small HSTs: cut (8) 1 ¾" squares; sub-cut each square in half along the diagonal to yield 16 HSTs
  • Violet medium HSTs: cut (4) 2" squares; sub-cut each square in half along the diagonal to yield 8 HSTs
  • Green large HSTs (these are cut ACTUAL SIZE): cut (2) 2 1/4" squares; sub-cut each square in half along the diagonal to yield 4 HSTs.  Draw ¼" seam allowances on reverse side
  • Green diamonds: use templates and cut 8 in each direction (16 in total).  Template technique is detailed here and here.


Construction of the block is detailed on the pattern download.  When the outer half square triangles (I1, J1, K1, L1) are added use the stab pin method to match the seam points- the pin is placed perpendicular to the fabric,(see photos above) another pin is used to keep this in place  for sewing and the first pin can be removed. 

Top Tips for Foundation Piecing this Block
  • Pre cut all pieces
  • Use a water based glue stick e.g. Sewline, to stick the first piece of fabric on each section
  • Chain piece where possible
  • Press section seams open apart from the last two, they sit easiest to one side
I put together two more nine-patch blocks to add to my collection, these are 12 and 13.  I love pairing the fabrics to go with the 1 inch checks.


  • You can share your farmer's wife quilt blocks with the hashtags #fw1930sqal and for these blocks either #Peonyblock or #Pharlemiablock as well as #fw81Peony, #fw82Pharlemia
  • If you want me to take a look at your blocks, tag me on Instagram, I'm @verykerryberry or comment here and paste in a link to your blog
  • There's a Flickr group you can add to here.  All my Farmer's Wife 1930s blocks can be seen in this album and my 9-patch blocks in this album. 
Sarah Edgar of Pretty Fabrics and Trims is back as a guest blogger next Monday!
See you next week x 
SaveSave
SaveSave
SaveSaveSaveSaveSaveSave