

Fabric credits:
{Please note: On both blocks I have linked to my sponsors for fabric bought through them and elsewhere for anything that has come from other shops}
One of my cats ended up wandering in a different direction, my daughter has already called it 'spider cat'.
Block 68, Mrs Fay (p. 227, letter 124) is a challenging block to sew by machine. There are Y seams galore and you will definitely need a seam ripper as a constant companion. Hand piecing the block is easier than machine piecing.

Fabric credits:
P & B Textiles-Toy Chest Florals Trailing Blooms Yellow
Penny Rose Fabrics Hope Chest 2 Hearts Purple
Lecien Yarn Dyed tiny gingham in mint
Penny Rose Fabrics Hope Chest 2 Hearts Purple
Lecien Yarn Dyed tiny gingham in mint
How to sew a block with Y seams: Step-by-step
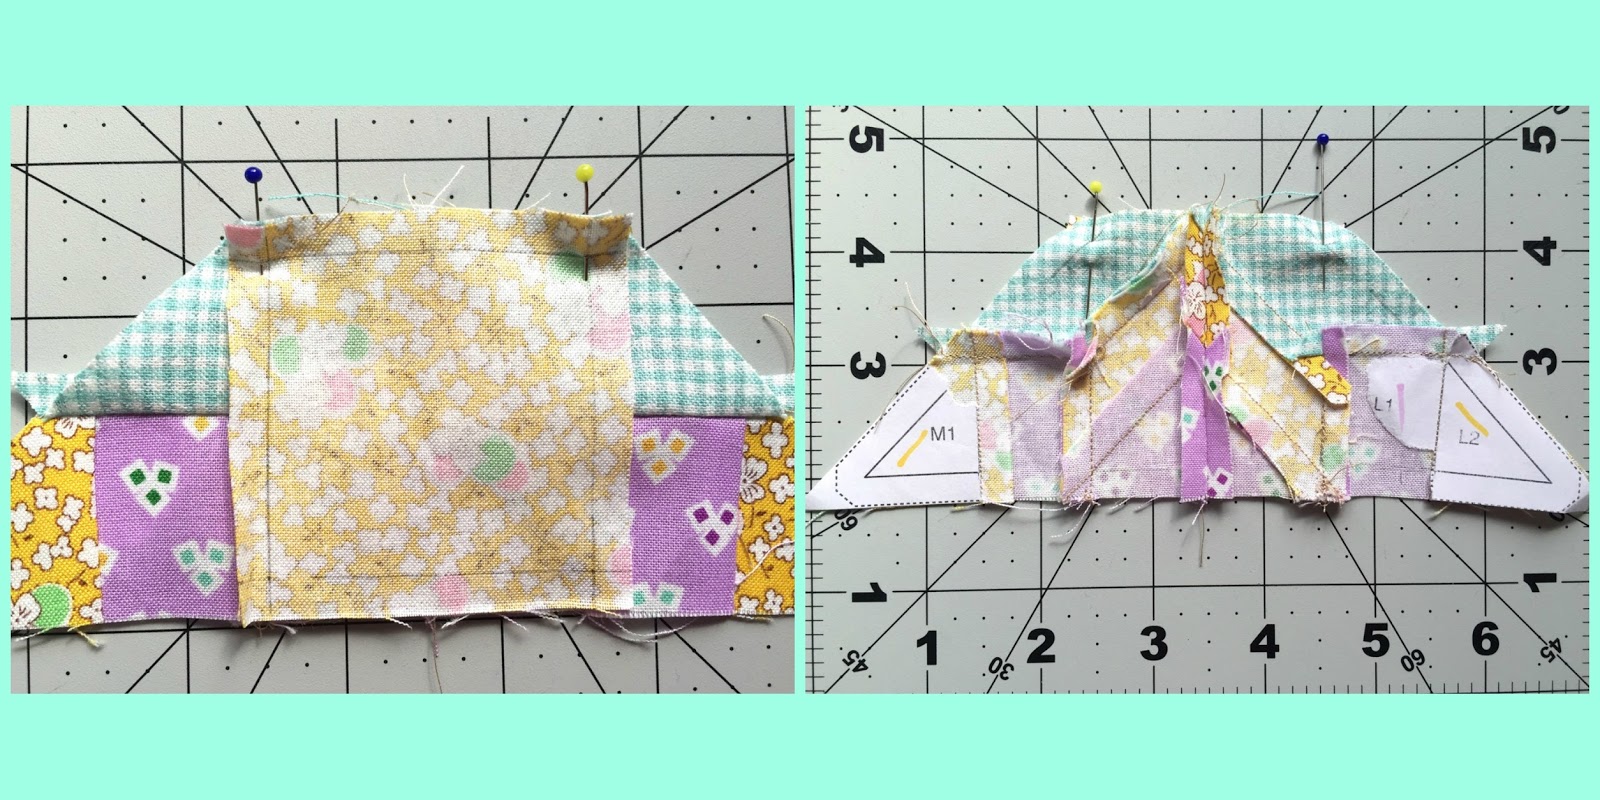
Y seams are inset seams that are used when a section or shape needs to be set into a quilt block. They occur at a place where three seams and three fabric pieces come together at a single point creating a Y shape. At the point where there is a Y seam, instead of a continuous seam that extends into the seam allowance, a Y seam instead requires the seams to be sewn precisely on the seam line and not in the seam allowance. In English paper piecing or when hand piecing, it is standard practice to sew only the seam lines, leaving the seam allowances mobile/floating so they aren't stitched down and can be pressed in any direction when the block is complete. Before I started sewing this block, I identified the Y seams as they come in two stages of making the block. This block is made of a central square and eight sections fit around the square. The sections are made of smaller sections (shown in yellow and blue below) and contain a Y seam where they are sewn together. 

2. I recommend pre-cutting all the pieces before starting sewing. Rotary cutting instructions are given for the squares and the triangles. Cut the centre square to the exact size, cut all the other shapes at least ¼" larger. For the diamond shape, I used a freezer paper template using this method.

3. The sections comprised of square/half square triangle can be sewn in the usual way. The section with the Y seam needs to be sewn so that the seam stops securely where the Y seam will be and doesn't extend into the seam allowance. This needs to be done very precisely: I count three stitches forwards and backwards at this point, it also helps to hand crank your machine needle where these precise seams start or finish.

4. Then trim all the sections, use scissors for the inward edges next to the Y seam. On the reverse, peel back the paper and add ¼" seam allowances around all the edges with a soft pencil. To sew the sections together, pin as shown in the pic below, matching seam points precisely. Sew from the outside edge to the Y seam, stop and secure the seam. Again precision is key, one stitch over will mess up your Y seam. A top tip to remember is that there should only ever be two layers of fabric being sewn at the seam point of a Y seam, so make sure that no extra layers get caught in the stitches.

To sew the next seam, ensure A3 paper is torn off so the seam can flip over. Adjust and pin your fabric edges checking that the penciled seam allowances meet exactly. The Y seam starts and is secured precisely where the previous seam ended, and is then sewn to the end. Press.

Repeat until all the sections are joined in this way. These are then paired together (the seams will nest) to make an isosceles trapezoid. Make four of these in total. Now for more Y seams, you can see them identified by stars in the diagram below.

Sewing the trapezoid sections to the centre square is just like sewing a spool block. To join the first trapezoid to the centre square check that both have seam allowances marked in pencil on the reverse. Match seam allowances precisely and pin together.
With the square on top, sew along the seam line securing at the beginning and end and not letting any extra stitches go into the seam allowance. Repeat with the opposite trapezoid. I don't press at this point, I just smooth the fabric with my fingers. Now sew the remaining trapezoids to the remaining outer edges of the square. The square should end up with what looks like a continuous seam in a square shape but is instead four straight seams. The diagonal edges are not yet sewn together at this point.

To join the diagonals, ensure that seam allowances are marked in pencil on the reverse. Pin the centre point of the seam where the diamond points meed square shape is formed in the block and baste with a few machine stitches.

With this point accurately basted, pin the top and bottom edges of the seam and starting at the centre square, ensure there are only two layers of fabric under the needle, start and secure the seam and sew to the outer corner. Repeat this process on the remaining three diagonal seams. Now press the diagonal seams open and press the rest of the block on the reverse and right side, using starch to help flatten bumpy seams. When it comes to pressing seams, I go with what feels right- whatever reduces bulk the best or doesn't show through. It needs to be considered according to block and fabric, for me there are no hard and fast rules.

It is a punishing block and took me hours and a lot of unpicking to do as I aimed to get everything just right. Y seams are tricky and this is a small block with little pieces so it is undeniably challenging even for an experienced Y seam piecer. If you completed it, well done and if it beat you or you didn't dare start, it can be substituted with a block of your choice.
Top tips for foundation piecing this block
- Pre-cut all pieces
- Mark Y seam points on paper pattern pieces.
- Use a water based glue stick. I use Sewline, to stick the first piece of each section
- Chain piece where possible
- Mark in seam allowance around edge of each section
- Flatten seams with Flatter or similar light starch spray
Remember you can:
- Hashtag #fw1930sqal on Instagram and add photos to the Flickr group if you like to share there.
- For individual blocks, you can use #MrsBrownblock and #MrsFayblock on Instagram, Fat Quarter Shop and Angie are using these hash tags, #fw67MrsBrown, #fw68MrsFay - I'm using both hashtag systems.
- You can also copy and paste links to any blog posts you do on these blocks in the comments and I'd love to visit and take a look.

The kitty block is so cute and the second block ~ well, it looks hard and turned out lovely!
ReplyDeleteThanks for the Mrs. Fay tutorial, it really helped me get this block together and it looks great.
ReplyDeleteThat’s really good to hear! It took a long time to write all the steps down and take the pics and it’s great to know it has been a help to you
DeleteI love the fussy cutting in Mrs Brown!
ReplyDelete