Showing posts with label wendy ward. Show all posts

Sunday, 3 May 2020

Book review: Sewing Basics for Everybody by Wendy Ward


Wendy Ward is one of the most reliable voices in sewing today. She released Sewing Basics for Everybody earlier this year and the blog hop promo tour is currently active.  I wasn't able to take part this time as I had work commitments scheduled at this time (that was back in the pre lockdown life!) but I did very kindly receive a copy to review.  I find that with each of Wendy's books, the style gets closer to her true aesthetic and this book really feels like her functional style has been given the freedom to create a modern utilitarian capsule wardrobe.  The keyword in the title is 'Every': this book is based on five core basic patterns with full variations and instructions to make twenty different designs in woven and knitted fabrics for any gender, age or body shape.


The book is divided into two main parts: Techniques and Projects.  In the first section, there's lots of detailed information in writing, diagrams and tables. It's packed with a comprehensive range of tutorials that cover the key skills throughout the book from adding a bust dart to, sewing welt pockets, and even stencil painting.  Then the main part of the book concentrates on the projects with a chunky chapter (including variations) devoted to each of the five core patterns.  These sections are photo-heavy and feature a diverse range of models- different genders, ages etc.  The photos are crisp and concentrate on cropped close-ups of the garments.  


The instructions are supported by Wendy's excellent diagrams throughout like the tunic dress (below) variation of the Felix sweatshirt.


The 'Harper' pants stood out to me as a classic slouchy pant.  They reminded me of how I started sewing garments in my teens.  I would take my dad's old discarded trousers and pleat the waist and peg the legs until they fitted teenage-me (we're talking circa 1985).  I have photographic evidence somewhere!  I really like the pleated hem detail (far right purple pants) to narrow the leg. 


The Kim jumpsuit is a great style with three distinctive variations.  Fiona from Diary of a Chain Stitcher has made a great vintage workwear version.


As with Wendy's other books, there are full-size pattern pieces to trace off (some pieces need to be traced off more than one sheet) at the back of the book.  As ever with Wendy, these are garments designed to be sewn on a regular domestic sewing machine and her attention to detail with plackets. cuffs, pockets, zips, linings and more will either teach you new skills or brush up your existing ones

Read my other reviews of Wendy's books:

Friday, 6 April 2018

Wendy Ward's A Beginner's Guide to Sewing With Knits: Book Blog Tour!

I am so happy to be a part of Wendy Ward's A Beginner's Guide to Sewing with Knitted Fabrics book blog tour.  The book actually came out at the beginning of the year but sold out so quickly, the tour had to be delayed to allow the second run of copies to be printed!  Wendy has a particular talent for demystifying and simplifying the sewing process and knitted fabrics are her specialism.


I made the Kinder cardigan which comes with three length options. Wendy has posted lots of versions of these on Instagram and it has been a popular pattern with many social media sharing sewists.  I made a test garment from some gold french terry that's been in my stash for a while: I wanted to check the sizing and experiment with length and pockets. As with Wendy's other books, the patterns are full-size and printed on paper sheets at the back of the book and you trace off the pieces you need. Some pieces extend over two sheets and there are extension lines, matching scissor symbols and numbered points to help you match the pieces - just remember to transfer all the markings when you are tracing off the relevant section.  A quick reference key for locating the pattern pieces for all the garments can be found on page 23.


I made a tester version first in some gold coloured french terry that I've had for a while. I traced the smallest size, extended the length beyond the shortest option but not as long as the mid-length option. I also included the pockets but placed them higher. You do need to plan the length of the Kinder before you stitch it up as the pockets are sandwiched in the neckband and side seams and the neckband creates the hem length.  I chose long sleeves without the cuff. There are five size options and you use your actual bust measurement to decide. Wendy includes finished measurements for bust, sleeve and back on this garment so you can make pattern alterations if needed before you cut out. This pattern has plenty of room built in so it can be layered over clothes.


Good result, great pockets, but I thought the shortest length would suit me better and work well with skirts and dresses. The fabric for the second version was kindly supplied by Minerva Crafts. It's Atelier Brunette french terry which is a wonderfully soft, mid-weight, french terry sweatshirt fabric- this is the same weight, different print.  It is stretchy, especially for a french terry and the colour is a deep navy with bronze/gold sprinkles.  I've used this fabric before and I find it easiest to hand baste all my seams before overlocking to manage the stretchiness and keep the seams even whilst sewing. If you've been following the book tour, you'll remember that Zoe used the same fabric and also made the short version, before going on to make a longer version in Ponte de Roma. You can find other sweatshirt fabric options here at Minerva.


So let's talk more about the Kinder. I see it as the beginner-friendly cousin of Wendy's MIY Langley cardigan. Construction is simpler and with a neat finish and the result is a wardrobe stalwart that will enjoy lots of wear! As with the other book patterns, it can be sewn on a sewing machine or using an overlocker and a sewing machine. On the Kinder, the hems are finished with straight stitching on the machine as no stretch is needed- so on my version, the neckband top stitching and all the hems are sewn with a long straight stitch. My favourite part is the neckband which just like the Longley cardigan, fits like a dream and sits very nicely on my neck. My only change on this version was to taper the sleeves from armhole to wrist and shorten the sleeve length by 1"/2.5cm at the cuff.
There's a plethora of guidance in the book for sewing the Kinder, as well as the other patterns and for sewing knits in general. There are extensive fabric recommendations for each garment and all the photo samples have fabric credits so you can recreate the look. Wendy suggests beginners start with a stable knit for the Kinder as it's loose fit doesn't rely on stretch.  Ponte Roma would work well, as would sweatshirt, jersey or scuba, so there are lots of options.  As with Wendy's other books, instructions are detailed and clear, supported with generously sized diagrams and photographs and there's something to learn for all levels of sewing experience. The aesthetic is clean and modern with classic basic shapes suitable for everyday, active and loungewear. There are lots of other bloggers to catch on the tour all with different styles and the tour continues with the Minerva Crafts Blog


A big thank you to Wendy's publisher, MakeETC.com for sending me a copy of the book for being part of the book tour.  They are also offering blog readers 25% discount when buying a copy of A Beginner's Guide to Sewing With Knitted Fabrics via their retail site, Just enter the code BLOG25 at the checkout, valid until 21st April 2018. Bargain!
SaveSave

Tuesday, 15 November 2016

Wendy Ward's Beginners Guide to Making Skirts Book Tour: Rusholme Maxi

Welcome to the second stop on Wendy Ward's Beginner's Guide to Making Skirts book blog tour.  I was honoured to be asked to take part!  I'm  a big fan of Wendy's work, I've had great results with her patterns and I like her straight talking style and her secure methodology.  This book is guide to making eight basic skirt shapes - jersey straight, wrap, circle, A-line, bubble, woven straight, culottes and button through and covers all the techniques you will need.  Each style is a starting point, with three style variations to add new details to your garments and increase your sewing skills.

There's a lovely group of bloggers - Handmade JaneMarilla WalkerPeas and Needles, and Elisalex from By hand London taking  part and we've each been kindly supplied with the fabric of our choice from Fabworks Online to make a skirt from the book and showcase the styles.   I chose the A-line skirt, Rusholme.  I lengthened the pattern at the hem to maxi length and opted for pockets and a straight waistband.  I also added a lining on the advice of George of Fabworks.  I wanted a check and  find wool itchy so I chose Teal and Charcoal gingham check: a soft brushed cotton with herringbone weave and good drape.  Other brushed cottons are available as I think this one has since sold out.  It's medium weight and the lining supports the fabric, gives a quality finish and adds extra warmth for a winter skirt.  George sent me this sapphire satin twill lining which was a great colour match and feels lovely and silky.  As always, don't forget to prewash and dry flat!


Full size patterns are included at the back of the book and you trace trace the parts needed for the style you're making and some pieces like waistbands are used with more than one skirt style.  Some larger pattern pieces come in two-parts so check out the pattern sheets thoroughly to locate everything you need. The styles are printed in rainbow of colours with a  key on each sheet so you know which is which and I found Swedish paper was perfect to see the lines through the paper; dot and cross paper was a little too opaque to see the lighter colours.  To pattern match the checks, I cut the pieces out flat rather than on a folded double layer.  For the front skirt I drew the fold line in chalk on the reverse, pinned the pattern aligned with that, cut one half and then flipped the fabric over the chalked line so I can match the pattern exactly.  For the two back pieces, I cut one and then laid it on the fabric to act as a pattern piece for the next one.


I cut a size S and my only adjustment was to sew slightly narrow seams from the top of the hips up to the waist and at each end of the waistband as I like a bit of ease around the waist.  I lengthened the hem by 3" on the skirt back and front and used a quilt ruler and a chalk pencil to mark directly on the fabric.  For the lining, I used the same main from and back pattern pieces, but cut them 1" shorter than the skirt.   I also added some of the skirt fabric to the top of the lining as I cut into it a little too keenly and needed to rectify my mistake!  I used Wendy's method to insert the invisible zip (I usually use this method although not any more!).  There is a fair bit of hand basting but it's worth it for the accuracy and all my checks lined up first time.  It also helps to mark the back of your zip with pencil so you can match up each side exactly - you can see a similar method here.  I also used 1" strips of interfacing on the zip seams  which Wendy mentions for invisible zips.  Adding a skirt lining isn't covered in the book but it just involves sewing a second skirt, pressing the raw edges of the centre back seam by ¾" and hand stitching the lining to the zip.  The top of the lining is caught in the waistband and the bottom edge is hemmed. ***Edited to add: Wendy will be covering how to line ALL the skirts in the book on her blog next week! ***

 I cut my pocket facings on the bias for visual interest and I block fused this fabric with sheer perfect fuse before I cut them out  to stabilise the grain.  Once I'd sewed my pockets, I secured the top opening to the skirt front along the top stitching to keep them secure. 


I anchored the lining with a thread chain which is covered here.  


The front of the book introduces to each skirt, the cutting plans and requirements and then the putting it together details take you through construction and refer you to more detailed techniques at the back of the book.  Each skirt has large uncluttered photographs, including close-ups so you can clearly see the features and the styling is clean and modern throughout.  The techniques are clearly illustrated and easy to follow.  The size range is UK 8-26.  once you have some sewing experience, it would be easy to mix the styles up, I like the idea of a button front Rusholme.


I was very pleased with the resulting skirt. It's a classic shape, a great fit and has generous pockets.  Wendy's Beginner's Guide to Making skirts is a solid book for any dressmakers bookshelf, great for beginners and beyond - there's always something new to learn!  If you want to read more about the book, Wendy has done a series of posts featuring each style, see more at her blog.
Disclaimer: I was given the book and fabric as part of the blog tour.  All views are my own.

Wednesday, 30 March 2016

MiY Longley Cardigan with Knit/Bias Band Neck Finish Tutorial


 I've got to know Wendy Ward  through Instagram, especially sewing photo events like #miymarch16 when you post a picture each day following a list of sewing themes.  She's got a long background in the industry and I have huge respect for her work. She explains the basics of sewing so well- see this example on sewing machine settings from her blog - and is an industrious and independent spirit writing books as well as regular features in sewing magazines, running workshops and designing her pattern line.  I got in touch with her recently for my Sewing World column and when we were emailing each other she asked if I'd like to try a pattern and review it here.  I chose the Longley Cardigan and here it is!


Wendy's patterns come in a bag and with a detailed A4 size instruction booklet.  The pattern pieces are printed on large paper- copy shop style.  For this style I checked my bust measurement which fell smack in the middle of the small range and cut the pieces out of paper without tracing- I know living life on the edge.


It is a beginner friendly pattern- a page of the pattern is dedicated to information about knitted fabrics- their characteristics and how to sew them.   On the pattern pieces, the seam edges are given letters and these are referred to in the instructions.  There are lots of diagrams to support the written instructions and the Longley Cardi can be made using an overlocker or on a standard sewing machine.  I used a mix of a Brother 1034d overlocker and my Bernina 830 record with a walking foot.


I made the cardigan from a lovely quality draped cotton loopback medium weight fabric from Ditto Fabrics.  I've bought a selection of jersey fabrics from Ditto over the years and they have always been of very good quality and this was no exception- sadly it has sold out for the moment.  When sewing a thicker knit fabric I usually refer to this very helpful Indie Sew Bulky Knits blog post and I used the settings specified as that machine matches mine!  On my sewing machine I use a Bernina walking foot and a 90 ballpoint needle.


The pattern is clear and easy to follow.   The cutting plans are accurate and there is relatively little fabric wastage and the fabric quantities specified were perforce.  I used a knit that was over 150cm wide and it took 2 metres (that width/quantity applies to all three sizes).  The only thing I changed on the pattern was not adding the sleeve cuffs.  I read Rae's post and also Anna's review before I sewed it up so I knew the sleeves would be on the long side and so I turned up the sleeve ends by 1 ¼" and sewed a double needle hem using this method.


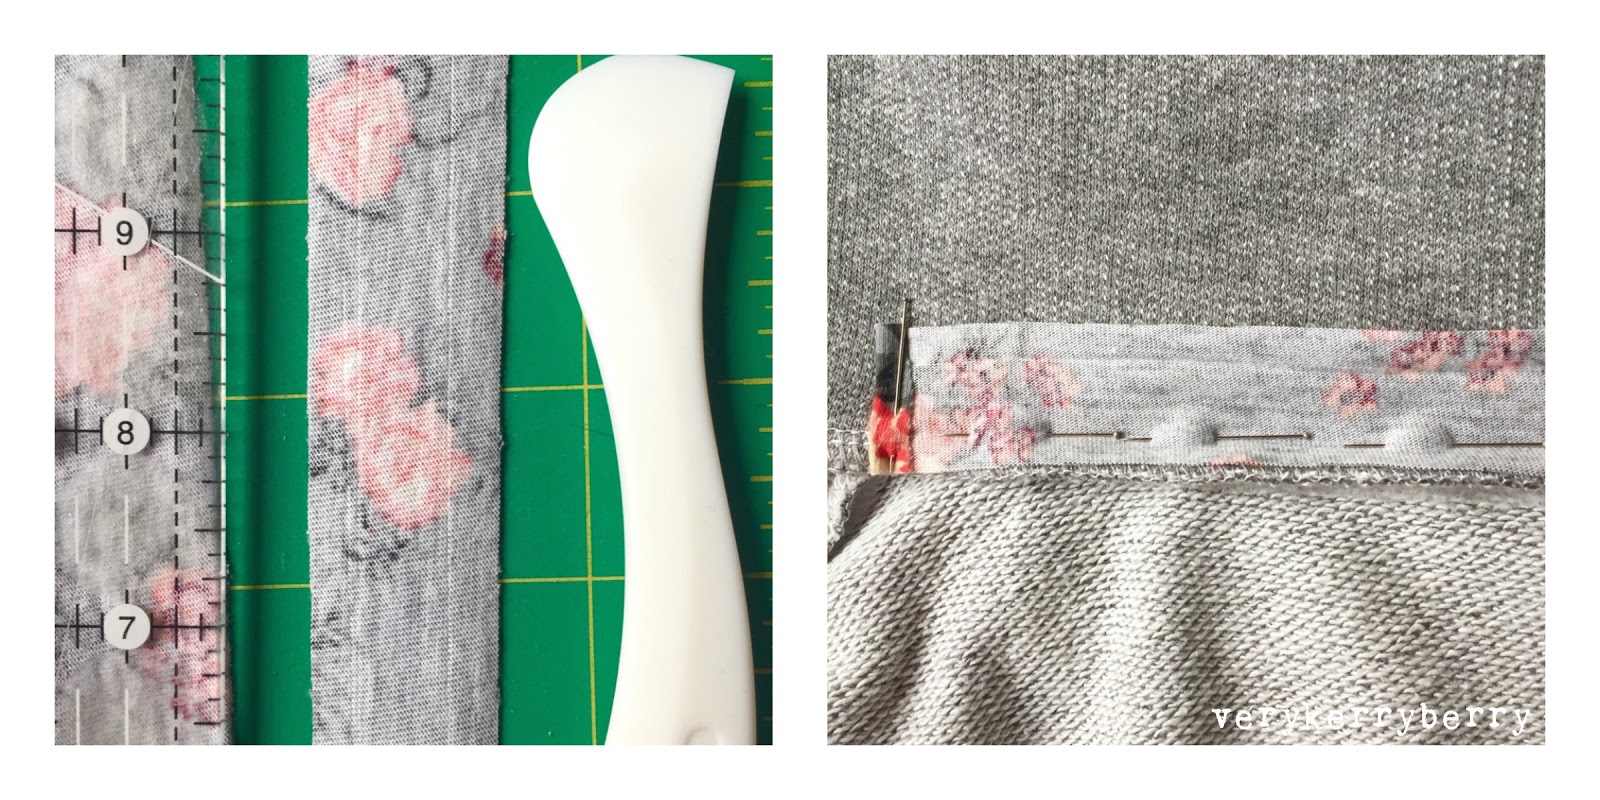
I added a few little extra touches that are decorative and have a little function including adding a strip of fabric over the back neckband seam.  This is a ready-to-wear style finish that you see in sweatshirts and hoodies.  It makes for a smooth neck and stops the seam flipping up after it's been pressed down.   I used some Girl Charlee floral jersey that I had left over, it has a small amount of stretch. You could use twill tape or hem tape


Adding a Bias Neck Strip
  • Cut a 1 ⅛" width 14" strip of jersey or bias fabric.
  • With the fabric strip wrong side up, using a Hera marker or smooth bladed knife and a ruler, make a crease along the length of the fabric ¼" from each edge.  Fold and press the short edges of the strip in  by ¼" in 
  • Place the fabric strip along the neck seam (this should be pressed downwards).  The crease of the strip will be lying against the seam line. Pin in place.
  • Stitch along the crease using a slight zig zag to allow for a small amount of stretch.   The start and end of the strip will be folded over.   At the end of the stitching, trim the strip so there's an extra ¼" to fold inwards and stitch over it.  My stitch settings were 0.5 width and 3 length.  Flip the fabric over the stitching and press downwards. 
  • Fold the long raw edge so it tucks under the neck seam and pin into place. 
  • Starting at the short edge and pivoting at the corners, sew along the bottom edge of the strip.
I added some top stitching along the shoulder seams, the front neck band edges and the hem band just using a long straight stitch.  These aren't areas that need to stretch and even though I had pressed everything I wanted the seams to stay firmly down plus I liked the look of the stitching.  The fabric is such great quality and it didn't distort or go wavy-  on a lighter weight cotton/lycra jersey it may not have worked so well!

spot the stray thread!  Perils of a dressmaker in photoshoot...
I love the result.  I've worn it every days since I completed it on Sunday,  Even with the arrival of Spring, I know I need long sleeves for many more months and even well into the summer.  The Longley Cardi is perfect for keeping warm working from home, wearing to yoga and pilates as an extra layer, throwing on as a jacket when the sun's out.  My daughter has already put her order in so a second is definitely on the cards- I just need to find the right fabric for her.  I think it would work well in a Ponte Roma too with a smarter and more structured jacket sort of look.  Recommended!

Stats:
Size Small
2m of 160cm wide fabric
Changes- removed cuffs, turned up sleeve ends by 1 ¼".