
I have a couple of posts left to write about the Baby Bear Paw quilt, this one is about finishing the quilt top and quilting a spiral, the next will be about binding. If you want to revisit the other posts, the first is here and the second here. So, starting with finishing the top, from the last post we were left with four quilt sections- this one will be the lower left corner.

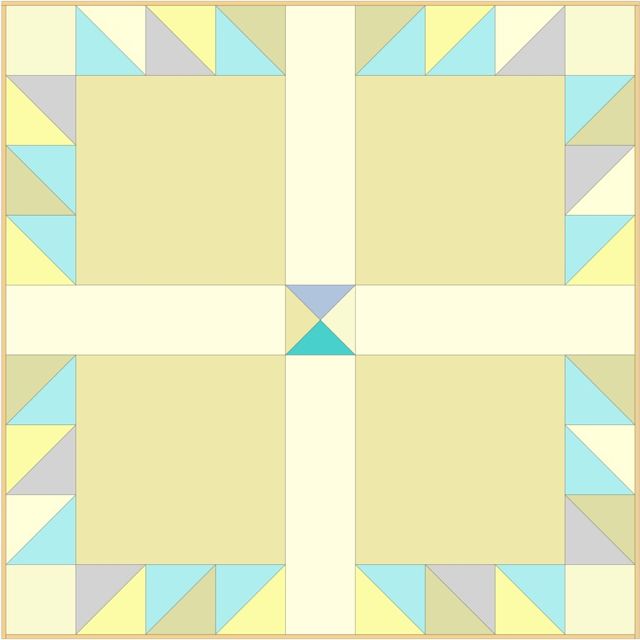
The next stage is to link those sections together so it looks like this diagram:
For this you will need:
4 Strips: each measuring 4 1/2" x 16 1/2"
4 Quarter square triangles to make the centre square- made either using Sizzix Quarter Square triangle 2" x4" finished (Die 657166 find it here with free delivery) and 2 rectangles of fabric each measuring 5 1/2" x 6", or cutting a couple of 5 1/2" squares into quarters across the diagonals
- Join the 4 quarter square triangles to make the centre square, trimming to 4 1/2" square using the 45-degree line on your quilt ruler.
- Arrange the 4 large quilt sections. Place a strip vertically between each.
- Join remaining 2 quilt strips either side of centre square. Join large quilt square sections above and below.
The quilt top is finished. Cut batting and backing fabric- 42" square for each. Make your quilt sandwich using pins or basting spray- I use 505 spray as this is a small quilt- and you are now ready for quilting.
Download the spiral template here, remember to print at 100% actual size and to use the PDF printer icon to print it out- I know this seems obvious but we can all forget the little things! You will only need this small spiral as once you have stitched this you will be able to continue the spiral using a quilting bar. To transfer the design I pinned the paper in the centre of the quilt and used a Sewline pencil and stabbed dots through the paper- very sophisticated! As long as you can just see them to sew, that is enough. You can join the dots if that helps. A Sewline pencil uses a ceramic 'lead' for marking and is soft to use, accurate on fabric and generally rubs off-but test first, always!

You will need a walking foot and a quilting bar/channel guide for this technique. Fit the walking foot on to your machine if necessary- some machines have these built in. The bar can be added in after we start the spiral. This is the hardest part is the curve is tight at the beginning- but trust me, it is only a few stitches of hell and then it is dreamy and easy. Start with the smallest stitch possible and secure your first few stitches. You will hardly be able to see the pencil marks, you will be cursing and I had to redo this part of the spiral 2-3 times eventually using the holes left from unpicking as my guide! You could trace the spiral on to tissue paper and then sew through the tissue paper to make this easier- and then tear it off. As you work around the first curved section increase your stitch until you get to your desired stitch size mine is 3.8. Once you have completed the marked area, place the quilting bar in your walking foot (they usually slot in around the back) so it sits to the left of your sewing in the curve you have just sewn. You can see in the picture the end of the bar is just touching the stitching and pointing downwards, acting as a marker. If we were sewing an anticlockwise spiral, the bar would be fitted on the opposite side of the walking foot, with its curve following in the previous stitches.

And now all you do is keep stitching, the further away you get from the centre, the easier it becomes.

As long as the quilting bar doesn't get knocked and lose position you can sew until you run out of spiral. If the bar does get moved, slide it back in and rejoin the spiral. The process reminds me of bias binding a quilt with rounded corners- I always think it will be a nightmare to do but in reality it is the preparation that is a pain to do- cutting the binding, but the actual sewing is easy peasy you do is keep sewing with no corners to mitre and start and stop with!

At the corners, you will need to all the extra curves as if the spiral was continuing- just rest the quilting bar in the previous circle of stitching and sew until the fabric runs out. Repeat until the corners are full, maintaining the clockwise direction as you sew to give your quilting bar a sewing line to follow.
Square the quilt and now we are ready for binding. I use Rita Red Pepper Quilts binding tutorial for all quilt binding and for this quilt I tried a little basting glue to help with the machine finishing- no hand sewing on this binding. As it is a baby quilt I wanted to keep the edges as strong as possible- more on that coming soon!
Inspired now - thanks for the template, starting it off was freaking me out!!
ReplyDeleteI've been wanting to try a spiral...maybe I will give it a try!
ReplyDeleteYou do make that look so easy. Quilting is not my favourite part, so any design that makes it easier is a winner with me! Might try this on my daughter's quilt. Thank you for sharing :)
ReplyDeleteI have always wanted to do a bear claw quilt, ever since I saw one in my first quilting book. Soon I'll work my way up to it! Your spiral quilting method is intriguing me; I've admired spirals on others' quilts but have been terrified to attempt that myself. I'm going to have to give your method a try!
ReplyDeletelove your spiral quilting
ReplyDeleteEvery single post I see on this is great. I am going to make this for a baby gift, thank you ;)
ReplyDeleteWhere did I put my quilting bar?
ReplyDeleteSuch a great tutorial Kerry - can't wait to have a quilt to try it out on! Hope you've had a great w/e, Sx
ReplyDeleteThanks for the tutorial and the pdf. I am nervous about making the center part. Also, how far apart are your quilting lines generally? I was thinking about half an inch or 5/8 or so, just curious about what you are using.
ReplyDeleteMy quilting lines were about an inch apart- tighter at the beginning and I used the quilting guide bar that clips on to my foot. The centre is hard as you can't see what you are doing but I found this made it much easier
DeleteI used this yesterday and it came out great! Thank you.
ReplyDeleteI'm going to try this on my next quilt.
ReplyDeleteI'm going to pin the template to my quilt and sew through it like I do when foundation paper piecing and will tear it off when I get to the end of the template. Well that's the plan. I will let you know if it works.
Really thin paper helps Alison, or using stabiliser and tracing the design on. Hope it works for you!
DeleteAnyone ever use a Push Pin to do spiral quilting? I saw it somewhere....................either you held the pushpin, and gave it the gas on the machine, OR you used the pushpin to push against the machine foot? and turned the fabric. Driving me nuts trying to find this technique!!!!!!!!!!!!!!
ReplyDeleteThanks,
Kate
That's a new one on me! I haven't heard of that technique, I'd love to know more Kate if you find it!
DeleteGreat tutorial ~ just what I needed to get a quilt quilted!!! Thanks for the template too!
ReplyDeleteThanks for putting the beginning spiral available, I was a little worried about starting out.
ReplyDeleteYou have get ten to be a expert! Hugs sweetie
ReplyDelete