Showing posts with label pattern review. Show all posts

Wednesday, 16 August 2017

Fancy Tiger Wanderlust T shirt with Dachshund Dog Print

I've had a little project waiting in the wings and as it was our dog Lottie's birthday this week and I had time off work, it was the perfect quick sew and ended up being a rewarding make. This is the Wanderlust T shirt by Fancy Tiger, the fabric is Dashwood Bertie Dachsund jersey from Mori Girls.


I bought the pattern as part of a Creative Bug membership from last year.  I subscribed for a few months and bought the class so even though I'm no longer a member I can access it.  The digital pattern pieces are included and there's a video of Amber taking you through the making process from beginning to end.  A paper version of the pattern is also available.  For a beginner or more experienced sewer, it's always helpful to see how someone else does something, especially in real time. 
Details
  • I made size XS.  Your chest measurement is the deciding factor in the sizing as the side seams flare outwards.  I fell between the XS and S with a 33" chest but my upper chest is very flat and I would rather have a smaller fit than a more generous one. 
  • The back dips so the front is slightly cropped. I'm quite short on the body and 5' 5" tall, there are lengthening lines to extend the top and back pattern pieces.
  • I used a metre of fabric and had enough left over to make a pair of matching knickers! These are a slightly adapted version of the free hipster pattern from Make Bra.
  • The only alteration was lowering the pocket by 1/2"- it's placed really high!  For the next one I'd lower it a little more, so it's 3/4" from the original marks.
  • The fabric is expensive (£20/m) but it is lovely quality, great recovery and the colour is excellent.  It's very similar to Art Gallery jersey; both are 95% cotton 5% lycra.  They are also both quite bouncy to sew, especially on an overlocker. I found it easier using my Bernina and a small zig zag (e.g. attaching the neck band) than serging.
I'm really pleased with the finished result, a quick make, easy fit but cute shape and a very wearable garment, paired with a Deer & Doe Fumeterre skirt in these pics.  


Lottie had had a tough week.  Lots of teeth out - apparently part of the downside of being a small breed with a soft jaw - and despite regular brushing over the years she only has a few teeth left.  She has coped very well, despite having just turned 10 years old, she has a lively nature and loves her food so she is adapting quickly, although there are some great comedy tongue moments with it just falling out of the side of her mouth when she's very relaxed.  She's in her retirement years now and having a happy time maximising her chances for cuddles wherever she goes. 


SaveSave

Sunday, 30 July 2017

Sew House Seven Burnside Bibs in Linen : Pattern Review

I've always loved dungarees and aprons; 70s styling, skirts that wrap, dresses that tie, a bib front and now is a good time for those sewing those styles. There's such a range of patterns available and I was finally nudged into action by Sarah of Pretty Fabrics and Trims who mentioned the Burnside Bibs by Sew House Seven in an email exchange.  I had two metres of gorgeous linen from a destash purchase, I had the pattern printed in copy shop format, I was good to go!


I chose version 1, a more fitted trouser with an invisible side zip and I opted for a straight across bib. The pattern also includes a looser trouser with pull on waist and a curved bib so you can mix and match the style elements. Size wise, following the body measurement guidelines, I cut out a size 2 bib; widening to 4 at the waist, and a size 4 lower half.  I could manage to squeeze a full length pair out of 2 metres but I wanted the summery feel of the cropped style. The length of these uses the pattern hem line; I am 5' 5"/ 164cm in height.  It's a well written pattern and fitting is minimal as the apron ties bring the waist in and out. 


The only change I made was adding a layer of Liberty lawn to interline the pockets as they are sewn on to the front and I thought the linen would bag out in use.  I also added a light fusible interfacing strip into the zip side seams.  Otherwise, everything was as written in the pattern.A future change I would make would be to stay stitch the underarm section of the bib and maybe interface it with a very lightweight fusible as it did go a little out of shape at the edges.


The fit is good, especially in the trouser section. Dungarees are not the most flattering look on the derrière but I think these have the balance about right and you could easily make a few adjustments to make them more fitted, or choose the looser trouser pattern and have a baggy look.  The size 2 bib is very slightly short and in hindsight, size 4 throughout would've been fine but the difference is minimal.  They are a satisfying make and great to wear on a hot day out, the leg has just the right width to it, they look wide leg and not like clown pants!  I have the Tea Dress in my dressmaking queue, along with some beautiful linen from USA so I'm tempted to start that next.  


Other dungaree pattern suggestions:

SaveSaveSaveSaveSaveSaveSaveSave

Wednesday, 22 April 2015

Grainline Floral Linden Sweatshirt

You've probably seen this sweatshirt somewhere before?  Linden sweatshirts have been all over the sewing blogs the last few months.  It's a Grainline pattern designed by Jen Beeman.  I've made her Alder dress,  actually I made two and it was one of my favourite patterns of last summer.


The sweatshirt is all cotton, fleece backed with only a little stretch.  I bought it from Guthrie and Ghani.  It's not listed as Liberty fleece but the pattern looks to me like it is.  A few other bloggers have used the same irresistible fabric/pattern combo including Lauren of G&G and Karyn of Make Something


So what is it about this pattern that makes it so popular?  There are cheaper similar patterns from the big pattern houses like Simplicity, why not choose one of these?   I swear Jen has a magic touch for designing modern classic casual clothes that suit many shapes sizes and ages.  I am not really a big sweatshirt wearer.  I find most sweatshirts are too boxy and just make me look saggy and shapeless and I had a sneaky feeling that the Simplicity one would do just that. This one felt just right.  I did make a test garment out of an old cotton jersey duvet cover, just to check sizing.  I find that indie patterns for knit jersey designs take into account jersey sewing techniques such as smaller seam allowance, using double needles for hems, adding a flat sleeve rather than insertion into an armscye etc. and the big pattern houses don't always do the same. All the pattern details are below:

  • Size 2 based on bust size 33" which is my bust size
  • Because of lack of stretch in this knit, I cut the cuffs on the bias (as recommended by Jen and also used by Karyn) in cut them slightly bigger at a size 4.  The alternative is to use ribbing.
  • The next binding is also cut on the bias butI cut a much larger size band to allow for reduced stretch, I cut between size 14/16
  • The hem band is cut on the straight, I used a slightly bigger size 4 to make up the lack of stretch
  • Seam allowances are narrow at ¼".  You could always add a little extra to make for a bigger seam allowance if that is more comfortable for you.
  • I used my overlocker/serger throughout.  I did baste the the neck binding with long machine straight stitch and top stitched this area too.
  • Paper Pattern from Village Haberdashery, or PDF version from Grainline
Picture from Grainline.com

It is a quick and rewarding make and a pattern that will last me well over the years.  The instructions are clear and the diagrams neat and informative as usual.   I have worn this version many times at home and in pilates and yoga classes.  I bought the paper pattern from Village Haberdashery and it is well worth the investment, I'll make it again for me and I'm guessing the daughter will want one too- I've got her coming along to pilates too.  I probably owe her for taking my photographs...


sib blog

Sunday, 19 April 2015

Yoshiko Jinzenji Patterns

A few months ago, Lindsay from Zakka Workshop got in touch asking if I would like to try some Yoshiko Jinzenji patterns they were launching.   They are projects from her book Quilting Line and Colour.  I haven't got the book and it is now out of print and rather expensive to get hold of so I chose The Modern Sampler Quilt and Lindsay generously included some other patterns too.  


The patterns are in booklet form, all pattern pieces or templates are included full size on a separate sheet.  I assume that as the book is now not available, patterns like this provide more efficient alternative to a fresh print run whilst making the author's work more accessible and providing royalties.  It's a great idea if you are limited for space- I have lots of books that I keep for the one project I might make.  Buying a booklet like this reminds me of buying a single download instead of an album.  Efficient, cost effective but you might miss out on the joy of the whole book.


In all three patterns, the instructions involve a lot of detailed diagrams- this suits my learning style; plus text and photographs.  Yoshiko Jinzenji's style is clean, minimal, organic and modern.  The patterns are described as 'Japanese Quilt Artist Series' and they definitely lean towards the textile art side of quilting.


I chose four of the  blocks in the modern sampler quilt.  For the blocks that included curves, I traced the block templates onto freezer paper, ironed them onto the reverse of the fabric, drew round them in pencil and added seam allowance all round.


I hand pieced the curved blocks and this method is shown in detail in the pattern.   They could be machined but I am enjoying hand piecing at the moment and I thought I would get better results. I used a selection of linens and cottons for my neutral background and vintage prints for my quiet bursts of colour.


You can see more of the construction on the reverse.


For the square and triangle blocks, I departed from the instructions, traced the blocks onto thin paper and foundation pieced the blocks.


 Each block has mitred border pieces which are a bit of a pain to trace- there are four as the angles have slight variations, but they sew together beautifully using Y seams.  These were sewn by machine.  See my tutorial for this technique here.


I am now at a large cushion cover size but I think I need to add more details to it.  The pattern includes appliqué irregular strips that are sewn on by hand using needle turn technique and I fancy adding some strips to the centre cross.  I love this pattern, it was a calming and pleasing make and I would like to return to and make the whole quilt.  It's a slow burner project that I keep returning to as other sewing comes and goes.


You can find the patterns at Zakka Workshop and in their Etsy shop.  The Modern Sampler Quilt is quite an advanced skill level.  The Graphic Squares Pillow and Throw pattern is a beginner project- covering a 16 patch cushion layout and fussy cutting in lots of photo graphics step-by step-detail and the Quilted Silhouette Pillows are a simple raw edge appliqué project.


What are your thoughts on this sort of pattern production- extracting projects from books and selling then as independent products?  I wonder if it is something we will see more of?

sib blog

Wednesday, 11 February 2015

Kanerva Blouse by Named Clothing

 I have been searching for a long sleeved, woven fabric simple top for sometime.  When I saw 'Kanerva Blouse' by Named Clothing on the Fancy Tiger Crafts blog here and here I was seriously smitten and a discount code over the new year on the Named Clothing Facebook page had me clicking buy


I really like the Named Clothing PDF style.  The pattern is layered (each piece overlaps another) and there are only 12 pages pattern to print, so it is much faster to put together than the average blouse PDF.  Because the pieces are overlaid, you need to trace off each piece in your size but as their are only two sizes displayed at a time that was easier than the average Burda Style magazine.  I traced a size EU 38 (UK size 10, USA size 6) which was a little bigger than my measurements but as this pattern is made for jersey fabrics as well as lightweight woven I thought it best to be on the safe side.  I opted for the peplum version and I wanted it to be big enough to go over my head (there is a button fastening at the back).


I made very little in the way of alterations. I added the binding in a slightly different way (more info further down this post.  The sleeves were quite short (considering that I am 5' 5" (164cm) and the pattern is drafted for almost  5' 8" (172cm) so instead of turning up the hem, I left the sleeves at full length and added bias to the bottom.  


For a first attempt I am pretty damn pleased with the fit.  It is a small busted pattern.  I am a A cup at the most and this worked for me.  There is a slight surplus of fabric in the centre of the pattern especially on the upper bust area and the darts could do with coming very slightly inwards.  The sleeves and arm holes fit brilliantly.  I did need to ease stitch the sleeve head which isn't mentioned in the instructions but is a standard method for fitting a sleeve into an arm hole.  I like lots of room to move and I loathe tightness under the arms, these sleeves were winners!  It goes over my head without straining so no need to fiddle around with buttoning up.


The pleat detail at the waist is an easy addition and sat at the perfect place for me- a longer bodied, taller person may need to add a little length in the body.  The pattern pieces fit together well and the instructions are functional.  They are not hugely detailed and they read like they are a translation but they do the job.  Everything was sewn on my new vintage Bernina 707 including the buttonholes and was hassle free.  The fabric is Robert Kaufman Lennox Gardens Lawn and is a lovely light lawn, a little thiner than a Liberty lawn and it pressed and sewed easily with a 70 Schmetz Microtex needle.  


Here's how I did my binding.  Firstly I trimmed my seam allowance off at the neckline.  Then I cut bias binding 1 ⅜" wide, three pieces- one long enough for the neck and two the same width as the cuff on the sleeve. I sewed it to the inside of the neck edge using a ¼" seam allowance (the right side of the binding is placed against the wrong side of the neck edge.  Press upwards. You can see the ¼" overhang at the vertical edge which is then folded inwards and the binding is folded to meet the neck edge.  There is an option at this point to grade the seam and trim the neck edge to ⅛" wide, the binding is untrimmed.  The grading makes the binding sit flat rather than standing up- I did this on my second Kanerva but not on this one.


Press the binding over so that the folded edge extends over the seam line and stitch close to the folded edge.  I used the same method on the sleeve cuff.


My only significant alteration was to reduce the peplum length by 2" taken from the bottom edge.


I've already made another Kanerva with a few tweaks- I just need to wear it.  Fit is something that needs to be judged in wear as well as during the sewing process.  For me, this blouse it is the equivalent of a long sleeved lightweight jersey T, a core wardrobe piece.  It layers well with cropped cardigans- I am constantly in a state of cold at the moment so this is a big plus for me!  The simple design makes the perfect showcase for prints too.  The skirt which can just about be seen is from Stylish Skirts by Sato Watanabe.  It is skirt I, "Escargot' skirt with straight hem panel.  This is a book where you draft your own pattern pieces based on your measurements.   That sounds harder than it is but you do need to comfortable with a Japanese diagram instruction style.  The book is translated but there are errors.  The skirt fabric is a dress weight denim from Merchant and Mills- any fabrics I have had from them have been the most fantastic quality

Stats:
Fabric: Lennox Gardens Lawn, 110cm wide, size 38 needed 1.5 metres
Alternations: Reduction of 2" in length of peplum. Bias binding added to sleeve cuff edges. 
sib blog

Wednesday, 21 January 2015

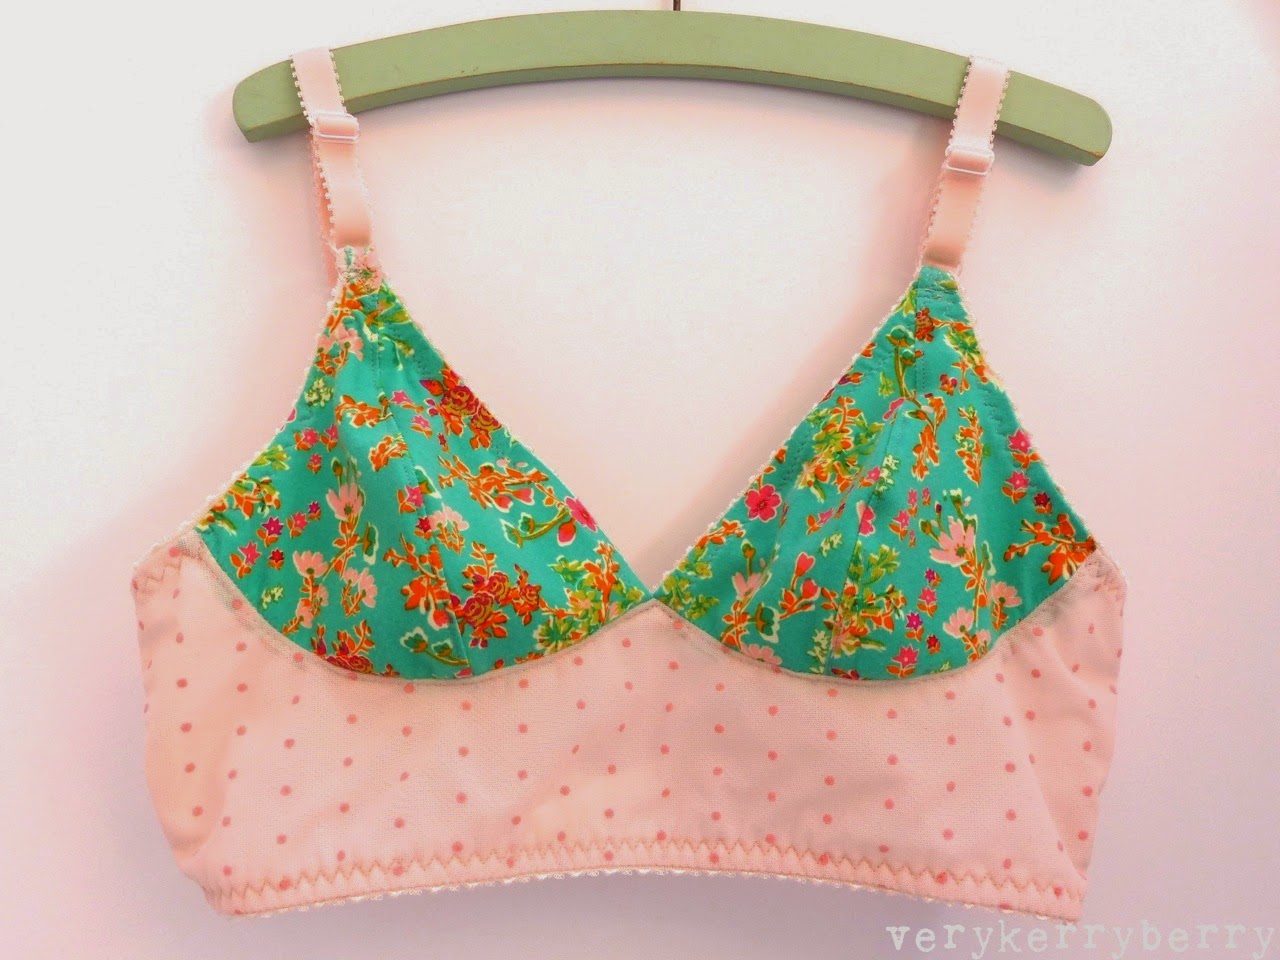
The Watson Priory Peach Bra

Lingerie making has long been a sewing specialism I have wanted to explore.  After some tentative attempts at knickers I made a cami slip and briefs following Gertie's sew-along last year, I made test garments and altered the fit and the resulting undies have been worn many times.  When I saw Amy Chapman's Watson Bra on instagram last December, I knew this style was for me.


It is the perfect pattern to dip your toe into bra making without yet entering the world of the underwire. There is a sew-along just starting now but you don't necessarily need it.  The pattern was quite detailed and there is lots of info at Clothhabit.


You do need a machine that is happy sewing stretch materials and elastic- happy in terms of tension; the stitches are straight, zig-zag and three step zig-zag so suitable for a standard domestic machine.  I did not use an overlocker/serger.  A multitude of stretch needles is a must.  I always break a minimum of two  when sewing anything with elastic or lycra.


These came in handy: duckbill appliqué scissors.  This pair were a Christmas gift from my brother so I asked for Ginghers!  You can see a more cost conscious pair at Plush Addict awaiting restocking. 


The joy of these scissors is that you can trim away a layer of fabric without harming the layer beneath. I usually do this turning a small pair of scissors on their side which works but is not without hazard. This is a luxury method and makes trimming and grading seams a lot easier and safer for me.


You can see how the duck billed side slides underneath the seam being trimmed and shields the lower layer, allowing you to trim closely. Nice!


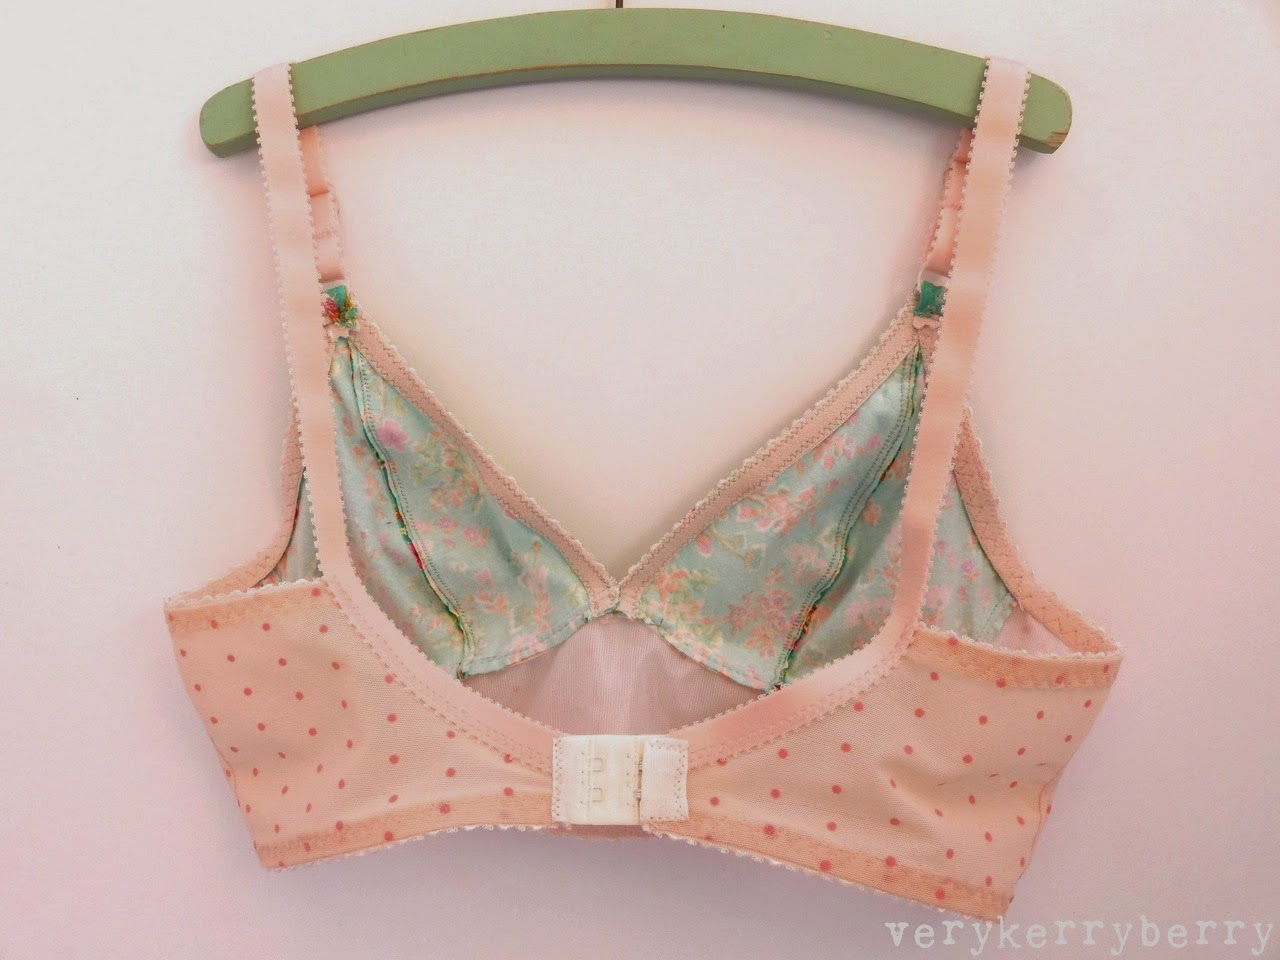
This area is the back upper elastic which leads into the bra strap as seen from the wrong side (above) and the right side (below).


Sewing this bra was a teeth clenched experience.  I measured myself as the pattern instructions stated but there is no fitting during construction.  Instead you have to wait for the end product and cross your fingers!  I was lucky, for a first attempt the fit is good, very wearable and I love the longline feeling- it seems to provide the feeling of security of an underwire bra with a lighter weight coverage. None of my shop bought bras fit well- they fit on the band around my ribs but tend to be big at the top of the cup and I worked out with this bra that my cup size is 34A at the lower part of the cup and 34AA at the top part so that will inform the next Watson and the underwired bras that are next on my list.


Stats:
Size made: 34A
Fabrics: Bra Cups from Priory Square cotton spandex knit (also available here
Bra cradle: lightweight powernet with a light weight non stretch tricot lining
Bra Band: Very firm power net
Elastics: ½" plush back throughout- fancy edged for back, front and sides, satin finish for straps
Alterations: I removed a little fabric at the back to accommodate a 2-hook width fastening rather than a 3-hook.  This is covered in the pattern.
Top Tip: Print the patterns pieces on to card.  It makes drawing round them and cutting out a lot easier.


For more detail about the fabrics involved, look here at Clothhabit. I bought the Craftsy bra making class with Beverly Johnson and found her fabric information invaluable and the whole class is a joy to watch.   Sewing Bras: Construction & Fit (w/ Beverly Johnson) (affiliate link).

Thankyou to Sonia who shared some tips on Instagram (@fabricandflowersuk) and stressed the importance of sewing as close to the edge of the elastic as possible so the edging just peeps through.

This bra seems to work in a huge range of sizes. Look at #watsonbra on Instagram to see the variety.  Obviously the support and coverage is much lighter than foam cups and underwires but I was very happy with the result.  It is the sort of bra I would wear under a shirt or jumper but not under a tighter fitting jersey top-I still prefer foam cups for those!  My daughter has requested one and I definitely want more of these in my undie wardrobe.

A note on supplies: frankly, it is very hard work and a total PITA in the UK to find your supplies in one place.  You can either go to Bramaker.co.uk, Vena Cava Designs or English Couture.  Selection varies and postage adds up.  What you really want is a kit to make a Watson bra with the correct fabrics and findings but you may struggle to find that.  I have bought kits from Merckwaerdigh, they tend to be quite brightly coloured but they do include all you need and even with postage from Holland, they work out cheaper than many UK options. You can find a good range of elastics and associated notions at The Bra Shop on Etsy- UK based.  It does make me want to set up my own UK bra hobbyists supply shop but a small house, no spare storage and pets does not seem like a suitable environment!

sib blog

Sunday, 11 January 2015

Cottagely Posy Coppelia


Pattern: Coppelia by Papercut Patterns, available here (awaiting stock) or from Papercut as PDF or printed pattern. Size XS.  

Fabric: Cottagely Posy knit- 95% cotton, 5% spandex, 150cm wide from Priory Square by Katy Jones for Art Gallery- buy here, and here.  I used 1.25 metres, directional pattern so all pattern pieces placed in the same direction and a little creative placement to cut the hem ties.

Alterations: Added 3 ½" to hemline. Kept neckband to the same length. Cut additional hem ties- 4 in total and made them a little longer so the tie could wrap round to the front if needed. Widened cuff by 1" in total.

This is my first Papercut pattern.  I love the presentation and the thick brown paper and it is worth paying extra for.  It makes tracing so much easier.  The sizing is generous. I started out tracing a Small but quickly realised with a little pattern comparison from well fitting knit patterns that I needed to go down a size and this feeling is replicated on other sewing blogs. My niggle with Papercut is the model aesthetic they choose for their patterns is very young, very slim, many styles are very short and at 44 years old this makes me feel totally out of their target market. Seeing ingénue styled models standing with their toes pointed inwards also irritates me. Maybe I need to get over that or maybe it would be good to see them vary their presentation a little and I don't just mean a blonde model replaced with a brunette.  Whinge over.  It was a well cut pattern, I liked the construction and although I did a test run with some duvet reclaimed jersey and did a few tweaks I can see this is a pattern that I will return to and my daughter saw this and requested her own version. My test run was the cropped wrap view which sits on my natural waist line.   For this version, I extended the hem line so it sat between my waist and hips. The fit was great and definitely makes me want to try other Papercut styles.

Raglan sleeves make for easy construction. You do need to consider how to handle the gap in the seam for the hem tie so I used a combination of lightning bolt stitch (Janome Stretch stitch) and overlocking the seams.  Art Gallery knit fabric is very stretchy which means it recovers well- the jersey bounces back into place- but the elasticity means that they curl a lot when cutting or sewing and are a little tiresome to work with. A stretch needle rather than a  jersey ballpoint is essential.  I also use ballpoint pins. I also find that served seams on this fabric have a tendency to pop open so I used lightning stitch for the seam and the overlocker to finish the edges.  You could stitch the whole top on a standard machine, a serger/overlocker is not essential.  I love the print, so pretty and such vivid colours.


Getting the correct amount of stretch on the neckband to prevent gaping, especially for a small busted/flat chest fitting is hard.  I didn't stretch enough on my test run and I stretched it too much on this version.  You can't tell when I am wearing it but it is a little too tense and I know for next time. The level of stretch is going to vary according to the fabric used and is mainly done by feel and experience.  The most important place to get it right is as the band curves round your neck. I also looked at my better quality ready-to-wear jersey tops e.g. Boden, and many have twill tape stitched across the back neck so I used that method here.  Its a handy technique as it neatens and stabilises a bulky seam.


It's a pattern that benefits from a jersey with a little elastane/spandex/lycra- they are all the same thing.  The lycra helps it cling rather than flop or gape.  Papercut rate the pattern as Rookie/beginner.  I would say intermediate is more accurate. A bit of knit sewing experience is going to help a great deal and the construction of the neck band and hem ties needs a little time to get your head round. Definitely one to make a test version of first. 
sib blog