It's week 9 in the Farmer's Wife 1930s Quilt Along. Newcomers are invited to join in at any time - you can find all the QAL info here. My block is Bride which is a version of the Nosegay or Bridal Bouquet traditional block (p.176, letter p114.).
Fabric credits:
Plus other ditsy unknown 1930s florals from my stash.
Bride is a fiddly block with lots of little pieces and sections to join a straightforward block, it's only the size of the pieces that gets fiddly. As usual, I precut all my pieces before foundation piecing each section. For the half square triangles I rotary cut as below. This will give you triangles with ⅜" seam allowance so if you need a bit more wriggle room consider going bigger!
Rotary Cutting for Foundation Paper Piecing
A4/B4: from background, cut (1) 2 ½" square, sub-cut once diagonally to make 2 half square triangles
B2/C2: from a ditsy print, cut (1) 2" square, sub-cut once diagonally to make 2 half square triangles. Repeat for J2/G2, F2/E2, H2/I2, D2/A2, I used a different fabric for each
For the remaining shapes, I used freezer paper templates. I was kindly sent some ready-to-print Quilter's Freezer paper by Search Press. This is ready-cut 8 ½" x 11" paper that you can run through a inkjet printer or, with a little preparation, also through a laser printer. The block diagrams on the Farmer's Wife 1930s book CD are perfect for making quick templates. Make sure your settings are on 100% or to scale. The block should print at 6" square. On a laser printer (which I have), you need a piece of standard paper behind the waxy side of the freezer paper. Then, seal the two together along the top short edge by using a hot iron to press the top inch of the freezer paper to the standard paper. I then feed it through the manual slot on my printer as if it was a single sheet with the dull freezer side on top. Finally I write on the numbers and letters from the paper piecing pattern. It is quite a pricey option but it's a great time saver product, handy if I am in a rush and don't want to trace carefully and a pack of 70 sheets is going to last me ages! I freezer paper is very handy for templates for felt too- more on that soon.
Once I had the templates, I worked my way through each square of the block. Using solids with no right or wrong side makes cutting easier. I tend to cut one shape using the template and adding a large ⅜" or ½" seam allowance, I then place that on the fabric and use that to cut multiples of the same shape.
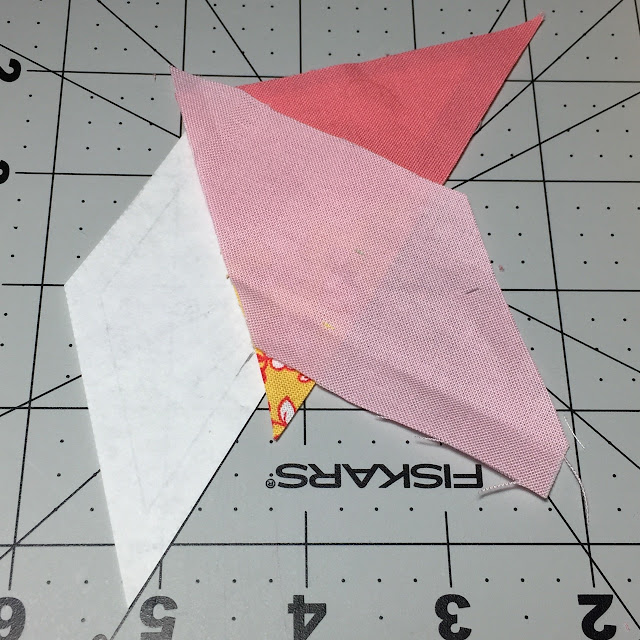
Adding the diamonds is tricky. I cut mine with ⅜" seams using a template but larger seams would've been better/ You definitely need to pin and flip before you sew a seam to make sure your diamond covers the paper adequately. This sort of placement worked for me:
Top tips for this block
- Make a templates by tracing the block diagram onto freezer paper.
- Only cut out the templates just before you are about to use them to avoid lots of small bits of paper getting lost or confusing things!
- Use a water based glue stick- I use Sewline- to stick the first piece of each section and to hold seams in place when joining sections
- Diamonds are tricky to join in accurately- make sure you pin before you sew to fabric/paper foundation and double check that when opened out the diamond covers the area with at least ¼" over the seam lines all round
- When joining the sections I like to remove the paper on one of the pair of seams being joined and draw on the seam allowance (see below). This gave me accuracy and stability with less bulk.
- There are a lot of sections to join, keep your seams scant and accurate otherwise your block will start to shrink!
The traditional Nosegay block which this is based on has lots of inset seams so although this block is a little fiddly, there are no inset/Y seams and once you get sewing it should be plain sailing. It is a great block for hand sewing, especially English Paper Piecing if that is your preference.
Kona Candy pink
Moda Daysail Hatch in Green
DS Quilts Picnic and Fairgrounds range for Joann
- Use the hashtags Don't forget to use #fw1930sqal on Instagram and the Flickr group if you like to share there.
- For individual blocks, you can use #brideblock and #carolblock on Instagram. are using these hash tags, #fw17bride, #fw18carol, I'm using both hashtag systems.
- You can also copy and paste links to any blog posts you do on these blocks in the comments and I'd love to visit and take a look.
- I have a busy work day tomorrow so my usual periscope.tv/@verykb short broadcast might not happen but I am hoping it will and it will be around 2.30pm GMT today and will be available for 24 hours to replay before it disappears! These broadcasts are conversational and are all about this week's blocks! The link will be in my twitter feed @verykb and I'll post on Instagram and twitter about 15 minutes before it goes out.
Please note: I have linked to my sponsors on items bought through them and elsewhere for anything that has come from other shops.
You can join the quilt-along at any time, all the posts are here for you to catch up with. Back next Monday with Jo Avery and blocks 19 and 20.


Two gorgeous blocks Kerry. I agree - Bride was fiddly - I dislike using little triangles to make squares. But, as your block shows, it looks lovely in the end.
ReplyDeleteLook at the perfect centre on Bride - wow!
ReplyDelete