Tuesday, 13 September 2011

Doggles

This is Lottie, our dog
this is Eddie, Lottie's brother and my friends Kathy and James' dog.  We were near neighbours on the same road and they now live 5 mins walk away instead of 5 seconds.
Kathy and I are very close and the dogs meet up several times a week, play together,  sleep over- you get the picture.  Its a bit like children who are always in and out of each other's houses, they become a memeber of the other family, maybe start to call their friend's mum auntie and the children are loved in both houses.  Well that's how it is with our dogs.  We love them both which ever we 'own'  They are 4 years old and Cavalier King Charles Spaniels.  This is a breed which is at risk of many genetic health problems.  We bought from a good breeder and did our research but some stuff you can't control.  Yesterday Eddie had a seizure and it is likely that he has epilepsy.  It is a rare condition for a cavalier.  
Early days at the moment, these pics were taken today, you can see they are both fine.  They are hilarious to walk together, you can see they are both fine and it is a great destresser for me just being with them- I had a busy morning at work.  It was a punch in the stomach hearing the news from Kath, so we are all keeping an eye on him and it has shaken us all up.   Black humour prevails, yesterday we were also thinking about Flight of the Concords, Brett is trying to impress a girl with an epileptic dog so he and Jermaine organise a fundraiser and sing this song. 
Fingers crossed that Eddie is OK and episodes will be rare.  I love both doggles to pieces- not a typo just a word I use.
Back with sewing stuff soon x
sib blog

Friday, 9 September 2011

Courthouse Steps Cushy Pillow 1

I thought it was time to get started with this, my arms are a bit sore so I can't race along and  I am breaking this tutorial down so you can see it as I make it and then I will collate all the posts into one big tutorial at the end.  The finished size of the pillow will be 18 inches- perfect for a plump look with a 18 or 19 inch inner or looser with 17 or 16 inch pad.  I sketched out the design- I like to do this on paper not a screen, quicker and more responsive.  You can see it is made of 9 blocks, each block is 6.5 inches unfinished.  I am going  to call the shapes that make up these blocks lanterns and half lanterns- makes life easier!
I am using a mix of grey and yellow plus black.  There are lots of possibilities, you could stick to 3 fabrics, or go for solids- all would look good.   I did contemplate scrappy lanterns in greys and yellows too with a big mix of fabrics in each- might try that another time as I think it will look good.  But this time, I went for 1 fabric per lantern.   I pulled all they grey fabrics I had that were similar in tone.  I have 6 varieties and you can see there are 6 whole lanterns and 6 half lanterns so some grey fabrics will be used more than once.  For the yellow I am going to alternate between a light yellow lantern- you can see these at the top of the fabric pic below- and darker yellow lanterns, fabrics seen at the bottom.  Again 6 whole lanterns and 6 half lanterns so some yelllow fabrics will repeat.
For the centre of each block you will need a 2 inch square of contrasting fabric.  When cutting fabrics for piecing I cut slightly generously with ruler line on the fabric, in fact the fabric runs very slightly under the line.  You can see on the pic below how I would line it up for cutting 1 inch strips.  This allows for the tiny amount of fabric lost by the line of stitches and  the pressing process and prevents your blocks from getting too small.  You will need 9 of the 2inch squares for this cushion, I used black fabrics for these.
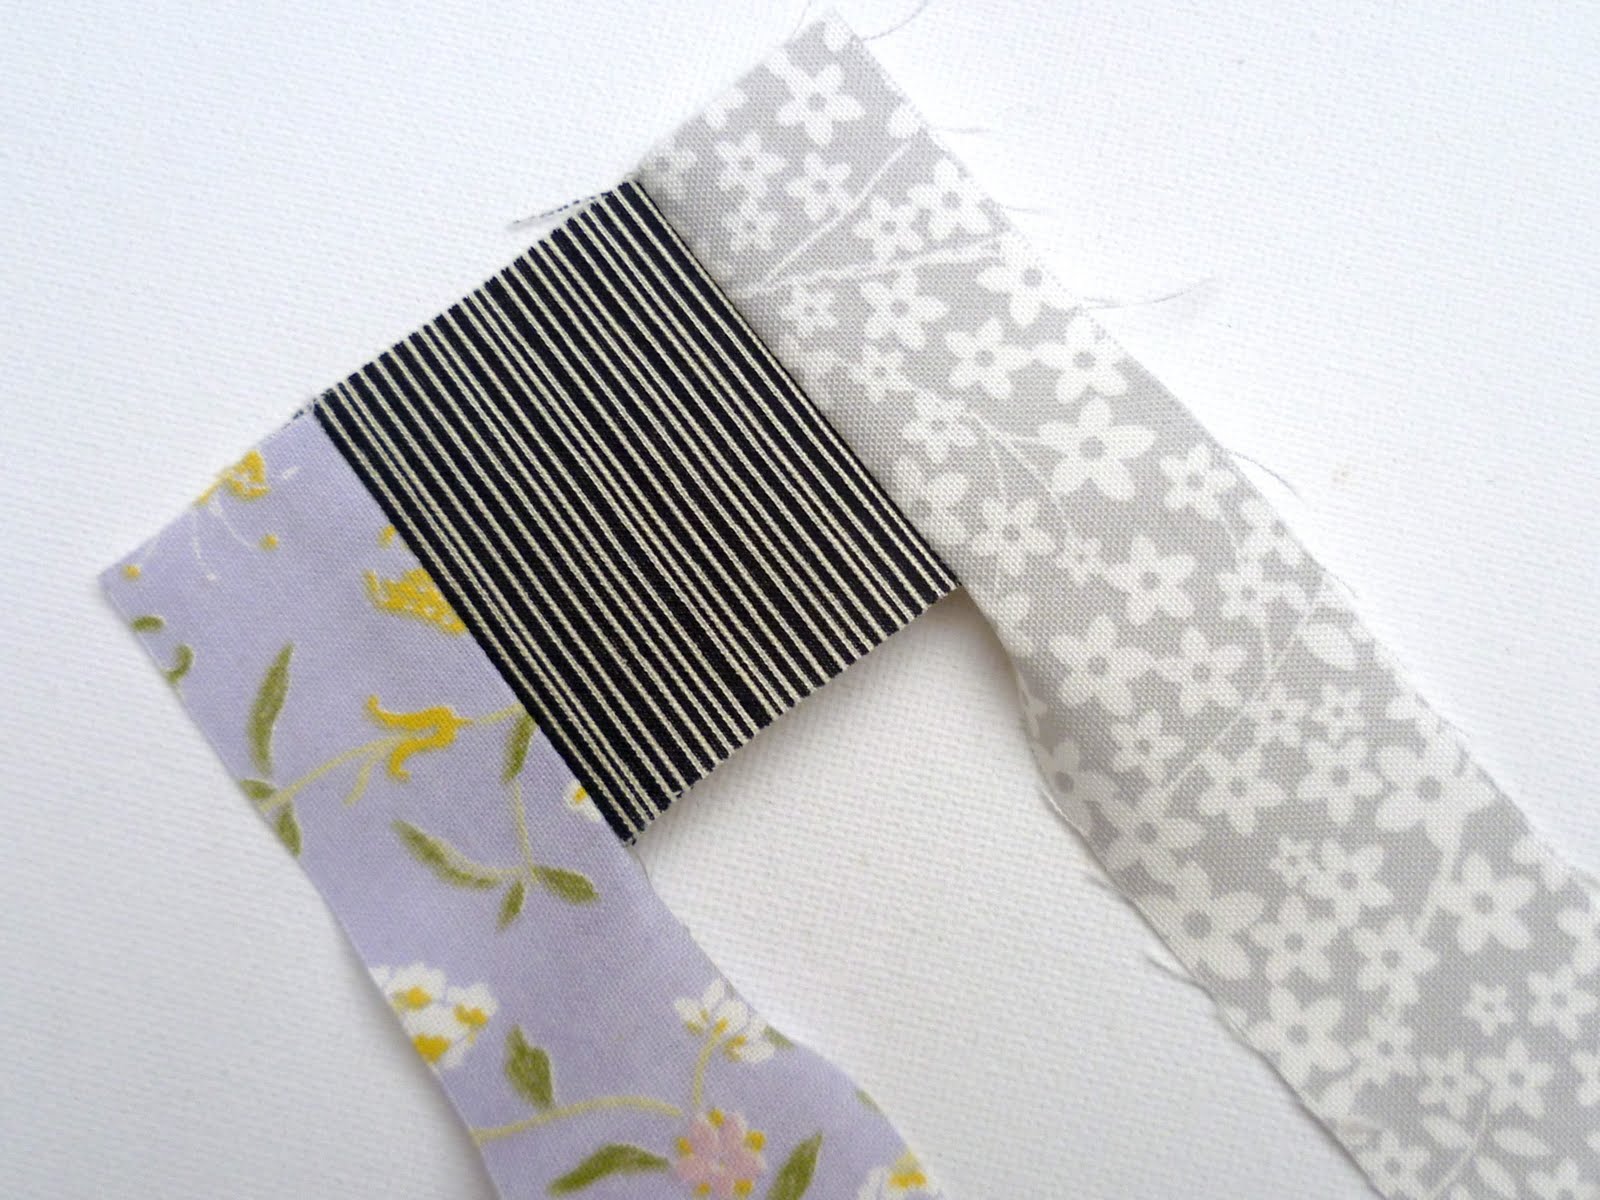
All the other strips are 1.25 inches wide, I cut a couple accross the width of each fat quarter- that will easily cover one whole lantern and then cut more if I need them.  After the first block a bit of planning is needed to make sure your e lanterns match up across the blocks. For my blocks I will always need to start with the grey fabrics on the left and right edges of the centre squares.   I stitch with small stitches 1.5 length so no securing is needed.
 Press, flip the fabric over so the wrong side is facing you and then lay your cutting rule on top.  At each stage of the block, as you add 2 strips at a time, the block should square up to fit along the inch or half inch lines.  I even my block out each time.  When the first strips are added it will measure 3.5x 2 inches.
The next two strips in yellow take the block to 3.5 inches square, you can see untrimmed below
and trimmed here!  The seams are always pressed outwards.
A front view of the same stage.  Keep adding alternating 2 yellow strips, 2 grey strips and using your rule to square off your block each time- it will alternate between rectangle and square and will line up with the inch and half inch lines!
On the next 2 strips you can see top left that my seams didn't quite meet, don't worry- its fixable!
Here it is in close up...
 When I added on the next grey strips, I lined them up with the taller white and yellow fabric so the grey flowery fabric had one edge that was under a quarter inch, (see below). The little 1.5 stitches will hold it all together fine and the block will end up the right size instead of shrinking.

And the finished block 6.5 inches square.  You will need 9 of these in total.  I sew mine together in lines of three as I completed them.
 I sew mine together in lines of three as I completed them.  Still some more to do yet, I am having to go slow at the moment.  You can see how the fabric matching works in this pic. 
See you when 9 are complete.  Meanwhile Tamiko is doing a Courthouse Steps tutorial - this is foundation paper pieced with a, check in at her blog to see what she comes up with- it is a beauty!
sib blog

Giveaway Winner

The biggest thank you for all your entries and the great advice I got for voiles and the recommendations that have kept me busy for quilts and so much more.  I will be returning to those comments many times for books, recipes and music!  And an extra thankyou for those who clicked the follow button- wow that is a lot of followers for this little space, welcome to you all.
Drum roll please!  The winner of the Accuquilt GO! Baby is number 40- Robin. 
 I have sent you an email Robin, I hope you will be very happy together!
I am going to chose a squares/courthouse steps kind of arrangement- the idea is only partially formed but I will blog the process and share quilt as you go for those who haven't done it before.  After all the voile tips I think I need to collate them and include them into the process.  I am planning to do this quilt over a long time as something I can dip in and out of- quilt as you go is handy for that.  Meanwhile, I need to sort out a courthouse steps tute for later!  
sib blog

Thursday, 8 September 2011

Shallow and Material things that make me happy

A few hours left to enter my Accuquilt Go! Baby giveaway here.
My car had pretty much had it and at rather short notice I had to buy a new (to me) one.  It is the first time I have bought a car with a year's warranty rather than the wing and a prayer that I usually receive after handing over a few thousand pounds.  I am the sole driver in our house so the onus on car purchases is firmly on me.  This one is a honey, even I can get excited about it and I am not fussed about cars.
I knew a new car would come around now so I have been saving and saving- I am very risk averse and loans are hard to get so handing over such a big wodge of money was hard but a relief, I don't think this car will need attention for a long time, no more trips to the garage.  My blood sugar needed something to recover with, my local shop still has a few of these...

Cadbury's creme egg are my favourite chocolate sweets.  Strictly speaking only around for Easter, these must be close to being out of date but hey, there are only three and I've eaten one already.  A bit of reading matter to go with the cup of earl grey and the choc- how about McCall's Quilt It Book II-1974  magazine picked up in a charity shop today.  It has patterns based on some traditional quilts. I liked this Ocean Waves quilt until I read of the 2000 triangles that made up the design.
This curtain is a great way to showcase  the Rob Peter to Pay Paul pattern, and some random wicker bird cages.
And who doesn't feel the need to have a Yo-yo vest of many colours- click on the pictures to see them larger and in eye watering detail!
I'll do the accuquilt draw tomorrow and kick off the Courthouse Steps pillow tutorial- I am going to spread it across a few posts..x
sib blog

Monday, 5 September 2011

Back to Schooldays

 Looking for the Accuquilt giveaway?  Click here
Today is back to school day in England, Lula starts secondary school.  She- cool calm and collected, Damian and I- nervous, churning, emotional.  She is going to our local comprehensive, chosen because of its results and amazing facilities but it was a failing school a few years ago and all the time I've lived in this area (29 years) it has not has the best reputation.  It is the sort of school that, despite its dramatic turn around, some  parents still raise their eye brows and give me the sympathy face when they hear that is our choice.  I am confident, it was one of the best improved schools in recent years and the teacher part of me is certain she will have a great and happy time and exciting opportunities.  I know the education is good but locally, in a small city, reputation takes a while to change.
(fabrics: Cosmo Cricket Girl Friday and Windham American Vintage)
So to all of you with children, nieces, nephews, etc starting school of any sort today it made me think of this track,  I have it on vinyl so I can't play it but it take me to happy places in my head.  A little known Kinks LP but a wonderful listen. 
sib blog

Friday, 2 September 2011

Testing the Dies

Lets start pretty with a nice fabric stack- I am enticing you in...
Interested?  Well now I've caught your attention it is carrot and stitck, the carrot comes at the end but meanwhile I have been testing my Accuquilt dies and not wanting to waste fabric I have gone to my ugly pile of 1980s rejects that I use to test ideas and shapes so I apologise for the dull fabrics but its all in the name of testing.  I was really happy with the Drunkard's Path die, it made economical use of fabric, cut a shape I would struggle to cut consistently by hand and added the handy notches.  I find the block useful and have other ideas for it in the future. The next die I wanted was 2.5 strip cutter.  this is a giant of a die designed so a folded piece of fabric will cut a 2 full fabric width strips 2.5 inches wide, handy for binding, sashing etc  But that is not all it will do...
Once you have cut a stack of 2.5 inch strips you can lay one pile down the centre- roll it through and you will have 1.25 inch strips.  You do have to place carefully, I tired using a bit of chalk to help line up but the spongy surface is not great for this.  Amy recommends a Sharpie for this. You could use masking tape for temporary hold but keep it well away from the cutting blades.  Better than this is placing the strips at a right angle, you will need to trim them, I did it to 5.25 inches, but it is a quick way to cut a huge stack of 2.25 inch squares, especially if you used the full length of the die.  It takes a bit more patience to do diamonds on the same die.  The strip needs to be lined up at a 45 degree angle to the cutting blades and trimmed at either end so it doesn't over hang
Chalk and masking tape would help again, I rushed this so my results could've been more accurate.
Diamonds are hard to cut with a standard quilt ruler so I like this feature but I think I would use scraps for this, roll them through to produce short strips and then diamond cut them.  It does make the strip cutter more versatile than I first thought.
 My final choice was the value die- this is what I always chose in giveaways!  It was more limited than I realised. It is designed to cut the shapes separately not all together unless you want to waste your fabric!  The shapes are compatible with each other, the triangles form a 2.5 inch square, the big square is 5 inches so you could use them together to create blocks.
The blades run off centre and I tried lining the fabric up to the edge of the whole die and then with the blades- I thought it was best lined up with the blades- the grain is straight and the accuracy is fine.
The best shapes are the triangles, I find these harder to rotary cut accurately and these stitch together without dog ears to trim and make neat half square triangle blocks.  With a little stack of 6 layers you can cut 12 triangles.  The squares cut fine but I would need to precut a strip and carefully fold it when I might as well cut 6 squares with a rotary cutter or using the strip cutter so not so useful for me.
The value die is what it says- good value- 3 shapes in one die but you are not really getting the benefits of bulk which is what the accuquilt does so well.  If I was choosing again I would go for a triangles die that cuts a lot more triangles in one go.   If enough of you register for this... 
22 Free Patterns - Download Now
 I might just do that!- No obligation really :)
So if I was you and I had 3 dies to choose, I would consider:  What shapes do you use a lot in your sewing?  I think any dies with curves are great as these are hard to cut using other methods.  The 2.5 strip cutter offers more variety  than you would think.  I like the triangle dies like this as they come pre snipped and easier to match up and will cut a lot more than the value die.  If you are an applique fan there are a huge number of applique blocks and there is a new ric rac die with curves all the way.  If you like rag style quilting there are rag dies, all the snipping done for you- saves a heap of work!  
So back to pretties- tutorial coming for this soon- 
Courthouse Steps cushion/pillow in yellows and greys, I am just waiting for some more grey fabric- I didn't realise I had so little!
and lets not forget this...
Comments are now closed!  Thankyou for all the entries.
To win an Accuquilt Baby Go! plus 3 dies of your choice with cutting boards included please leave a comment below.  Want something to comment on?  I have a big stack of Little Folks voiles that I want to make into a single sized quilt for me- it must be a quilt as you go friendly block and with quite chunky pieces-I want the fabric to shine! Any suggestions would be welcome.  Plus any experience you have had machine quilting Little Folks would also be good- I can't do hand quilting,  good for a quilt but bad for my hands. 
 Otherwise recommend me something in your comment- music, recipes, books, blogs, sewing, whatever, I don't mind.  
Your email must be in your profile or your comment- Are you a no-reply blogger? Check here International entries are welcome, the generous folks at Accuquilt will send this straight to the winner anywhere in the world!  I won't reply to comments this time but I will look at what you recommend for Little Folks or anything else!
Comments close 6.30 am GMT Friday 9th Sept.  Random Number will chose the lucky winner.
sib blog

Thursday, 1 September 2011

Goodbye August, Hello September

August was a busy month for sewing- less work+ more time at home= more time sewing :)

The newest addition is top left, a little top from the Lisette Market pattern.  The Lisette patterns are a pleasure to sew, easy techniques and nice finishing details plus it fits perfectly!  I'll post a modelling pic soon but meanwhile can I draw your attention to a new page on my blog, Blogging Tips, a little compendium of helpful tips and tutorials that I've found on the web to make your blogging life easier.  Linking in with Lynne's Fresh Sewing Day, I have been meaning to do this for ages.
Back soon with review of my accuquilt dies, just in time for you to think what you would choose when I post the giveaway!
sib blog