Thursday, 18 February 2016

Starting The Splendid Sampler

Pat Sloan and Jane Davidson kicked off The Splendid Sampler on Sunday 14th February and new blocks will be added every Thursdays and Sundays.  The first block, 'Hearts a Flutter' designed by Pat is a mix of simple rotary piecing and appliqué. 


I've used a mix of Kaffe Fasset shot cottons and Liberty lawn scraps and fat eighths.  I am letting my palette come through as I work which does mean some errors along the way- the corners on this blocks were originally a dark blue but I though the contrast was too much and changed for this mustard/grey floral.   The second block, 'Wings' is designed by Jane and relies on small accurate piecing.  


Kaffe shot cottons  again, plus a few Liberty lawn and Oakshott scraps.  I'm not sure about the navy wings in the middle but when  it's mixed  up other blocks it'll be OK.  There's an embroidery option on this block but  I decided to leave this out.  There's much to see in the Facebook group for both these blocks,  also on the website and there are some amazing blocks ahead from the 80+ designers.  I'm not making them all but I guess I'll a smaller quilt and I've already sewn up seven so who knows!


It's been a week of ups and downs during this half term holiday week.  High points were seeing new life emerge with my sister's cat having a kitten and being the happiest mother cat I think I've ever seen over her single kitty.  Low points were saying farewell to a friend moving abroad; a likely dementia diagnosis for a much loved elderly family member and the sad passing of an inspiring woman who has lived  her life to the full the last six years, defying cancer for as long as she possibly could.  


As always, there's beauty in the simple things, time with family, finding Buffy (our cat) sneaking successfully into Lottie's basket and walks on the beach.  My planned sewing has been abandoned, especially when the sun has been out on chilly days.


sib blog

Wednesday, 17 February 2016

Peach Floral Undies

When Girl Charlee had new arrivals which included this floral knit fabric I knew exactly what I was going to make!


I bought some Ohhh Lulu patterns in the Black Friday sales back last December and I've seen her use this very floral knit fabric in some of her gorgeous lingerie.  


I have lots of lightweight mesh and different elastics from a lingerie supplies splurge early last year and I set to work.  First I made a sample pair of knicks to check the pattern sizing.  The Grace Hipster Panties are designed for a mix of woven  on the bias fabrics(front/back panels) and stretch fabric sides.  This floral has a small amount of stretch but no lycra so I went down very slightly in the sizing- instead of cutting my hip size which is between small and medium, I cut out small and the fit is perfect.  I love how the panels match up perfectly front and back too.


I find all lingerie making a nerve-wracking activity but this pair went smoothly.  They are sewn on the sewing machine, I used the overlocker only to finish the edge of the floating gusset (let's not dwell on that sentence too long).   The Ohhh Lulu instructions are good but I referred to the Watson bra briefs pattern as it gives specific zig zag stitch size for attaching waist and leg elastic and I need that level of hand holding for this.  There are tutorials and videos at Ohhh Lulu which are great for understanding how much you might stretch elastic when you sew it.  The stretch lace is lingerie elastic from Village Haberdashery and I heartily recommend it, soft and in pretty colours.   The best way to attach lace elastic like this is to overlay it and sew on with one line of zigzag before carefully trimming the fabric away underneath.


I then moved on to a pattern I drafted from some Uniqlo hipster briefs.  I've made these before in a stretchy cotton lycra.  However, I underestimated the difference that degree of stretch makes!  


These look perfectly wearable but in reality, the horizontal stretch is small and the vertical stretch is slight so when squeezed into, this creates a builder's bum effect and very skimpy unflattering coverage, even on my small derrière.   This is the frustrating side of sewing knickers and bras.  Fit is often late in the sewing process and you have to be prepared for failure as well as success.   Knickers take a lot more elastic or lace trim that you would imagine and having sewn all the picot elastic with two rows of small zig zag, I was not going to make myself go blind unpicking it all.  Instead, I repurposed the knicks into an eye mask with lightweight interfacing over the knit fabric, quilt wadding and a couple of layers of Kona black cotton. Result! 


I've cut out three more pairs of Grace panties with different trims and I am now summoning the courage to test out the Josephine bralette- the pieces are cut and ready...

Fabrichere.  Mine was supplied by Girl Charlee to make items of my choosing and share the process.  Out of a metre of fabric I have cut out 4 pairs of knickers, an eye mask and a bralette with lots more left to play with. 
Elastic/lace trims: here
Grace Panties Pattern: here
Recommended Eye Mask Tutorial: here

sib blog

Monday, 15 February 2016

Farmer's Wife QAL Blocks 43 and 44: Hope and Iris

This week it's blocks 43 and 44.  Jo Avery is  back as a guest blogger for Hope (block 43 p.202,  letter p.128), read all about it here!   This is my version - keep a look out for the partial seam, it's not too tricky if you pencil the seam allowance on the reverse of the central square.


Fabric credits:


Block 44, Iris  (p.203, letter p.50) is one of several rather pictorial floral blocks (like Daffodil) which I am not drawn to as much as the more symmetrical and geometric blocks:


Fabric credits:

Riley Blake Fabulous and Fancy-Breath in Yellow
Kona Violet
Kona Petunia
Darlene Zimmerman Grandma's Garden Bouquet in Country

{Please note:  For all fabric credits I have linked to my sponsors on items bought through them and elsewhere for anything that has come from other shops.}

The easiest way for me to piece blocks like these with lots of different shapes is to use freezer paper templates.  I was asked an interesting question by Rebecca about grainline in a comment on a Farmer's Wife post .  Even though the paper acts as a stabiliser in foundation paper piecing, I still try to maintain a consistent grainline where possible in a block.  It can't aways be done and sometimes bias edges end up on the outer edges- I usually sew a border ⅛" from the outer edge to prevent bias edges stretching.  I print the block diagram for the templates and add piece letters/numbers and grainline arrows.


I'm not totally rigid about grainline.  If I only have a little scrap of fabric, I'll fit the pieces however I can and if I'm fussy cutting, I'll sacrifice grainline for an image but generally I'll try and keep with the straight grain- lengthwise or crossways.  For this design, because many of the pieces are repeated in a mirror image, I often cut two pieces using one freezer paper template.  To do this, I fold the fabric wrong sides together, press the freezer paper piece on to the right side and cut out through two layers with a ⅜" seam allowance added around the edges (or ½" if you want more wriggle room creating two pieces that mirror each other.


Top tips for this block
  • Pre-cut all pieces using the freezer paper template method. 
  • Use a water based glue stick. I use Sewline, to stick the first piece of each section
  • Chain piece- for any repeated sections
There is a lot of bulk on the section seam where the stem reaches the base of the flower.  I sewed this seam in two runs working from the centre and folding seam allowances out of the way so they are floating and can move around.  It's still a little lumpy but I think that's unavoidable with so much going on at that point!  I pressed the joining seam open between ACE and BD and the base of the flower sits over this. 

Remember you can:
  • Hashtag  #fw1930sqal on Instagram and add photos to the Flickr group if you like to share there.  
  • For individual blocks, you can use #hopeblock and #irisblock on Instagram, Fat Quarter Shop and Angie are using these hash tags, #fw43hope,  #fw44iris.  I'm using both hashtag systems.
  • You can also copy and paste links to any blog posts you do on these blocks in the comments and I'd love to visit and take a look. 
I'm taking a break from Periscope.  I have covered so many techniques in the Persicope broadcast and I feel I am in danger of repeating myself, plus I have a change in my usual routine that means I can't always do the same time as easily so I'm going to leave it for a while.  You can find links to posts that cover all the main techniques used to piece these blocks here and that includes using freezer paper templates, English Paper Piecinghand piecing plus more!  Thank you to all of you who have joined me there- it's been fun trying out a new social media and meeting you all!
See you next Monday with guest blogger Jo from Life in Lists returning for her third post!

sib blog

Friday, 12 February 2016

The Maker's Atelier Drawstring Dress and a nifty jersey hemming technique

Following my Maker's Atelier Drawstring top which was a bit of an experiment in style and aesthetic , I went on to make the dress version.  I had a rare invitation for an evening out, the sort of thing which involves a small bar and dance floor.   My usual vintage style cotton dresses don't really cut the mustard for this sort of sartorial occasion and mild panic usual sets in when I realise that I should really get my legs out and stick a pair of kitten heels on.


 I had some  gorgeous slinky bamboo jersey bought locally which had amazing drape qualities plus a suitable belt bought from a charity shop so I thought this dress option would be the ticket.  As with the top,  stylewise it is outside of my comfort zone.  I usually wear A line skirts and avoid belts but sometimes you need to push your soft edges and try something different and I am happy with how this turned out.  It has a grown up elegance which is a hard look for me to achieve- I'm usually more free flowing and bohemian.


The dress pattern is an extended version of the drawstring top but as this fabric was a little thicker than the viscose jersey I used before, I wanted to reduce some of the fullness at the front (the back piece is flat.  Frances includes hacks and adaptation posts on the Journal section of the website so I  used this post, traced the top section only and took a wedge out of the centre front and then joined it onto the traced lower section of the dress, squaring off the bottom edge on the top whilst I did so.  Another change I made was to omit the buttonhole for the drawstring and just have a casing for the neck elastic.

I sewed this on my vintage Bernina 830 record using a walking foot.  The fabric has a little lycra content and is bouncy and resistant to sew with a  standard foot.  The manual comes with an excellent section on stretch stitches and although the machine dates back to 1974, it would be hard to improve upon it today.   Frances suggests a deep hem  for this dress and my first attempt at this was a little puckered: the width of the hem being turned up is narrower than the dress above so it needs to be eased in which lead to bit of a mess that did not improve with pressing.  I consulted my Bernina manual and found a solution...
  

I left the original hem stitching in place and hand basted the lower edge about ½" from the edge.  I then stitched with a slightly longer stitch and with a top thread (green in the picture below) which is held in gentle tension whilst the zig-zag sews over the top of it.  I had to be careful to lift the fabric so it didn't stretch whilst holding the thread.  When the zig-zag is complete, the hem is pressed with a damp cloth and the top thread is pulled out.  It was a great technique!  I then carefully unpicked the original hem, trimmed the excess fabric on the wrong side and pressed again with a damp cloth.


I cut a size 8 with front modification (as detailed above) and used 2.5m of 150cm wide fabric.  Raystitch sell a similar Bamboo/lycra mix.


I think this will get most wear in the summer with flat Saltwater sandals and a hint of a tan (wishful thinking).  It also looks good for holidays, easy roll-up packing!

sib blog

Wednesday, 10 February 2016

February at Village Haberdashery

There seem to be a flurry of floral themed fabric arrivals at Village Haberdashery so I'm starting February's visit with a look at some glorious colours and flowers, starting with Sarah Jane's Sommer range for Michael Miller.


It's hard to pick favourites, it is such a vibrant and uplifting collection of painterly prints.  


L to R: Tulip Tangled in Bloom, Garden in Bloom, Swan in Grass.
Aneela Hooey's first collection for Cloud 9 fabrics, Vignette, is full of florals and includes double gauze as well as quilting cottons.


For dressmakers, the big plus on the double gauze is that the Petal and Floret prints are multi directional which makes fabric usage a bit more economical. 

The newest Cotton+Steel collections have been some of my favourites ever.  I like the way each new set of designs echo something from the last whilst pushing the designs forward.  This is Melody Miller's Fruit Dots range, a delicious mix of themes, colours and prints.


The Bluebird range is amazing too.   I know the Black and White range has been popular but I find the monochrome look a little stark but the blues in all their different shades are stunning. 


Other companies are catching on to the blue trend, Michael Miller have an Indigo range.


Also fresh in the shop are Heather Lou's Closet Case patterns, including the hugely popular Ginger jeans:


These patterns offer a great set of capsule shapes-  Ginger jeans, Nettie top/dress,  Clare coat and Carolyn PJ's- any sew alongs for the styles are included each pattern link!

I've loved looking at all these gorgeous colours!  Enjoy x

sib blog

Monday, 8 February 2016

Farmer's Wife QAL Blocks 41 and 42, Granny and Heather

I hope you are all making good progress at your own pace in the Farmer's Wife Quilt Along.  We are now in week 21.  Justine of Sew Justine Sew is back as a guest blogger for this block.  She started her blocks a second time in a new colour way that she's much happier with.  You can see her Granny block here and read all her hints and tips.  This is my version of Granny (p.200, letter p.96):


Fabric credits:
Lecien Yarn Dyed tiny gingham


I found block 42, Heather, (201, letter p.39) relatively quick to sew once I had pre-cut all the fabric pieces.  I did make some easy alterations to the foundation piecing pattern: I changed the number order on sections C and E (details below) to maximise seam nesting.


Fabric credits:
Kona Sour Apple
Kona Carnation
P+B textiles: Toy Chest Florals, Trailing Blooms in Yellow
Riley Blake? Sewing text print- scrap from stash

I pre-cut all the block pieces using my usual generous rotary cutting measurements for foundation paper piecing.  These create seam allowances larger than ¼" so that your fabric pieces are larger than needed- if you like more wriggle room, cut even bigger!  I've referenced my colour choices- substitute your own.

Rotary Cutting for Foundation Paper Piecing
Pink
A1: cut (1) 2" square 
A3, A7, F3, G3: cut (4) 1 ¾" x 2" rectangles 
Yellow
A2, A4, A6, A8, F2, F4, G2, G4 : cut (8) 1 ¾" x 2" rectangles 
B2, B4, C2, C4, D2, D4, E2, E4: cut (4) 2 ¼" squares, sub-cut each in half diagonally to make 8 half-square triangles.
Green
A5, A9, B1, B5, C1, C5, D1, D5, E1, E5, F1, G1: cut (6) 2 ¼" squares, sub-cut each in half diagonally to make 12 half-square triangles.
Text
B3, C3, D3, E3: cut (4) 2 ¼' x 3" rectangles 

Top tips for this block
  • Pre-cut all pieces
  • Use a water based glue stick. I use Sewline, to stick the first piece of each section
  • Chain piece- especially identical sections
  • Nest seams where possible
  • Remove paper when needed- I leave it on as long as possible as it stabilises the sections.
  • Stitch around the edge of the block within the seam allowance to stabilise any bias edges
To maximise seam nesting, I changed the order of piecing on sections C and E:  
C1 became C5 
C2 became C4
C3 remains the same
C4 became C2
C5 became C1
Repeat on section E.  Sections B and D are unchanged.  Following this easy change allows your sections to fit together more easily at the seam points.  I pressed the final section joining seams open.


Remember you can:
  • Hashtag  #fw1930sqal on Instagram and add photos to the Flickr group if you like to share there.  
  • For individual blocks, you can use #grannyblock and #heatherblock on Instagram, Fat Quarter Shop and Angie are using these hash tags, #fw41granny,  #fw42heather, I'm using both hashtag systems.
  • You can also copy and paste links to any blog posts you do on these blocks in the comments and I'd love to visit and take a look. 
  • You are welcome to watch and join in the chat on Periscope at 2.30pm GMT today, I'm periscope.tv/@verykb.  It will be available for 24 hours to replay before it disappears! Link will be in my twitter feed @verykb and I'll post on Instagram and twitter about 15 minutes before it goes out.  
Please note:  I have linked to my sponsors on items bought through them and elsewhere for anything that has come from other shops.

Next week, Jo Avery will be back with me as guest blogger. 

sib blog


Monday, 1 February 2016

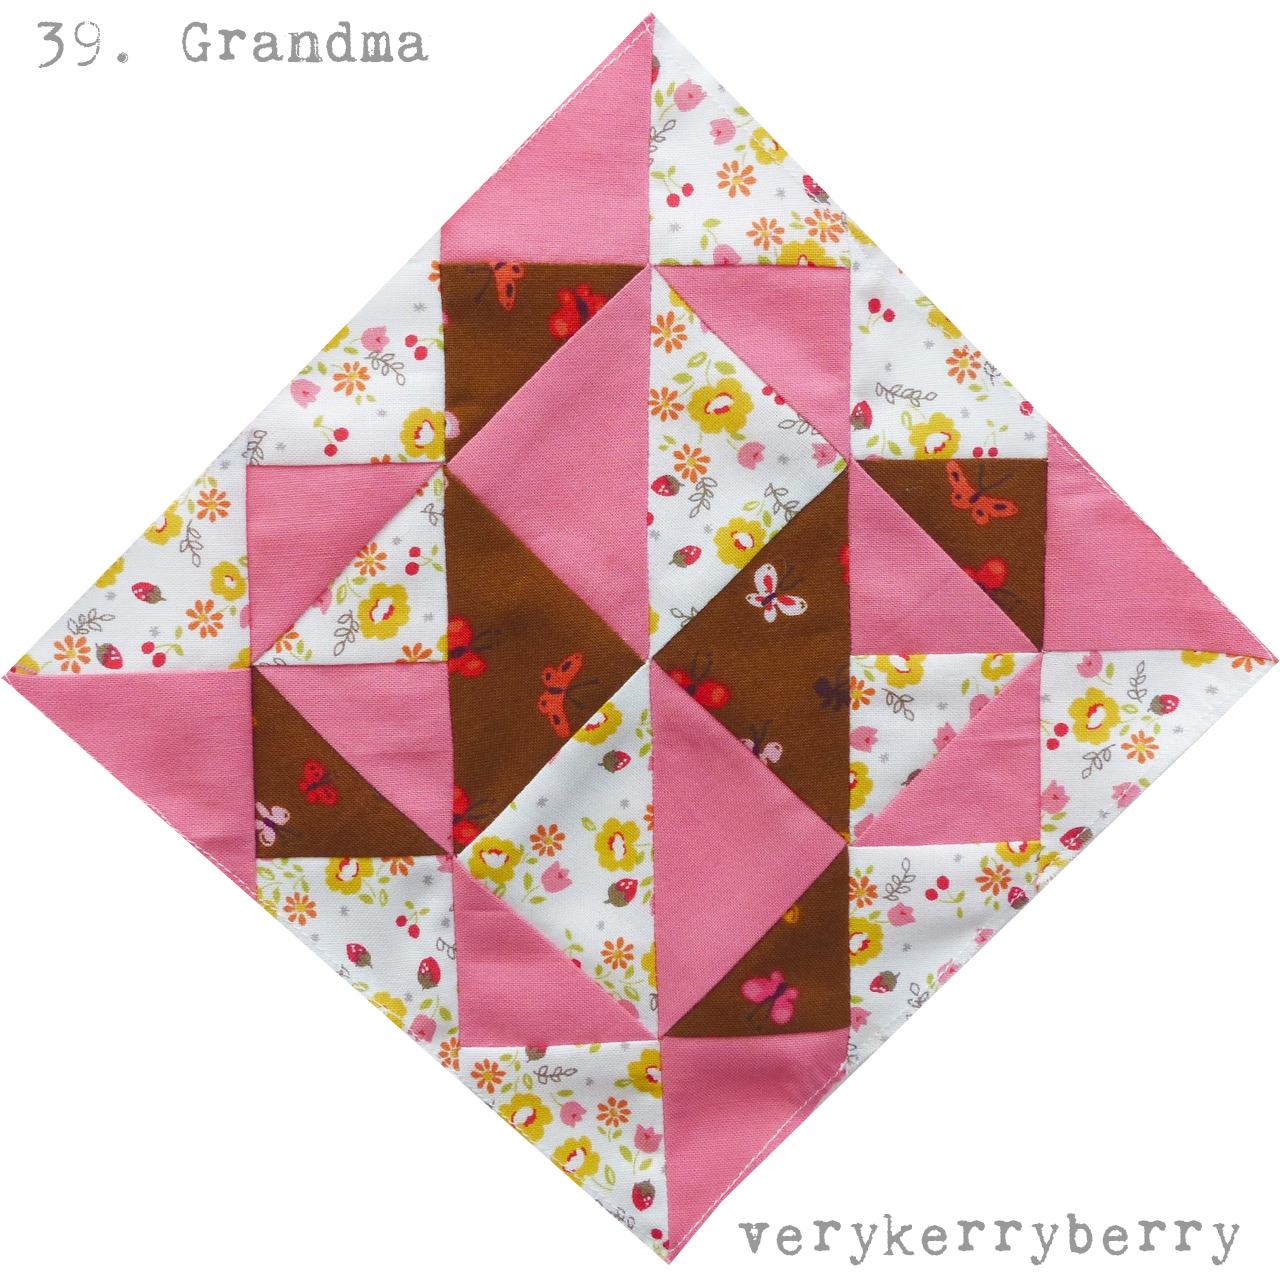
Farmer's Wife QAL Blocks 39 and 40, Grandma and Grandmother

We're in week 20 of the Farmer's Wife Quilt Along and this post covers blocks 39 and 40.  Melinda of Quirky Granola Girl, who shared her original Farmer's Wife quilt at the beginning of the quilt-along, is guest blogging for this block.  You can see her Grandma block here and she's written a very interesting choice about her colour experiments and value for this QAL.  Here's my version of Grandma,  block 39 (p.198, letter p.22):


Fabric credits:


Block 40 (p.197, letter p.144) is Grandmother and there is a far easier to sew the block together than following the foundation paper piecing instructions from the book.   Amanda from Patchsmith made this block a few weeks ago found the same thing.  You can read her changes here  she also adds a handle to the basket and kindly provides a template for this on her blog if you wish to do the same.  I left mine without, I welcomed the chance to have a bit of space for this gorgeous Heather Ross floral.


Fabric credits:
Windham Tiger Lily Rose Blush by Heather Ross
Kona Sour Apple
Kona Citrus

The book instructions  for foundation paper piecing use an inset seam which is easy to omit.  I didn't use the original pattern and instead I printed out the block diagram (if printed at 100% it should come out at 6" square) and redrew and labelled the different sections.   The example below is an illustration and is not to scale.  Instead print the block diagram from the CD and add the lines and labels as below.


Cut along the blue lines that mark the different sections A, B C, D and E.  You can add ¼" seam allowances around the outer edges of sections A, B, C, and E but these will have to be allowed for on the other edges when you add the fabric pieces. 
Precut the fabric pieces using the measurements below, I've included my colour choices for clarity but substitute with your own.  These are not precise, instead they will give you the larger seam allowances that provide the necessary wiggle room in paper piecing!

Rotary Cutting for Foundation Paper Piecing
B4, C4: Cut (2) 1 ¾" x 5 ¼" rectangles
A3: Cut (1) 3" square and sub-cut in half across the diagonal to make 2 half square triangles.  You will need 1 of these.
B2, D2, C1: Cut (3) 1 ¾" squares in yellow
B1, C2: Cut (2) 1 ¾" squares in green
C3, D1, D3: Cut (2) 2 ½" squares and sub-cut in half across the diagonal to make 4 half square triangles.  You will need 3 of these.
A2: Cut (1) 2 ½" squares and sub-cut in half across the diagonal to make 2 half square triangles.  You will need 1 of these.

Top tips for this block
  • Pre-cut all pieces
  • Use a water based glue stick. I use Sewline, to stick the first piece of each section
  • Chain piece- the four sections are identical
  • Nest seams where possible to match seam points
I sewed up sections A, B, C and D adding on the extra ¼" seam allowances where needed. My labelling is slightly different from the block diagram, I changed it a little for the diagram to create better seam nesting for you!


Join A to B and press seam open.  Join C to D, pressing seam open.  Join AB to CD pressing seam open.  


Use the completed ABCD triangle as a template to cut piece E.  Place it right sides together on top of fabric for E and cut out with a rotary cutter.  Whilst the two sides are still together, pin along the diagonal and stitch the joining seam.  Press towards E.  Carefully remove paper, starch if desired and press.

Remember you can:
  • Hashtag  #fw1930sqal on Instagram and add photos to the Flickr group if you like to share there.  
  • For individual blocks, you can use #grandmablock and #grandmotherblock on Instagram, Fat Quarter Shop and Angie are using these hash tags, #fw39grandma,  #fw40grandmother, I'm using both hashtag systems.
  • You can also copy and paste links to any blog posts you do on these blocks in the comments and I'd love to visit and take a look. 
  • You are welcome to watch and join in the chat on Periscope at 2.30pm GMT today, I'm periscope.tv/@verykb.  It will be available for 24 hours to replay before it disappears! Link will be in my twitter feed @verykb and I'll post on Instagram and twitter about 15 minutes before it goes out.  
Please note:  I have linked to my sponsors on items bought through them and elsewhere for anything that has come from other shops.

See you next Monday with guest blogger Justine from Sew Justine Sew.

sib blog