Sunday, 21 April 2013

Aeroplane Bag Making and a giveaway!

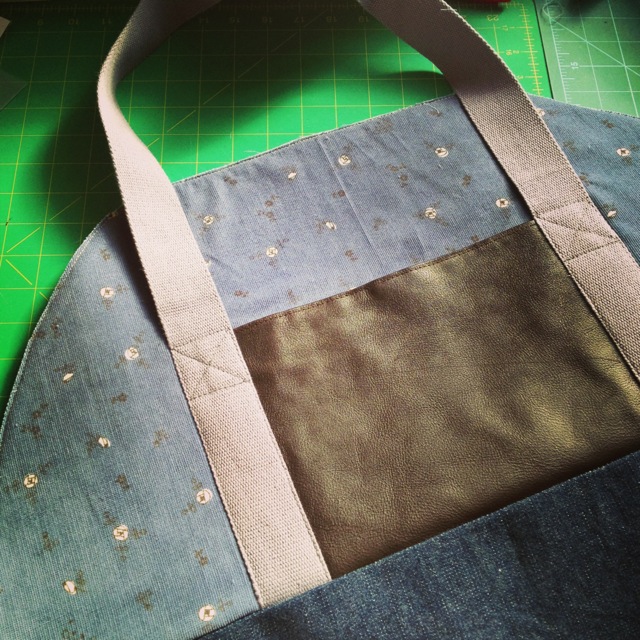
This weekend I got started on Sara's Aeroplane bag patten.  I have picked a range of textures with a vintage flowery Jonelle curtain for the lining, a Japanese corduroy for the main body, a denim (not pictured) that I got from the car boot sale and some leather that was once a couple of Marks and Spencers cushions (lucky charity shop find).  The cushions also yielded two lovely brass zippers and I had a navy zipper that I didn't use on another project.  The cotton webbing was from an ebay seller- I tend to choose webbing rather than making my own straps; saves time and I prefer the finish.  I Instagram the process (verykerryberry) as I go as it is such a great way of photographing the process and having a little company.
Sara was kind enough to send me some 'Soft and Stable' to try out and it is great stuff.  Foam construction with a fine knitted layer on both sides and very to cut and sew through.  I can see why she recommended it as it gives instant structure but its buly is quite manageable and it is sew in so no worrries about wrinkles.  I skipped the lightweight (Shape Flex/Vilene G700) interfacing for the lining and body of the bag as my fabrics were thicker than quilting cotton.
I was planning to have a leather base to the bag but I didn't have enough so I went for a front pocket instead and that was probably a good thing as leather is tricky to sew and I didn't want to invest in a specialist needle as I don't plan much leather sewing!  I used Superior 100 titanium needle (Justine stocks these in UK) on everything so far which with a Horizon AccuFeed Dual foot did power through.  
Clover Wonder Clips are the best invention ever.  Eternal Maker have just started stocking them.  They are great for for bags . Useful for binding too- I used them for my glue binding tutorial- but outstanding for holding all those layers when making a bag and leather cannot be pinned.  You can also see washi tape holding the straps onto the pocket ready for top stitching down- washi tape is aonther sewing room essential-for those that don't know, it is decorative paper tape like masking tape and peels off easily, great stuff!
You can see how the clips hold the multiple layers in place.  I used a dab of Copydex on the heavy interfacing to keep that lightly attached to the denim layer before top stitching on the seam at the front held it in place.
The front so far,(and the other finished without pocket).
This has been my friend: the pressure dial on my machine.  It adjust the pressure from the presser foot.  The default is 7 but for thicker layers I reduce this to 5 and 4 for the thickest and it works brilliantly.  I also do this when hemming knits with a twin needle and it stops them stretching out of shape. 
One inside pocket made, the other to follow.  So far an excellent pattern.   The insructions are clear and well paced.  I am not surprised!  Sara really does know what she is talking about when it comes to interfacing and structure of bags!  Another Aeroplane bag maker (Elizabeth (Don't Call Me Betsy) described this as like making a zippered pouch and it is exactly that but as it is on a much bigger scale it is a lot less fiddly! There aren't many pattern pieces as some pieces are rotary cut and the lining is cut using the front and back sections that you have sewn as templates for a perfect fit.  Now to sew pocket two, darts and the external zipper (that is the bit I am slightly apprehensive about)!  My K charm was from Ayumi but there are lots of brass charms available on Etsy and ebay.
Giveaway time!
 Wanna make one of your own?  Or maybe another of Sara's bags?  Leave a comment and I will pick 3 random lucky winners.  You have until my next bag post to get your entries in. If there is no email in your contact details you will not be able to win so check before you comment or leave a recognisable address in the comment kerrykit (at) yahoo (dot) com- you know the sort of thing.
Each winner will receive 3 PDF bag patterns of their choice- go look, drool at what you can pick and marvel how Sara can design in 3D!
sib blog

Thursday, 18 April 2013

Baby Love at the Village

Annie at the Village Haberdashery has had the most special of deliveries with her new son arriving last Friday.  Huge congrats to her and her family!  I couldn't resist choosing baby suitable fabrics bundles in her shop for this month's post.  All would make wonderful baby quilts, burp cloths and tiny booties to welcome a new baby!
A bright and vibrant selections of Monaluna's retro Cunban inspired 'Hava', in a' Boy' bundle.  You will find a 'Girl' bundle here.

 
Sarah Watson's gorgeous new Indian Summer (Art Gallery)- imagine the silky feel of this collection in a baby quilt,


Everybody knows a 'cool' family- designers maybe?  Trend setters? Fashionistas?   WHat better than Comma!  Great colours and graphic prints, perfect.


I couldn't resist a bit of forest cuteness with Scamper.


A Liberty Stile bundle, all ready to make an heirloom quilt!


Simpatico by Michelle Engel Bencsko, in the sale too so a definite bargain.  I have some of this and it is the most wonderful quality, fine, light and strong.


Cloud 9 Maman and Nursery basics- a mix of sale and non sale and again amazing feel and quality.  Many of these will mix with the other bundles, perfect with Simpatico (a Cloud 9 range) but I think these would work with Indian Summer too, the colours look like they would blend in beautifully.


Cot/crib sized batting can be found here.  I used  Quilter's Dream Cotton for the Baby Bear Paw quilt for the first time and I loved it.


A light low loft (thickness), lots of drape and very easy to machine through.  I use spray basting for baby quilts and it worked a treat with this.  I used warm and natural as my goto in the past but I will be buying Quilter's Dream instead.  I found it really easy to handle when cutting out and layering the sandwich I am trying out a Quilter's Blend soon for a quilt that has waited a while for quilting, I might even try hand quilting which tends to be easier with a blend and I will report back. when I finally get round to it!  Congrats again Annie xxx
sib blog

Monday, 15 April 2013

Strawberry Friends Forever...story of a quilt

You know things have been a little hard here, events since December etc etc- I am not going to bore you with the details.  For the last few months I have had many messages of support for which I am dearly grateful.  I have had cards, messages and gifts... so many gifts that I felt I couldn't keep shaing them here as it would just seem like my life was a succession of presents in the post!  But there have been so many, I have even commented to friends and it was kinda strange in a lovely way.  And then Penny told me that she wanted to Skype with me becuase she was going to send me something funny.  A box arrived and I thought Penny might have been very bad and either sent me one of her quilts or made me a blanket covered in bras and pants fabric or something funny like that!  Oh I was so wrong, it was all a ruse and they all knew, except me, that this was inside...
Twenty quilty friends had each made my Sew-Ichigo Strawberry block and a bigger version of the traditional Friendship block (I made a pillow of this block).  They used fabrics they knew I would love, fabrics we have swapped and shared, precious and collectable fabrics of my dreams.  They stitched their names and Penny put them all together used a gorgeous green sashing (Topography from Architextures and a Suzuko Koseki daisy print border and binding.  She used my new glue method so she could machine bind and I had even commented on her binding on Instagram- "Nice binding Pen, what's that quilt?"  but she fobbed me off and I believed her.  And then she sent me an invitation to the private Flickr group where they had been plotting Strawberry Fields for the last few months, including a rota where they took it in turns to send me gifts hence the constant stream of parcels!  I had no idea, not a clue!
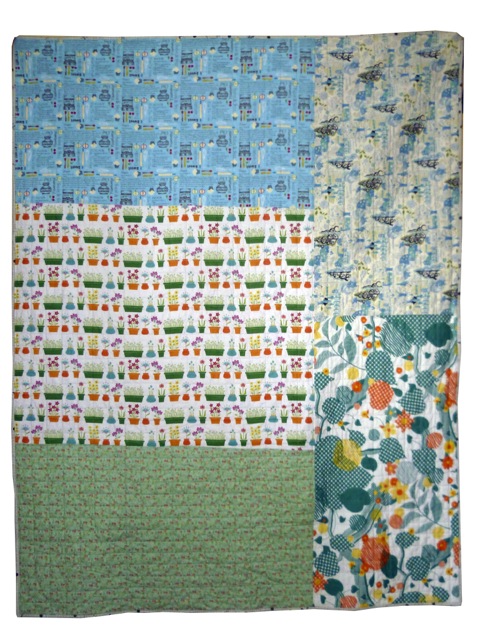
And the back is beautiful too...
This quilt is big, big enough for me to (reluctantly) share it on the sofa with D and L.  Too big to phtograph in my tiny house so I took it to show my friend Kathy and she and her son held it up for these pics and let me drape it over their couches in the sunny living room.

I couldn't take pics of every single one as it would make the longest post ever and maybe break the internet but here are a few random ones as we moved everyone out of the way on a Sunday morning at Kathy's house.
I can see Laurraine's deep dark strawberry, and Kristas's pretty siggy block
 I can identify these by fabric alone.  The colours drop hints, and the choices really do tell me who made what. Amy's bright red retro Strawberry next to Nova's Umbrella Prints raindrop strawberry.  Lynne's strawberry made from one of her favourite fabric ranges (Sandy Klopp's Punctuation) next to Leila's pastel Japanese prints
Angela's siggy block, I knew it was her fabrics straightaway!  I think the black Little Folks 'Buttoned up' Anna Maria Horner print gave her away!
Ayumi's sweet siggy which has one of my vintage fabrics in, a peek of Chase's Denyse fabric strawberry top right and Amy's siggy block below which has the Sevenberry floral that I still go nuts over.
Sonja's juicy grid strawberry, Lori's fussy cut friendship block,  Marit's strawberry in divine Kumiko Fujita sewing notions print, and Charise's vintage sewing inspired print choices.

Brioni's pretty repro fabrics and sweet embroidery.
Penny's perfect stitches and snippets of Garden Party, Amber's strawberry with the cutest leaves
 Doe's feedsack strawberry ( I swear she has the best stash ever), Megan's fussy cuts- the chicken in there makes me laugh and the scale of her prints is perfect!

A glorious picture with the sun pouring in...
Elnora's wonderful Japanese prints in her blocks- she has such great taste in fabrics. 
And then the icing on the cake,the bit that made me cry, along with the whole emotion and kindness of it all- Penny's embroidered panel, 
"more than kisses, quilts mingle souls; For thus friends absent speak"
Penny didn't know this, but John Donne, the writer of the original quote this is based on, is one of my favrouite poets.  I studied English Literature at Uni and Metaphysical poetry was my love.
The time, effort, thought, love, care, skill they poured into this project amazes me.  I have had separate conversations over the last few months with the people in this group, they have shared their own hardships and difficulties.  Quilters are an empathetic bunch and behind that often lies heartbreak, dealing with loss, health problems, family troubles, and the quilter ready to make a big warm beautiful blanket to hold and comfort those that are hurting.  Despite my best efforts I have felt so negative, ineffectual and down recently but the gesture warmth in this quilt and all those many packages has made me feel differently about myself and I feel well and truly loved.  These friendships run deep, I will be there for these women like they are there for me. Miles make no difference.
sib blog

Thursday, 11 April 2013

Something I made Earlier...

 I am attempting to get some sewing done whilst off work for Easter holidays but it doesn't seem to be happening at the moment so I will comfort myself by wearing something I made earlier a couple of weeks back.   I made Simplicity Amazing Fit 1717.  It is the first time I have tried anything from the Amazing Fit range (Simplicity are 50% off at the moment) and I really liked the pattern- a good maxi skirt can be hard to find.  
You choose your fit - curvy, narrow etc and there are extra inches built in to the pattern pieces to allow for fitting.  The instructions explicitly encourage you to fit with basting/long stitches temporarily holding pieces together whilst you try on and adjust so no need to make a muslin or toile- the only bit I would advise you to test first is the waistband to give you the idea of which size to cut.  The fabric is Denyse Schmidt Chicopee Cord from Annie at Village Haberdashery- beautiful soft strokeable fabric.  I made this out of 2 metres with a little creative cutting- the waistband is cut cross grain.
I added a flat binding to the waistband following this excellent tutorial at Coletterie and tweaked the pockets.  I think the original large long pockets could end up looking a little strange and as I like to use pockets a lot I thought flat ones would end up bagging out so I adapted the pattern piece to make a pleated patch pocket with a bound edge.   You can find some very helpful pocket tutorials for adding your own pocket choice here. The floral Shellburne Falls print works perfectly with the Chicopee, Denyse Schmidt's fabrics from different ranges often work together subtly without being too matchy matchy. 
My usual helper came out to play, hi Lottie!
And rewarded with neck rubs!
sib blog

Thursday, 4 April 2013

Plans

It is a rare day when I say I am bored and I have nothing to do.  I like to be busy, very busy, even when I feel I am getting nothing done I like to plan future projects.  Sometimes they happen fast, others are slow burners but most come to something, I rarely abandon them all together.  And having so many friends designing great patterns too keep me well booked up with ideas.  Sara at Sew Sweetness has been developing her brand and range of bags.  Her recent Aeroplane bag had me hooked.  A spacious weekend away type bag- I am making one for retreat to go with my new wheely Cath Kidston Suitcase, bargain price on ebay if you need one.  Having decent luggage must be a sign of being a grown up- I have lived a life of rucksacks and oversized Head bags so a decent case and a handmade overnight bag makes me finally a grown up!  Once my supplies arrive, this is going to be sewn and I will share my progress with you along with a giveaway- bide your time, its coming soon!  Sara is developing clothing patterns too- ahh!  Cannot wait for these!
Christina at The Sometimes Crafter has been busy and found the time amongst all her activity to draft a great new paper piecing pattern. 
All the instructions are there to make a table runner but the squares within squares feature could be used for pincushions, pouches, anything really and the pattern includes all the different sizing used so no need to reduce/expand the pattern pieces.  Ideal for those who are maybe a little wary of paper piecing too as all the piecing is done in a single section for each square.  I think I maybe trying a pincushion or a zipper pouch with these, maybe with something like Liberty- I have some more thank you goodies to make.
Talking of Liberty, I was lucky enough to win an e-copy of this wonderful book from Stash Books at Kate's blog.
There is a huge number of projects in this book- pretty much all you can see on the cover- the picnic quilt, baby dress, woman sitting on rug dress ( quite fancy making this one), neck tie and lots more inside- bags, pincushions- a great variety. There are full size pattern pieces and with the ebook they are ready to download and print at home too!  It also includes the Marcelle quilt, you can see Kate's progress so far here and Lynne's here.
And more Alexia Abegg, I just ordered her Diamond Ring Quilt pattern from Annie at Village Haberdashery.  I have a little plan for this- will share more soon but I was so taken with it from Quilt Market photos that it stuck with me as a must do- I do love a circle on a quilt! 
Plans for the next few weeks: arrived in under 24hrs! from @VHaberdashery
 I have also got into sewing knits recently with a bit of success- will show you soon but the Briar is a great shape and Megan includes so much info on variations on her blog.  The pattern comes in thick paper which makes handling and tracing a lot easier.  Her pattern presentation is my favourite amongst all the indie designers. 
Tracing Penguin & Fish Lion kit from @eternalmaker
 We are doing a bit of visiting of various peeps over Easter so whilst I catch up with hand sewing and another bunny, L is going to be working on a little 'Penguin and Fish' Lion embroidery kit from Eternal Maker.  This kit comes with everything you need- hoop, thread, needle, designs, instructions.  I traced onto the fabric using a Sewline pencil and it is ready to stitch. She wanted something simple and easy to do and this is perfect!
And finally, Ayumi's book arrived here in preparation for the Patchwork Please sew a long!  You can see more details here. 
So excited!!! Ayumi's book just arrived!!!
I don't know what I will be making yet but I would be happy making anything from this book- it is a joy from start to end!  I am going to make this quilt anyway for L's birthday because we both love it.
Planning this now for daughters birthday- couldn't help myself! @ayumills
That should keep me occupied just for a little while.  What about you... plans?
sib blog

Wednesday, 3 April 2013

Machine binding with a little help from glue

I generally make quilts for using.  I don't enter my quilts in competitions or displays so I like my binding to be strong and resilient.  I hand sew small item bindings and any that have a single binding but I machine sew my quilt bindings and I like that to look neat.  Rita's machine binding tutorial is my go to for method and I generally use a 2.25" binding, sometimes wider.  For the Baby Bear Paw quilt I decided to try a few new things.  Firstly, I used a Sizzix Bigz XL die for cutting 2.5" binding strips.


I had a beautiful binding fabric all ready to use, Art Gallery voile in Praline Honey (Village Haberdashery stocks it here).  This has a silky light texture and is a beautiful rich golden colour.  I wasn't sure if the Sizzix would cut voile cleanly but it powered through with no problems.  This die is extra long and cuts the length of the strip and not the top and bottom so it cuts folded 44" fabric into 44" long strips.  Voile is wider width so I needed to clip the end of these strips to finish them off but it still cuts far more accurately and quickly than I can on a tricky fabric like this.  
As the fabric is lighter weight a smaller size machine needle helps, 70 Microtex are great for voile and lawn.  For joining the binding strips I used a leader to stop the machine from swallowing the edge of the fine fabric.  


A leader is a little scrap of material folded over, placed under your machine to start a seam.  You stitch the leader and then keep sewing onto your seam- my machine doesn't need this help on quilting weight but anything fine or slippy benefits from this.
I stitched the binding on to the front of the quilt as usual, but on the back instead of pinning like crazy so I can machine from the front I used a little basting glue. I used Roxanne Baste it which is a temporary fabric glue with a long fine tip so tiny amounts can be applied.


 A fabric glue stick doesn't work well on a big sticking job like this.  The applicator on the Baste-it is very helpful at getting the glue exactly where you want it.  I worked on around 24" at a time and applied glue to the quilt seam allowance.


Clover Wonder clips are perfect for holding down the binding until the glue dries.  I used a pin for each corner.


Once tacked down with the glue I flipped the quilt to the right side to stitch in the ditch just catching the binding on the back.  You do need to make sure that your spool and bobbin threads match the front fabric and binding fabric.


This really sped up the binding process. it meant no unpicking and re-sewing which is what I usually have to do especially at the corners.  The corners were the best bit, it made for excellent corners!  This is the binding from the back (top of pic with label) and front, (bottom of pic).


I hope this helps any of you who like to use machine binding.

The Baby Bear Paw quilt plan is here
Making the blocks is here
Completing the top is here
Spiral quilting is here