Showing posts with label wiksten. Show all posts

Wednesday, 18 September 2019

Wiksten Shift Dress: Long Length in Double Gauze

I tried to resist the Wiksten Shift Dress pattern, it was all over social media a few months ago and I wait to see if it's just a passing fancy or a style I think will suit me as well as a style I would actually make, wear and enjoy.   I recently updated my desktop computer and as I saved files and swapped data over, I could see many PDF patterns that I've bought and never sewn.  In the end,  I'd seen so many people on Instagram looking great in the midi dress version that I bought it as a PDF.  It is pricey (another reason I was resisting) but now I've made two, I can see why.  It is deceptively simple, but carefully and thoughtfully designed.  


I made a size 0.  I ummed and ahhed between sizes 0 and 2 and as soon as I cut the PDF pattern out and did some measuring, I could see that the smallest size would be the best match.  I'm 5'5" and my measurements fell between sizes 0 and 2.   There are detailed size recommendations and examples here.  On the dress, the back section under the yoke is gathered to create the extra volume- that gives the dress it's movement and ease when walking so there's no sense of restriction.  The dress front is much narrower so creates more of a column effect when viewed from the front.  I made a couple of changes- I did the forward 1/2" shoulder adjustment from the Wiksten journal (on my second, I also made a small high round back adjustment of a scant 3/8" which stopped the neckline falling back at all).  My sleeves are about 1/2" too as I accidentally lopped 1/2" off the paper pattern when sorting the shoulder adjustment out!  I corrected this for the next dress!   I also added some interfacing to the waist tie, just a small section along the centre back- it adds a little more body to the area that lies against that part of your body (see pic below)...


Top sewing tip coming up:  I added a bar (from small hook and bar fastenings) on the inside of each split, right at the top (example below is on dress two).  This adds some strength to a vulnerable area and it has worked well as I've worn both dresses a lot with no wear on the splits.


Otherwise, everything else is as the pattern stated.  I used a double gauze that I bought from Stitch at a show.  This had a standard gauze front layer and a loose weave underlayer which meant it frayed like crazy!  But it is soft, opaque and quite drapey so it suits the style well.  


Seeing the dress without the belt shows a little more of the shape- the straight front and the fuller back. I sometimes wear it unbelted if I'm working from home or it's the latter part of the day and I want to relax. 


Like Jenny's other patterns, the design is timeless and there is a top option (the back narrower) which I can see myself making too.  I have worn this version and the second (in Nani Iro Bird's Eye double gauze) so many times that buying the pattern has definitely paid off.  I took both dresses to London for a weekend away last month and they were perfect for travel.  I could roll them up in a holdall on the train and then happily wear them for a day of sightseeing or with a close-fitting cardigan for meals out in the evening.  A classic summer into sunny autumn dress!

Wednesday, 4 April 2012

Post 7 -Tova Collar, and your Tova is complete- Linky Time!

Are you still there?  Still sewing a long with your Tova?  The end is in sight and it is an easy finish.  this post is all about the collar and links in with stage 7 of Jenny Gordy's instructions.  I rounded my collar (details on how to here).  When you attach the collar, the important thing is to check that the front edge of the collar extends 3/8" beyond the front edge neck line- you can see the handy measuring gauge checking mine out.  The basting stitches below are not for the collar but for my double thickness inset section.  
(**edited to add**)You could staystitch the collar as Mel suggests here.  Stay stiching is just stitching inside the seam allowance- 1/4" from the edge would be idea around the neck line to stop it stretching.  A smaller stitch is a good idea for this.
I was incredibly lucky with the pattern matching, I centred the collar on the  fabric stripes just as I did the back section and they all matched up nicely!
When you attach the second collar piece it helps to press the 3/8" seam allowance up just at the ends of the collar before you start pinning.
With the curved end collar the only difference is that you are stitching a curve around the collar end rather than a straight line, pivot and continue round the rest of the collar.  It helps on both versions to use a really small stitch for the ends of the collar.  You can use a usual length stitch for the rest of the stitching but the collar end seams will be trimmed back and small stitches gives the seam additional security. 
You can see how the pressed lower collar edge gets sewn into the seam so that when you turn the collar through it should be just covering the seam.  For the straight edge collar you need to trim the corner but for the curve you need 'clip the seam', and because this curve will face inward when the collar is turned the right way out, you need to cut notches out of the seam.  These will close up and allow the seam to curve round smoothly.   You can reduce the seam a little too, I trimmed mine down, then cut the V shapes out.
You can hand sew the collar edge down or pin carefully and stitch close to the  edge of the fabric all around the collar.  And then your Tova is done!  
I am just starting to see sew-a-long Tovas pop up but I would love it if you could link your Tova here so I could see them all!  I would like to thank Jenny Gordy for such a great pattern, I can honestly say I have not seen a 'bad' Tova!  And thankyou for you all for sewing with me, it really does make it a lot more fun- now get your Tovas out.  I have given you a nice long 6 weeks to get your link in!


sib blog

Sunday, 1 April 2012

Tova Sew-a-long post 6: Setting the Sleeve

In this post we will assemble and set the sleeve into the armhole and add the cuff.  In Jenny's instructions this is stage 5 and 6.  
Assemble sleeves
This is easy, stitchithe sleeve seams right sides together and finish the seam edge- serge/zig zag/overcast or pinking shears.  Look at the notches around the armhole you transferred from the paper pattern (they looked like 'T' on the pattern), the double notch indicates the back of the sleeve, the single notch is the front.  Press seam towards the back.  Repeat with other sleeve so you have a left and a right sleeve.
Cuff
As I lengthened my sleeve I made my cuff narrower because my wrist is thinner than my mid arm where the sleeve would usually finish.  I recommend that you stitch the cuff together at the short seams so it is a loop like a bracelet and check for fit, I made mine smaller by 3/4"  at each end. If you have shortened your sleeve and want to add a cuff it will need to be bigger as your arm is wider at the top!    Prepare the sleeve end by two rows of gathering stitches just like we did for the placket.  I did mine just over 1/8" and 1/2" from sleeve edge and I sewed with the wrong side facing upwards.  Gather as we did the placket, evening out the gathers with a pin and matching the notches with the cuff.  When you are happy with the fit, knot the gathering thread ends and pin all round with right sides together.  You will need your free arm on your sewing machine and I found sleeve end/cuff too narrow to completely fit over my machine free arm so stitch slowly so as not to trap any fabric.  You can see my seam stitching between the gathering threads.
Finishing the cuff from this point is very similar to binding a quilt!  Remove the gathering threads, fold the cuff over so that the bottom edge covers the seam by just over 3/8.  Tuck  3/8" under at the bottom of the sleeve press and pin in place.  This folded line should just cover the seam.  You could hand sew the cuff to the sleeve- it is the inside of the cuff so your stitches will be hidden, or you could sew right next to the folded edge through the cuff.  You can see mine below on a sleeve board.  Sleeve boards are very handy items, useful for bag, purse and pouch making as well as clothing
Setting the Sleeve
At the top of the sleeve, stitch two lines of gathering stitches between the notches at the sleeve cap- look at Jenny's diagram in the instructions if you are not sure where to stitch.   I stitched 1/8" and 1/2" rather than the suggested 1/8" and 1/4"and I had the wrong side facing as that is the side you will be working with when you pin the sleeve in the armhole.  You will only be gathering very gently as there is only a little fullness to reduce so you will hardly see any gathers in the fabric.  The gathering here  is to ease the sleeve in and give you room for your shoulder to fit in rather than a style feature.  At the underarm area there are no gathers.  Your Tova top should be inside out, make sure you have the right sleeve for the right armhole and the left for the left armhole- use the notches to work this out, the double notch is on the back.  The sleeve should be the right side out, place it the through the arm of the Tova so right sides are together.   Match notches and pin working on the inside of the sleeve. When you come to stitch your seam you will start on the inside with your machine.  Make sure the sleeve seam is lying to the back of the sleeve (see bottom of the photo below)  
 I found the easiest thing to do was to stitch the underarm area first where there are no gathers.  I stitched the usual 3/8"seam and then I stitched just next to this line within the seam allowance. This extra line of stitching reinforces an area of strain- just imagine lifting your arms up and the tension placed on this seam.  You can just see the extra line of stitching in the picture.
Then I stitched the rest of the seam, starting my stitching from where the underarm stitching finished and stitching right round, between the gathering stitches until you meet where the underarm stitching started.  Go slow, there is a lot of fabric and it is easy to trap a little underneath- just like I did, see the pic below!
Once you have checked all round the seam to make sure there no pleats or trapped fabric, remove the gathering stitches.  You can then finish the seam edge by serging/zig zag/overcast or pinking shears.

We are nearly finished!  Back mid-week with the collar to finish the Tova!
Remember you can add you pics to the Wiksten Flickr group
sib blog

Wednesday, 28 March 2012

Post 5: Sewing shoulder, side seams and hem

Easy peasy today which is probably a relief if you have just made it through the placket!  This is stage 4 and 5 of the pattern instructions.  Sewing the shoulder seams and side seams and your first opportunity to try on.  There is not much I need to say as you are basically sewing straight lines here.   I did find I needed to stretch the shoulder back sections to get them to fit to the front sections but as there is a bit of bias in the fabric here that was easy enough.   My shoulder seam is below, after seam neatening but try on for fit before finishing your seams!
In terms of altering fit by the seams, there is only a little room to play with in the seams but on the shoulder and the side you could move out by 1/8 to make them a little larger and inward by as much as you need.  Finish your seams by serging/zig zag/3 step zig zag- this is good for fine fabrics like lawn and voile/ pinking sheers.  Jenny suggests stitching the hem now, I left mine until the end so I could get the whole effect of the style before I changed it.  I ended up taking off about 3 inches on each Tova but  I don't suit a longer style top so I was expecting that
And the hem is easy, I tops stitched on the edge side close to the fold.
I'll be back at the weekend and we will be setting the sleeves and finishing the cuffs- both easier than the inset!
sib blog

Saturday, 24 March 2012

Tova Sew-a-long Part 4. Sewing Placket and Inset

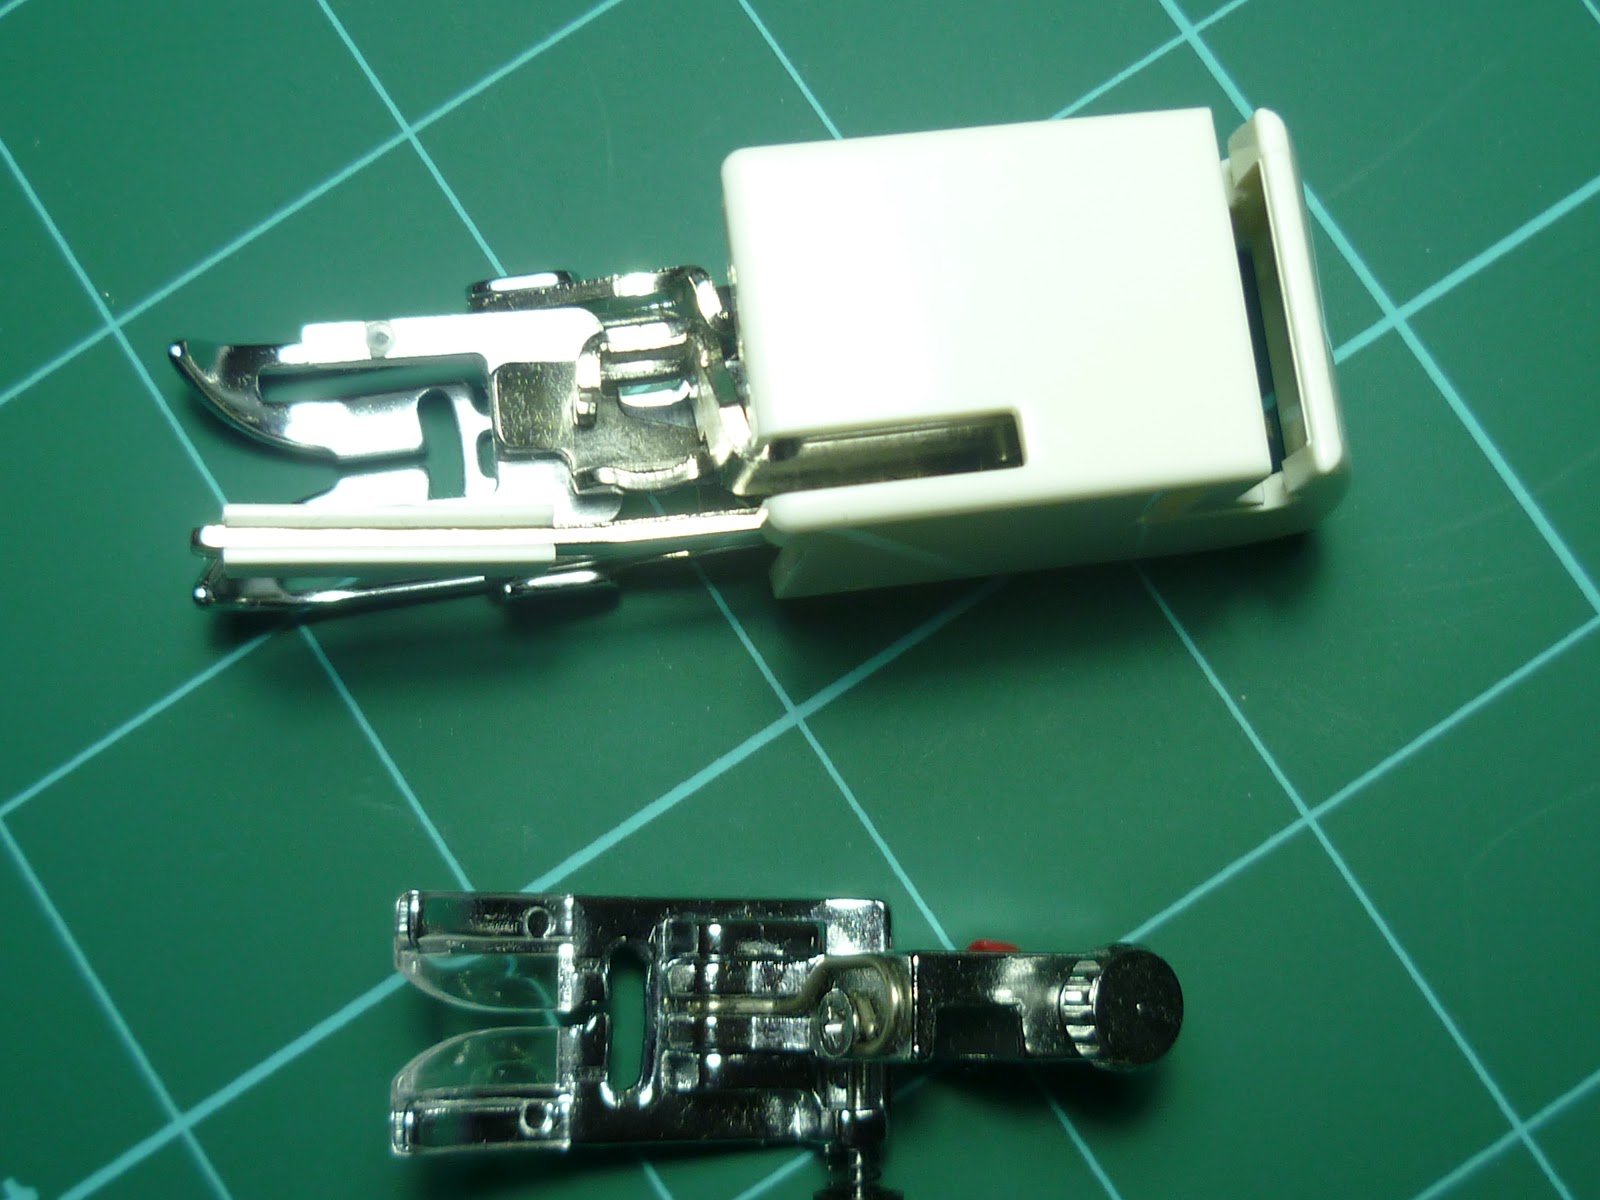
The first sewing section!  Jenny's instructions are clear and her photographs are helpful so refer to them at all stages of construction.   Jenny also gives advice on altering the bust size of the Tova here. I am doing is going into greater detail on the trickier bits.  The seam gauge that she shows in her pattern pictures is very helpful throughout.  I used a walking foot on my machine for both Tovas.  The benefit of this is it pulls both the top and bottom fabric layers through evenly.  You could use a standard presser foot too.  My walking foot is at the top and presser foot below.
 The same feet but from a bird's eye view.
1. Sew Placket to Inset
You can see my pieces ready below for my voile version.   The plackets are the strips, the insets are the wider L shaped sections.   My voile insets are double thickness and basted together at the edges and treated as one layer.  Using a double layer in this way to compensate for the lightness and transparency of the main fabric is called interlining.  My Lotta Echo version below has a single inset on each side. The thing to watch for here to make sure you stitch the right side of the placket to the wrong side of the inset- it is a little counter intuitive, you will want to do it the other way round.
You can see on the Lotta Echo version below how the triangle notches help to match up the plackets and the insets. The placket edges have been top stitched. 
You can see the fussy cutting on the voile version so both sides of the inset match up.
At the bottom of the inset where the two plackets cross over, Jenny suggests you pin these together.  I chose to machine stitch them within the 3/8" seam allowance, about 1/4" is fine.  It keeps everything secure and gives less to worry about for the next stage.
2. Sew Inset to Front
You will need a contrasting thread in your machine to sew your gathers.  It needs to be good and strong as we will be pulling on it.  Your stitch length needs to be at the longest setting.  Take your Tova front piece: the side on which you sew is the side you will pull on,  I had the wrong side facing me.   Starting at the notch near the corner where the inset will be sewn, secure your first stitch by sewing forwards/backwards and forwards and sew to the notch in the other corner 1/8" from the fabric edge- do not secure at this end and leave the thread ends long- e.g. 6" Then starting at the same notch as before, fabric the same side facing as before, sew a second line just the same, Jenny suggest 1/4" but it can be more (see below).  Leave the thread ends long.  Trim the thread ends at the secured edge so they don't get in the way
Jenny suggests very close gather lines 1/8 and 1/4.  I tried this and I tried wider- 1/8 and 1/2"- the latter was easier for me because when you sew the seam you will be stitching between the gathers as you can see below (this is from a sleeve cuff).    I did 1/8 and 1/4 for the Lotta Tova but the wider options for all the other gathering sections on both Tovas.  You chose what you prefer.
 Before you pull the gathering threads, you will need to secure the corners of the front piece.  Jenny's drawing shows where the reinforcement stitching will go.  I used a ruler and pencil to mark the line just inside 3/8" from fabric edge and where it would start and finish on each side.  It will be inside of your tailor's tack which marked the drill hole or dot with circle around from the paper pattern piece.  Change back to your usual thread, set you stitch length very short-1-1.5 on my machine and sew.  I then sew again, just inside or even on top of this line to make it extra secure.  Take care not to trap the gathering threads.  Repeat for other corner.  
Clip the corners- this means with sharp small scissors cut from outer cover to the corner just before your stitches.  I place a pin here to make sure I don't cut the stitches.  Remove pin once cut.
You can follow Jenny's direcitons and start pinning inset to front starting at shoulder.  If you are newer to dress making you might find it easier to start your pinning in the centre fof your front piece and the inset.  Pin at the notches- your pins need to be at right angles to your stitches.  .  Pull your gathering threads so that the inset is the same width as the front between the notches- you can wrap the ends around a pin to check and make a knot when you are happy with this.  Spread your gathers evenly.  I do this firstly with my fingers and then with a pin, stoking the fabric back and forth between the gathering lines.
You can then pin the side pieces, matching any notches,- it will be tight where the reinforced corners have been clipped. and you will need a lot of pins. 
Follow Jenny's directions and start at the right shoulder, stitch length normal- 2.2-2.5 is my normal, the first straight section down the sides is easy, slow down as you get to the first corner and I change my stitch length to shorter here 1.5 as it needs to be secure as we come to the clipped corner.  You should have a tailor's tack or mark to aim for, at this point do as Jenny says, stop, needle down, lift the foot and pivot- turn your fabric.  Check you are stitching through 2 layers and no extra fabric is trapped before you put the foot down again.   You should be stitching to the inside of the reinforcement stitches.  You can just see mine in the centre of the machine foot below and my needle is to the left of them.  Stitch about 1" with small stitches and change back to your usual stitch to sew along the gathered section of the inset- the gathers should be on top.   If your gathering threads were 1/8" and 1/4" apart you will be stitching below them with your 3/8" seam.  If your gathering threads were 1/8" and 1/2" apart you will be stitching below them with your 3/8" seam.  I stopped and checked my gathers several times as I stitched this seam between the notches.  When you have reached the notch at the end of the gathers, reduce your stitch size , go slow and stitch to the tailor's tack as before, check for trapped fabric, pivot and stitch along the secured corner.  change your stitch size back to normal and stitch seam to the top left shoulder.
This is a very tricky section.  Go slow and be prepared to unpick the odd section where you have trapped extra fabric.  my first took me two attempts.  Once you are happy with it you can remove the gathers, tailor's tacks and press well.   Follow Jenny's instructions, press seam towards the inset and finish the seam edge with a serger/overlocker ( I turned the knife off on my overlocker as the seam is already narrow) or you can use zig zag or overcast (depending your machine options) on medium weight fabric or 3 step zig zag on lightweight fabrics like voile/lawn to neaten the seam.   If you have no zip zag you could overcast by hand or use pinking shears. There is a discussion thread here on finishing Tova edges without a serger here.  Sew slowly as you finish the edge and watch out again for trapped fabric.  Press again and top stitch all round the inset, I did a extra securing line of stitches where the placket overlaps.  This is my Lotta Echo inset and placket finished.
And here is my voile version.
 This is the inside of echo with overlocked/serged seams pressed up and top stitched.
 And this is the voile version with a close up on the tricky corner.
The next sew-a-long post will be mid week with shoulders, side seams and hem- nice and easy.  You can find the links to all the post so far here and add any pictures to the Wiksten Flickr group here.
Any questions will be answered in the comments thread below, please add your ideas if you can help.
sib blog