Showing posts with label tova. Show all posts

Wednesday, 4 April 2012

Post 7 -Tova Collar, and your Tova is complete- Linky Time!

Are you still there?  Still sewing a long with your Tova?  The end is in sight and it is an easy finish.  this post is all about the collar and links in with stage 7 of Jenny Gordy's instructions.  I rounded my collar (details on how to here).  When you attach the collar, the important thing is to check that the front edge of the collar extends 3/8" beyond the front edge neck line- you can see the handy measuring gauge checking mine out.  The basting stitches below are not for the collar but for my double thickness inset section.  
(**edited to add**)You could staystitch the collar as Mel suggests here.  Stay stiching is just stitching inside the seam allowance- 1/4" from the edge would be idea around the neck line to stop it stretching.  A smaller stitch is a good idea for this.
I was incredibly lucky with the pattern matching, I centred the collar on the  fabric stripes just as I did the back section and they all matched up nicely!
When you attach the second collar piece it helps to press the 3/8" seam allowance up just at the ends of the collar before you start pinning.
With the curved end collar the only difference is that you are stitching a curve around the collar end rather than a straight line, pivot and continue round the rest of the collar.  It helps on both versions to use a really small stitch for the ends of the collar.  You can use a usual length stitch for the rest of the stitching but the collar end seams will be trimmed back and small stitches gives the seam additional security. 
You can see how the pressed lower collar edge gets sewn into the seam so that when you turn the collar through it should be just covering the seam.  For the straight edge collar you need to trim the corner but for the curve you need 'clip the seam', and because this curve will face inward when the collar is turned the right way out, you need to cut notches out of the seam.  These will close up and allow the seam to curve round smoothly.   You can reduce the seam a little too, I trimmed mine down, then cut the V shapes out.
You can hand sew the collar edge down or pin carefully and stitch close to the  edge of the fabric all around the collar.  And then your Tova is done!  
I am just starting to see sew-a-long Tovas pop up but I would love it if you could link your Tova here so I could see them all!  I would like to thank Jenny Gordy for such a great pattern, I can honestly say I have not seen a 'bad' Tova!  And thankyou for you all for sewing with me, it really does make it a lot more fun- now get your Tovas out.  I have given you a nice long 6 weeks to get your link in!


sib blog

Sunday, 1 April 2012

Tova Sew-a-long post 6: Setting the Sleeve

In this post we will assemble and set the sleeve into the armhole and add the cuff.  In Jenny's instructions this is stage 5 and 6.  
Assemble sleeves
This is easy, stitchithe sleeve seams right sides together and finish the seam edge- serge/zig zag/overcast or pinking shears.  Look at the notches around the armhole you transferred from the paper pattern (they looked like 'T' on the pattern), the double notch indicates the back of the sleeve, the single notch is the front.  Press seam towards the back.  Repeat with other sleeve so you have a left and a right sleeve.
Cuff
As I lengthened my sleeve I made my cuff narrower because my wrist is thinner than my mid arm where the sleeve would usually finish.  I recommend that you stitch the cuff together at the short seams so it is a loop like a bracelet and check for fit, I made mine smaller by 3/4"  at each end. If you have shortened your sleeve and want to add a cuff it will need to be bigger as your arm is wider at the top!    Prepare the sleeve end by two rows of gathering stitches just like we did for the placket.  I did mine just over 1/8" and 1/2" from sleeve edge and I sewed with the wrong side facing upwards.  Gather as we did the placket, evening out the gathers with a pin and matching the notches with the cuff.  When you are happy with the fit, knot the gathering thread ends and pin all round with right sides together.  You will need your free arm on your sewing machine and I found sleeve end/cuff too narrow to completely fit over my machine free arm so stitch slowly so as not to trap any fabric.  You can see my seam stitching between the gathering threads.
Finishing the cuff from this point is very similar to binding a quilt!  Remove the gathering threads, fold the cuff over so that the bottom edge covers the seam by just over 3/8.  Tuck  3/8" under at the bottom of the sleeve press and pin in place.  This folded line should just cover the seam.  You could hand sew the cuff to the sleeve- it is the inside of the cuff so your stitches will be hidden, or you could sew right next to the folded edge through the cuff.  You can see mine below on a sleeve board.  Sleeve boards are very handy items, useful for bag, purse and pouch making as well as clothing
Setting the Sleeve
At the top of the sleeve, stitch two lines of gathering stitches between the notches at the sleeve cap- look at Jenny's diagram in the instructions if you are not sure where to stitch.   I stitched 1/8" and 1/2" rather than the suggested 1/8" and 1/4"and I had the wrong side facing as that is the side you will be working with when you pin the sleeve in the armhole.  You will only be gathering very gently as there is only a little fullness to reduce so you will hardly see any gathers in the fabric.  The gathering here  is to ease the sleeve in and give you room for your shoulder to fit in rather than a style feature.  At the underarm area there are no gathers.  Your Tova top should be inside out, make sure you have the right sleeve for the right armhole and the left for the left armhole- use the notches to work this out, the double notch is on the back.  The sleeve should be the right side out, place it the through the arm of the Tova so right sides are together.   Match notches and pin working on the inside of the sleeve. When you come to stitch your seam you will start on the inside with your machine.  Make sure the sleeve seam is lying to the back of the sleeve (see bottom of the photo below)  
 I found the easiest thing to do was to stitch the underarm area first where there are no gathers.  I stitched the usual 3/8"seam and then I stitched just next to this line within the seam allowance. This extra line of stitching reinforces an area of strain- just imagine lifting your arms up and the tension placed on this seam.  You can just see the extra line of stitching in the picture.
Then I stitched the rest of the seam, starting my stitching from where the underarm stitching finished and stitching right round, between the gathering stitches until you meet where the underarm stitching started.  Go slow, there is a lot of fabric and it is easy to trap a little underneath- just like I did, see the pic below!
Once you have checked all round the seam to make sure there no pleats or trapped fabric, remove the gathering stitches.  You can then finish the seam edge by serging/zig zag/overcast or pinking shears.

We are nearly finished!  Back mid-week with the collar to finish the Tova!
Remember you can add you pics to the Wiksten Flickr group
sib blog

Wednesday, 28 March 2012

Post 5: Sewing shoulder, side seams and hem

Easy peasy today which is probably a relief if you have just made it through the placket!  This is stage 4 and 5 of the pattern instructions.  Sewing the shoulder seams and side seams and your first opportunity to try on.  There is not much I need to say as you are basically sewing straight lines here.   I did find I needed to stretch the shoulder back sections to get them to fit to the front sections but as there is a bit of bias in the fabric here that was easy enough.   My shoulder seam is below, after seam neatening but try on for fit before finishing your seams!
In terms of altering fit by the seams, there is only a little room to play with in the seams but on the shoulder and the side you could move out by 1/8 to make them a little larger and inward by as much as you need.  Finish your seams by serging/zig zag/3 step zig zag- this is good for fine fabrics like lawn and voile/ pinking sheers.  Jenny suggests stitching the hem now, I left mine until the end so I could get the whole effect of the style before I changed it.  I ended up taking off about 3 inches on each Tova but  I don't suit a longer style top so I was expecting that
And the hem is easy, I tops stitched on the edge side close to the fold.
I'll be back at the weekend and we will be setting the sleeves and finishing the cuffs- both easier than the inset!
sib blog

Saturday, 24 March 2012

Tova Sew-a-long Part 4. Sewing Placket and Inset

The first sewing section!  Jenny's instructions are clear and her photographs are helpful so refer to them at all stages of construction.   Jenny also gives advice on altering the bust size of the Tova 
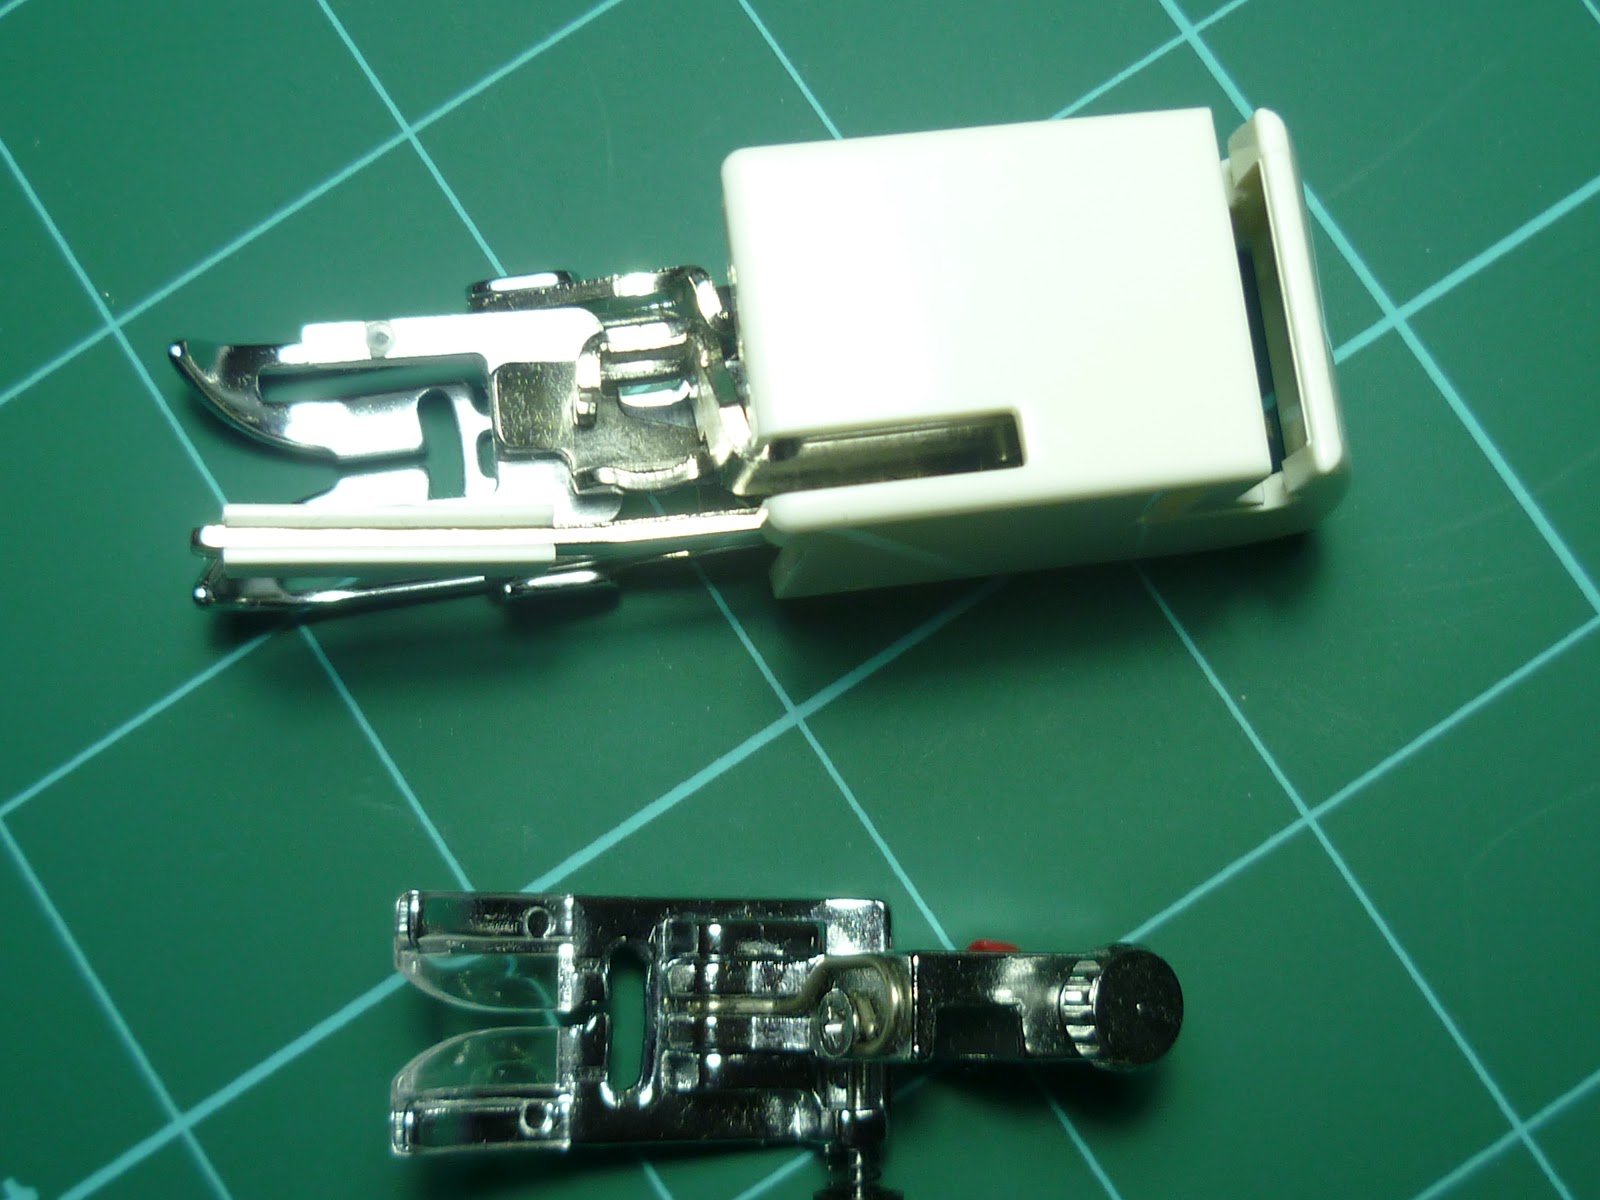
here. I am doing is going into greater detail on the trickier bits.  The seam gauge that she shows in her pattern pictures is very helpful throughout.  I used a walking foot on my machine for both Tovas.  The benefit of this is it pulls both the top and bottom fabric layers through evenly.  You could use a standard presser foot too.  My walking foot is at the top and presser foot below.
 The same feet but from a bird's eye view.
1. Sew Placket to Inset
You can see my pieces ready below for my voile version.   The plackets are the strips, the insets are the wider L shaped sections.   My voile insets are double thickness and basted together at the edges and treated as one layer.  Using a double layer in this way to compensate for the lightness and transparency of the main fabric is called interlining.  My Lotta Echo version below has a single inset on each side. The thing to watch for here to make sure you stitch the right side of the placket to the wrong side of the inset- it is a little counter intuitive, you will want to do it the other way round.
You can see on the Lotta Echo version below how the triangle notches help to match up the plackets and the insets. The placket edges have been top stitched. 
You can see the fussy cutting on the voile version so both sides of the inset match up.
At the bottom of the inset where the two plackets cross over, Jenny suggests you pin these together.  I chose to machine stitch them within the 3/8" seam allowance, about 1/4" is fine.  It keeps everything secure and gives less to worry about for the next stage.
2. Sew Inset to Front
You will need a contrasting thread in your machine to sew your gathers.  It needs to be good and strong as we will be pulling on it.  Your stitch length needs to be at the longest setting.  Take your Tova front piece: the side on which you sew is the side you will pull on,  I had the wrong side facing me.   Starting at the notch near the corner where the inset will be sewn, secure your first stitch by sewing forwards/backwards and forwards and sew to the notch in the other corner 1/8" from the fabric edge- do not secure at this end and leave the thread ends long- e.g. 6" Then starting at the same notch as before, fabric the same side facing as before, sew a second line just the same, Jenny suggest 1/4" but it can be more (see below).  Leave the thread ends long.  Trim the thread ends at the secured edge so they don't get in the way
Jenny suggests very close gather lines 1/8 and 1/4.  I tried this and I tried wider- 1/8 and 1/2"- the latter was easier for me because when you sew the seam you will be stitching between the gathers as you can see below (this is from a sleeve cuff).    I did 1/8 and 1/4 for the Lotta Tova but the wider options for all the other gathering sections on both Tovas.  You chose what you prefer.
 Before you pull the gathering threads, you will need to secure the corners of the front piece.  Jenny's drawing shows where the reinforcement stitching will go.  I used a ruler and pencil to mark the line just inside 3/8" from fabric edge and where it would start and finish on each side.  It will be inside of your tailor's tack which marked the drill hole or dot with circle around from the paper pattern piece.  Change back to your usual thread, set you stitch length very short-1-1.5 on my machine and sew.  I then sew again, just inside or even on top of this line to make it extra secure.  Take care not to trap the gathering threads.  Repeat for other corner.  
Clip the corners- this means with sharp small scissors cut from outer cover to the corner just before your stitches.  I place a pin here to make sure I don't cut the stitches.  Remove pin once cut.
You can follow Jenny's direcitons and start pinning inset to front starting at shoulder.  If you are newer to dress making you might find it easier to start your pinning in the centre fof your front piece and the inset.  Pin at the notches- your pins need to be at right angles to your stitches.  .  Pull your gathering threads so that the inset is the same width as the front between the notches- you can wrap the ends around a pin to check and make a knot when you are happy with this.  Spread your gathers evenly.  I do this firstly with my fingers and then with a pin, stoking the fabric back and forth between the gathering lines.
You can then pin the side pieces, matching any notches,- it will be tight where the reinforced corners have been clipped. and you will need a lot of pins. 
Follow Jenny's directions and start at the right shoulder, stitch length normal- 2.2-2.5 is my normal, the first straight section down the sides is easy, slow down as you get to the first corner and I change my stitch length to shorter here 1.5 as it needs to be secure as we come to the clipped corner.  You should have a tailor's tack or mark to aim for, at this point do as Jenny says, stop, needle down, lift the foot and pivot- turn your fabric.  Check you are stitching through 2 layers and no extra fabric is trapped before you put the foot down again.   You should be stitching to the inside of the reinforcement stitches.  You can just see mine in the centre of the machine foot below and my needle is to the left of them.  Stitch about 1" with small stitches and change back to your usual stitch to sew along the gathered section of the inset- the gathers should be on top.   If your gathering threads were 1/8" and 1/4" apart you will be stitching below them with your 3/8" seam.  If your gathering threads were 1/8" and 1/2" apart you will be stitching below them with your 3/8" seam.  I stopped and checked my gathers several times as I stitched this seam between the notches.  When you have reached the notch at the end of the gathers, reduce your stitch size , go slow and stitch to the tailor's tack as before, check for trapped fabric, pivot and stitch along the secured corner.  change your stitch size back to normal and stitch seam to the top left shoulder.
This is a very tricky section.  Go slow and be prepared to unpick the odd section where you have trapped extra fabric.  my first took me two attempts.  Once you are happy with it you can remove the gathers, tailor's tacks and press well.   Follow Jenny's instructions, press seam towards the inset and finish the seam edge with a serger/overlocker ( I turned the knife off on my overlocker as the seam is already narrow) or you can use zig zag or overcast (depending your machine options) on medium weight fabric or 3 step zig zag on lightweight fabrics like voile/lawn to neaten the seam.   If you have no zip zag you could overcast by hand or use pinking shears. There is a discussion thread here on finishing Tova edges without a serger here.  Sew slowly as you finish the edge and watch out again for trapped fabric.  Press again and top stitch all round the inset, I did a extra securing line of stitches where the placket overlaps.  This is my Lotta Echo inset and placket finished.
And here is my voile version.
 This is the inside of echo with overlocked/serged seams pressed up and top stitched.
 And this is the voile version with a close up on the tricky corner.
The next sew-a-long post will be mid week with shoulders, side seams and hem- nice and easy.  You can find the links to all the post so far here and add any pictures to the Wiksten Flickr group here.
Any questions will be answered in the comments thread below, please add your ideas if you can help.
sib blog

Wednesday, 21 March 2012

Tova Sew Along- Post 3: Cutting/Alterations Part Two

The basics of cutting out are covered in part one.   Now we get a little more advanced... 
Making a Narrow Collar with Rounded Ends
I wanted a narrower collar so reduced the height from the top of the collar pattern piece by 1/2" - you can see my new cutting line below.  I also rounded the ends using a cotton spool.  The dashed line was my size so that is where the rounding fits- nice and simple!   Remember the dseam allowance will make the curve tighter than the line your draw.  Cut out the pattern piece using the new lines.  The lower line stays the same as this attached to the Tova.
Altering the Length of the Sleeves
I like the look of 3/4 length sleeves but I don't like wearing them, I always feel like something is missing!  As the sleeve pattern piece stays the same width all the way down the main section you can easily lengthen or shorten.  Obviously if you lengthen, you will have to allow for extra fabric!  For lengthening or shortening, go to your wardrobe and fins a shirt you like with a standard shoulder seam.  Put it on and measure from the shoulder seam to where you want the seam to finish.  The Tova cuff will add on about 1/2".    I chose a finished length of 22 1/2" sleeve  including cuff, that makes the sleeve without cuff 22".  Now add on 3/4" for seam allowances.  Result: the sleeve pattern piece needs to measure 22 3/4" at the longest point- the grain arrow marks this on the pattern piece.  I pinned my pattern piece on and drew the extended length at the bottom using Frixion pen- you can see it faintly in red below.  As the sleeve is longer, the cuff may need to be narrower.  I recommend you cut your cuff using the pattern piece and reduce this later.  I will cover this when we come to sew the sleeves.
If you want shorter sleeves on a dress or a top, these are versions that Wiksten designer Jenny Gordy came up with. Dress with short sleeves and cuff...
Top with short sleeves and cuff.  Jenny used fabrics that look the same on both sides which means an easy turn up cuff for the end of the sleeve, this is like the hem on the Tova but shows on the outside rather than hiding on the inside.  For this, find the total sleeve measurement you want e.g. 8".  Add on seam allowance for the top and for tuning under on the cuff-3/4", then add on the length you want the cuff to be, maybe 2"?  Total sleeve length to cut= 10 3/4"Similar method to working out the length.  If you want your cuff on the inside, you could use the same hem as the bottom of the dress and top, so for a sleeve of 8" add seam allowances of 3/4" and hem turn up of 1"-total of 9 3/4".  You can either draw your new higher hemline on the pattern and trace off a new sleeve or cut you pattern- up to you!
Cutting on Wide fabric and Striped/Patterned Fabric
If your fabric is wider- the voile I used was 54", you will be able to fit more pattern across the width of the fabric but I did this in sections.  You can see in the photo below that there are two folds, one on each outside edge.  I pinned the raw edges because I was matching up my stripes so the top and bottom were the same.  It helps to do this for stripes of larger plaid/check as when you cut out a pair of pieces e.g. sleeves, they will be the same each side.  This fabric was just for the front and back.  I placed my pattern loosely on the fabric first to work out how much i needed and then cut across the length so i was working on this section only. The fold lines will be the centre of the front and back of your Tova.  You could have a stripe as your centre point or a row of squares in a check.  I choose to have the wider blue stripe as the centre.  Depending on your pattern and size you may be able to fit your front and back pieces like this- depends on both these things.
My patterns fitted but you can see how they are running in opposite directs.  This only works when you pattern runs in both directions- it doesn't have a right way up!  It didn't work with the Lotta fabric I used on the white version.  You can see the arrows follow the straight grain of the fabric.
For the sleeve I went back to my length of fabric and again I made a fold, partway along the width of the fabric, wide enough to allow the sleeve centre line (the grain arrow works for this) to be in the middle of a blue stripe.   I pinned the raw edges and the far edge where a selvedge  is.  You can see on the left edle of the sleeve it is very close to the fold so there is hardly any waste on that side.  On the right side there is a little more wastage but it worked pretty well!
For the inset placket I knew I would never get the lines in the right place on the bigger places so I placed them so the stripes ran across.  You could also do this on the bias for diagonal stripes or plaid/checks.  I also lined each piece so there is a second piece underneath and I basted round the edge as the voile is really thin.  I would also recommend you did this for bias cut pieces, line them with a straight cut piece or a thin piece of matching cotton underneath cut straight grain to stabilise the bias which stretches so easily.    For this method of lining, you treat the two layers as if they were one piece of fabric.  These are small pieces of the Tova so they can take a bit of playing with the grain.  it is like fussy cutting for clothes.
This is my finished voile version and I absolutely love it.  I wear a lot of blue so it goes with a lot of my wardrobe  and the soft silkiness of the voile is so nice to wear.  The lining on the inset section means it is not too see through, the darker colour helps with this too.  I am going to enter it into the Made by Rae Spring Top Sewalong .  A great idea for all those Tovas that are going to be made!
Back at the weekend with the first sewing- sewing the inset to the front- the hardest bit of the whole Tova so lets get it out of the way!
sib blog

Tova Sew Along- Post 3: Cutting Out Part One

  This post covers basic cutting out and transferring paper pattern marks.  Part two covers more advanced stuff including simple variations like rounding the collar, altering the sleeve length  and making Tovas out of patterned, striped and plaid/check fabrics.   I think cutting out is best done in a single session so set yourself a couple of hours to get all your Tova pieces cut out in one go. These are my cutting tools of choice.  
Your fabric needs to be prewashed and pressed.  If you are using 44"/115cm wide fabric, fold your fabric in half so the selvedges meet and press along the fold so the fabric lies flat and the grain runs straight.   It is worth taking time to get this done really well, it will save time in the end.  It is easier for this pattern to place the fold on the right of the surface that you are working on as you can see in the picture below.   If you are cutting from wider fabric, I will cover layout of the pattern pieces in part 2.   My fabric pattern is directional so all my pattern pieces will need to be the same way up- if I put the back piece upside down, the print would be upside down on the top when it is finished.  If you are working with plain fabric or non directional pattern like spots, you could turn your pattern pieces round 180 degrees if you wanted to.  Jenny shows a layout sketch in the Tova instructions which is suitable for this width of fabric and I mainly followed that.  There will be variations according to the size of Tova pattern you are working with but for the main pieces like the front back and sleeves, the layout will be as her sketch.  If you look at all the pattern pieces in the picture, you can see they all have an arrow- this is for the grain of the fabric. There are times (see post two) when you can play around with this-e.g. cuffs could go across the grain for a variety of pattern but the main pieces must be along the grain arrows, in this pattern they are all on the straight grain.  Look at the sleeve cuff and the placket,-both narrow strips but the arrows are in different places so the cuffs lie horizontally and the placket vertically.  Both benefit from the extra stretch in the cross grain of the fabric by being placed like that,
You can see in the photo above that the front piece is lying right on the fold, the back piece needs to do the same.  I pin the pieces loosely to the fabric just to check they fit together correctly.  Then I pin them more carefully and line the grain up properly. To do this, use a tape measure or a quilt rule, measure from each end of the arrow to the selvedges- it should be the same distance for each.
After you have pinned and checked all your pieces you will have a choice on how you cut out.  You can cut carefully round each pinned section.  Pins can distort the paper so this is not always totally accurate.  I prefer to take the pins out and draw round the paper using Frixion pen which will disappear under the heat of an iron.  I then use a rotary cutter with the ruler always inside the line on the piece itself to cut usign the pen line as my cutting guide.  You could use weights like wing-nuts or metal washers, trace round and skip pins altogether.  Any tricky tight bits I cut with scissors, big and small.  After cutting I pin the fabric together again to keep everything in one place.  But before you cut, there are some vital marks to add!
 Luckily on this pattern, there are very few marks to transfer but there are some important ones that really need atention.  You will see a T mark on many of the pattern pieces.  These vary in position according to the Tova size but all sizes have them.  I highlight all the T marks in my size on the pattern pieces.  You can see my pink highlight below and another mark, the dot in the cirlce that I'll mention in a minute.  So back to the T- these are marks to help you match up the seams where the different pattern pieces will meet.  The easiest way to transfer them is to make them into notches on the edge of the pattern pieces.  Where you see a T add a triangle, the width of the T to the cutting line.
This is the same mark on another pattern piece, I have just moved the paper pattern back a little so you can see it more clearly.
 You need to use little scissors to cut these, they are fiddly but you will be so glad of them.  I used very sharp embroidery scissors.  You can cut them out roughly as you are cutting the pattern piece out and then neaten them afterwards if you prefer.  The triangle notch on pattern piece should go outwards, you can see this above the scissors in the pic below- the inward notch is what is left behind on the remaining fabric- below the scissors in the same pic.
Now the other pattern mark needs to be transferred- the dot in the circle on the front which marks where the front inset panel will fit.  I choose to use tailor's tacks are here as they are easy to remove and leave no residue.  I have a youtube tailor's tacks tutorial here.  
I fitted the sleeve close to the selvedges as it didn't need to go on the fold.
As the sleeve cuff and the plackets look the same but run in different direction, I kept the paper pinned to them after they have been cut out so I didn't muddle them up.
Pieces cut out, ready to sew.  This is how my first Tova ended up- just so you can get an idea where we are heading and how a quilting fabric looks as a Tova.  I altered the collar- and made it narrower and rounded.  I lengthened the sleeve and I took a few inches off the hem as well.  That is covered in part two of this post.  It is a great fit.  I made size small.  My chest ( complete with generously padded bra) measures 34" and I am a UK size 8-10, I think that is size 4 in USA and 36 in Europe.  I am shortish in the body so needed a shorter hem length to make this version look like a top or a tunic.
Visit part 2 for alterations and cutting striped, checked/plaid fabrics.
Questions will be answered in the comments thread, do feel free to chime in and help!
sib blog