Showing posts with label voile. Show all posts

Tuesday, 17 June 2014

June at Village Haberdashery

My theme for this month's vista to Village Haberdashery is 'substrates'.  Its a word I don't remember hearing in my Needlework and Textiles O'level, nor when I did a HNC in Fashion in my late 20s- I suspect it is more of an American term when applied to textiles.  I think of Anna Maria Horner as queen of the substrates with her quilting cottons, cotton voile and velveteen.  With the release of her 'Pretty Potent' collection, she's added a few more in the mix and they have just arrived at Annie's shop.
The Echniacea print is the stand out of the collection, the one that I imagine will sell out and people will spend the future In Search Of with ISO pics on Instagram.


This is the 'Outloud' colour way in quilting cotton.  Here is the same print but a different colour way and substrate:

This time the 'Echinacea' print is in 54" wide voile and the colour is 'Sparkle'.  Voile is lighter weight, a looser weave than similar lightweight fabrics like lawn although sometimes the difference is hard to tell.  Anna Maria Horner voiles have a slight sheen to them and a silky buttery quality which makes them lovely to wear and colours seem to be more saturated on voile and remind me of boiled sweets and stained glass windows.  The Little Folks voiles were a big favourite of mine and I have used them in clothing (see here and here) and quilt blocks: I have an ongoing Swoon in voile and Kona Snow.  The School House tunic would work well in voile:


And the newly released as a paper pattern, Mathilde by Tilly Walnes would be very cute in voile.


This is 'Preppy' the green voile colour way:


And this beauty is the rayon challis substrate in 'Float'.  


Rayon challis is a beautiful dressmaking fabric.  it pours onto the body and has a magical drape quality where it will hang artfully.  It is tricky to sew- think of it as a sensitive child that must be treated gently and keep styles relatively simple.  It is great for long flowing garments like the Sewaholic Gabriola (although it would need careful handling on the bias areas) or a maxi length ByhandLondon Anna dress.  Rayon challis is used in the cover pic for the Date Night dress by April Rhodes. 


There are more variations in the quitling cotton/rayon and voile Pretty Potent substrates- find them here.
Other multi subtrate collections include Arizona by April Rhodes for Art Gallery- you will find voile, knits and quilting cotton in this mini collection all on pre-sale  so you can order now.

Jungle Avenue by Sara Lawson for Art Gallery has the same mix of quilting cotton, voile and knit.
You can sign up for notification when this arrives.
Nani Iro prints feature a variety of substrates and there are some new prints just arrived. There is a linen cotton blend featuring a delicate version of the Pocho print- Pierre Pocho in Mother of Pearl Cloud:


The whites are shimmery in a lovely contrast to the linen.  This would make a lovely A line skirt- Colette Ginger maybe, with a lining. 
You know I love double gauze, (more on double gauze later this week).  Another new Nani Iro print from the Spring 2014 collection is Mountain Views, this version in neon hues is called Ibuku

Double gauze works best in simple shapes.  There is a great free scarf tutorial on the Village Haberdashery blog by Fiona of Poppy Makes and I have one on here too- the perfect way to buy a little fabric and create a big impact. 

Enjoy!

sib blog

Saturday, 24 March 2012

Tova Sew-a-long Part 4. Sewing Placket and Inset

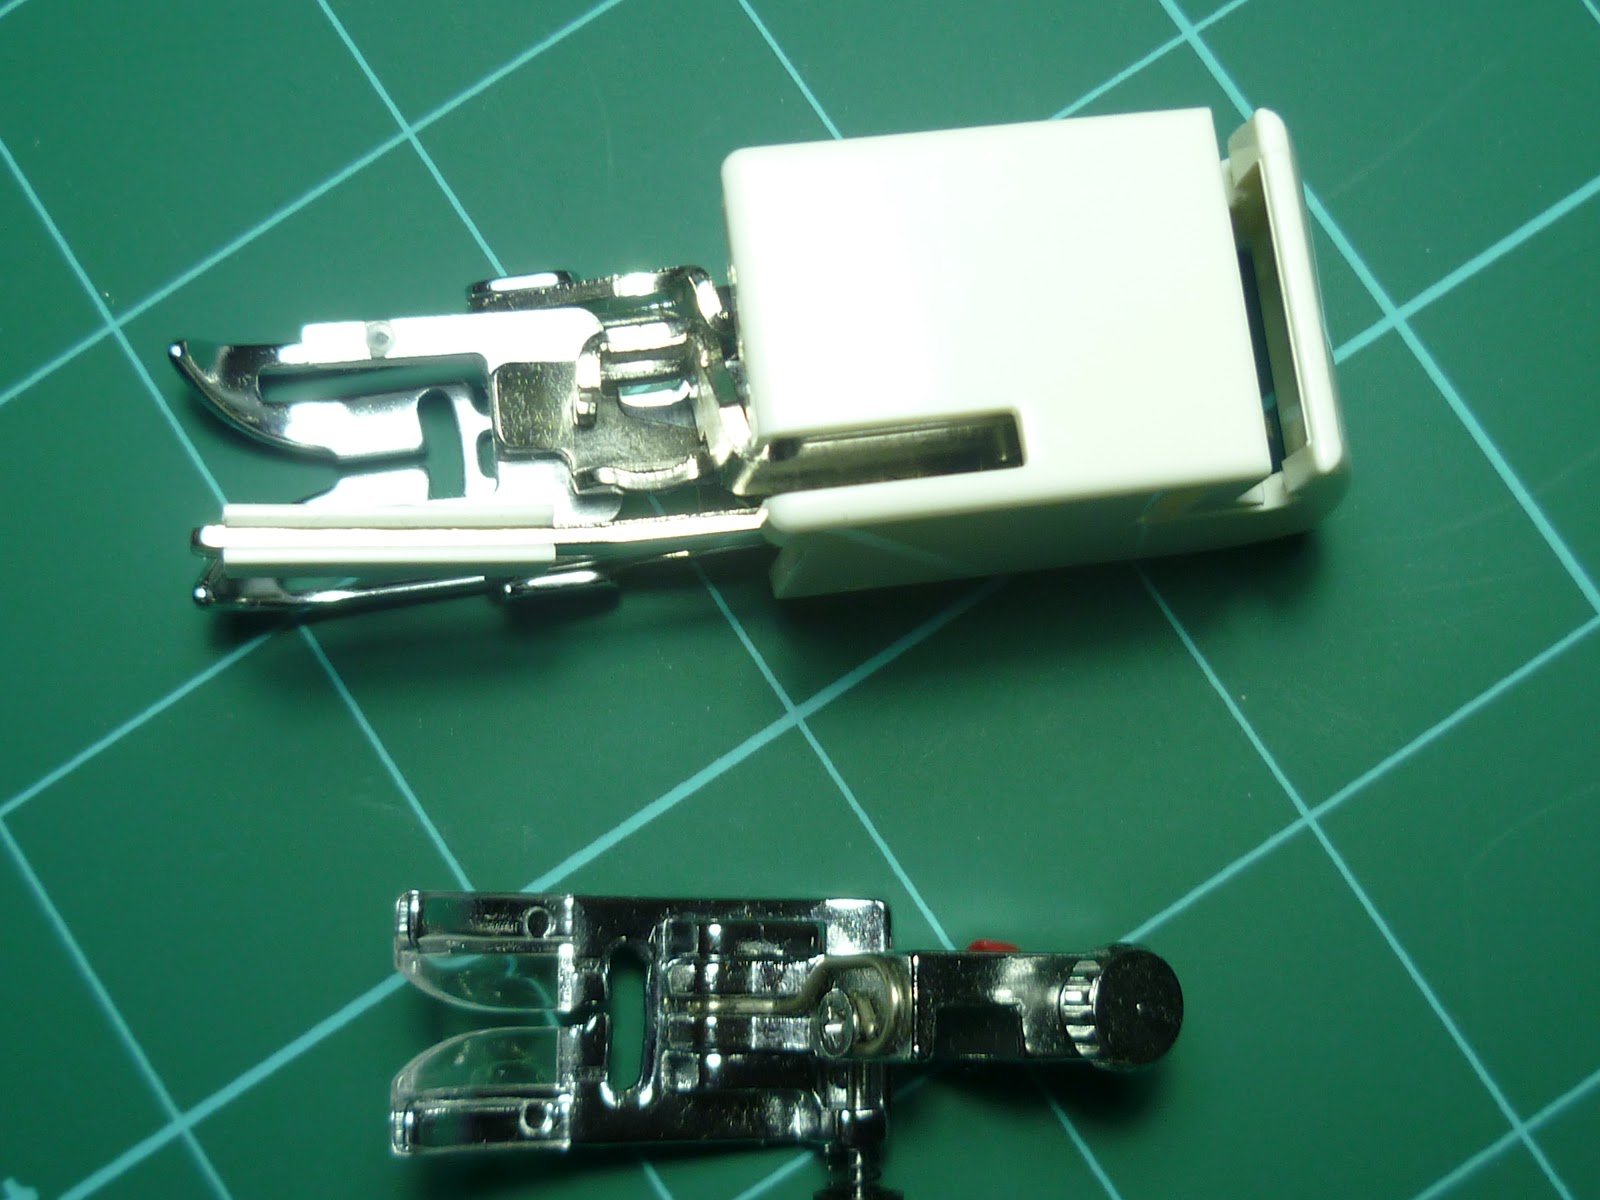
The first sewing section!  Jenny's instructions are clear and her photographs are helpful so refer to them at all stages of construction.   Jenny also gives advice on altering the bust size of the Tova here. I am doing is going into greater detail on the trickier bits.  The seam gauge that she shows in her pattern pictures is very helpful throughout.  I used a walking foot on my machine for both Tovas.  The benefit of this is it pulls both the top and bottom fabric layers through evenly.  You could use a standard presser foot too.  My walking foot is at the top and presser foot below.
 The same feet but from a bird's eye view.
1. Sew Placket to Inset
You can see my pieces ready below for my voile version.   The plackets are the strips, the insets are the wider L shaped sections.   My voile insets are double thickness and basted together at the edges and treated as one layer.  Using a double layer in this way to compensate for the lightness and transparency of the main fabric is called interlining.  My Lotta Echo version below has a single inset on each side. The thing to watch for here to make sure you stitch the right side of the placket to the wrong side of the inset- it is a little counter intuitive, you will want to do it the other way round.
You can see on the Lotta Echo version below how the triangle notches help to match up the plackets and the insets. The placket edges have been top stitched. 
You can see the fussy cutting on the voile version so both sides of the inset match up.
At the bottom of the inset where the two plackets cross over, Jenny suggests you pin these together.  I chose to machine stitch them within the 3/8" seam allowance, about 1/4" is fine.  It keeps everything secure and gives less to worry about for the next stage.
2. Sew Inset to Front
You will need a contrasting thread in your machine to sew your gathers.  It needs to be good and strong as we will be pulling on it.  Your stitch length needs to be at the longest setting.  Take your Tova front piece: the side on which you sew is the side you will pull on,  I had the wrong side facing me.   Starting at the notch near the corner where the inset will be sewn, secure your first stitch by sewing forwards/backwards and forwards and sew to the notch in the other corner 1/8" from the fabric edge- do not secure at this end and leave the thread ends long- e.g. 6" Then starting at the same notch as before, fabric the same side facing as before, sew a second line just the same, Jenny suggest 1/4" but it can be more (see below).  Leave the thread ends long.  Trim the thread ends at the secured edge so they don't get in the way
Jenny suggests very close gather lines 1/8 and 1/4.  I tried this and I tried wider- 1/8 and 1/2"- the latter was easier for me because when you sew the seam you will be stitching between the gathers as you can see below (this is from a sleeve cuff).    I did 1/8 and 1/4 for the Lotta Tova but the wider options for all the other gathering sections on both Tovas.  You chose what you prefer.
 Before you pull the gathering threads, you will need to secure the corners of the front piece.  Jenny's drawing shows where the reinforcement stitching will go.  I used a ruler and pencil to mark the line just inside 3/8" from fabric edge and where it would start and finish on each side.  It will be inside of your tailor's tack which marked the drill hole or dot with circle around from the paper pattern piece.  Change back to your usual thread, set you stitch length very short-1-1.5 on my machine and sew.  I then sew again, just inside or even on top of this line to make it extra secure.  Take care not to trap the gathering threads.  Repeat for other corner.  
Clip the corners- this means with sharp small scissors cut from outer cover to the corner just before your stitches.  I place a pin here to make sure I don't cut the stitches.  Remove pin once cut.
You can follow Jenny's direcitons and start pinning inset to front starting at shoulder.  If you are newer to dress making you might find it easier to start your pinning in the centre fof your front piece and the inset.  Pin at the notches- your pins need to be at right angles to your stitches.  .  Pull your gathering threads so that the inset is the same width as the front between the notches- you can wrap the ends around a pin to check and make a knot when you are happy with this.  Spread your gathers evenly.  I do this firstly with my fingers and then with a pin, stoking the fabric back and forth between the gathering lines.
You can then pin the side pieces, matching any notches,- it will be tight where the reinforced corners have been clipped. and you will need a lot of pins. 
Follow Jenny's directions and start at the right shoulder, stitch length normal- 2.2-2.5 is my normal, the first straight section down the sides is easy, slow down as you get to the first corner and I change my stitch length to shorter here 1.5 as it needs to be secure as we come to the clipped corner.  You should have a tailor's tack or mark to aim for, at this point do as Jenny says, stop, needle down, lift the foot and pivot- turn your fabric.  Check you are stitching through 2 layers and no extra fabric is trapped before you put the foot down again.   You should be stitching to the inside of the reinforcement stitches.  You can just see mine in the centre of the machine foot below and my needle is to the left of them.  Stitch about 1" with small stitches and change back to your usual stitch to sew along the gathered section of the inset- the gathers should be on top.   If your gathering threads were 1/8" and 1/4" apart you will be stitching below them with your 3/8" seam.  If your gathering threads were 1/8" and 1/2" apart you will be stitching below them with your 3/8" seam.  I stopped and checked my gathers several times as I stitched this seam between the notches.  When you have reached the notch at the end of the gathers, reduce your stitch size , go slow and stitch to the tailor's tack as before, check for trapped fabric, pivot and stitch along the secured corner.  change your stitch size back to normal and stitch seam to the top left shoulder.
This is a very tricky section.  Go slow and be prepared to unpick the odd section where you have trapped extra fabric.  my first took me two attempts.  Once you are happy with it you can remove the gathers, tailor's tacks and press well.   Follow Jenny's instructions, press seam towards the inset and finish the seam edge with a serger/overlocker ( I turned the knife off on my overlocker as the seam is already narrow) or you can use zig zag or overcast (depending your machine options) on medium weight fabric or 3 step zig zag on lightweight fabrics like voile/lawn to neaten the seam.   If you have no zip zag you could overcast by hand or use pinking shears. There is a discussion thread here on finishing Tova edges without a serger here.  Sew slowly as you finish the edge and watch out again for trapped fabric.  Press again and top stitch all round the inset, I did a extra securing line of stitches where the placket overlaps.  This is my Lotta Echo inset and placket finished.
And here is my voile version.
 This is the inside of echo with overlocked/serged seams pressed up and top stitched.
 And this is the voile version with a close up on the tricky corner.
The next sew-a-long post will be mid week with shoulders, side seams and hem- nice and easy.  You can find the links to all the post so far here and add any pictures to the Wiksten Flickr group here.
Any questions will be answered in the comments thread below, please add your ideas if you can help.
sib blog

Wednesday, 14 March 2012

Sew-a-long Fabric Choices

What a great response!  Thankyou!  It is so much more fun to sew with others.  You can grab the button in the side bar, the code is below it.  Or grab the pic in the last post. And I have added a page where all the posts will be for easy finding.  Don't forget the Wiksten Flickr group if you want to share photos.
So you've bought your pattern and now you are thinking fabric.  I thought the best way to look at this is to  use picture of Tovas that show a range of prints and fabric weights.

Quilting Weight
tova dress
Jenny Gordy has made lots of Tovas in different fabrics.  This dress version is in a Katie Jumps Rope print with a contrast for the panel.  I know a lot of you will have lengths of quilting fabric at home.  Some quilting cottons are thicker than others, I would plump for a lighter feel.   The benefit of quilting cotton is the Tova will not be see through, the downside is if the cotton is a bit thick the gathers on the panel at the front and the sleeves could get a bit bulky.  I have some white Echo Little Flourine print and I will use that for one Tova, I am already thinking multiple versions.

Plaid/Check
Kate at Harmony and Rosie made a lovely flannel plaid version.  What I like about this choice is that the fabric looks the same on both sides, so if the collar falls forward the inside looks like the outside. With any patterns, you do need to consider that you will need to match sections, I can see how Kate has matched the panel and the side sections of the shirt so they all blend together.  You could also cut the panel section on the bias with diagonal plaid- no matching to so and it would look great.  Flannel is a great choice for colder weather.  It does tend to cling to other clothes-something to consider if you are making the dress version, and thicker flannel like Anna Maria Horner's flannel fabric would be too bulky,  Kate is designing and selling clothes herself and has just opened a very pretty shop- check it out here  

Liberty Lawn
wiksten tovas in Liberty
Ashley from Film in the Fridge has just made these beautiful Liberty lawn Tovas and I know some of you are thinking of cutting into your treasured Liberty stash.  I think this is a perfect fabric for spring/summer.  Lightweight, crisp and easy to handle and sew and not so flimsy as to be transparent.  Perfect!  There are other lawns too, Rita has made this beautiful Lisette lawn Tova
Tova Tunic by Rita
Rita has also made a maternity Tova with a few alterations to the basic pattern
Tova, maternity style
I think it looks incredibly stylish, especially for maternity wear.

Voile
I have voile sitting and waiting for this, I know it can be a b*tch to sew at times but it is so silky and floppy and shimmery, it is hard to resist.
Wiksten Tova Top
Leila's looks so pretty and soft, I can imagine wearing a voile version in the summer.  Voile is often a little see through, OK if you are planning to wear it over your cossie at the beach as a cover up or with a little vest, not OK to show everyone your bra at work when you thought you could get away with it.
I am intending to make two Tovas, a quilting cotton Lotta print and a Anna Maria Horner Little Folks pastry voile in water. 
 These are different widths so check your pattern for your fabric width as the length needed varies according to width.  On the voile version will be attempting to used a balanced layout for my stripes so they are centred on the Tova and cross cut fabric for the panel so the stripes run the other way.  
What ever you chose, consider making a test version first.  From reading others' experiences many say they didn't have to make alterations but the seam allowances are small in this pattern, 3/8 inch in most places so you may not want to cut into that expensive Liberty lawn before you have had a test run with a bit of cheap cotton.  Bust measurement is the deciding factor to work out the best size for you and there is a size chart on the pattern that relates bust to size.  Check your chest measurement at the fullest part and use that as your guide.  Sleeve length and garment length is easy to change, width across the shoulder and bust is harder.  Once you have chosen your fabric, prewash it just incase it shrinks a little and press it ready for cutting out and transferring marks Wednesday 21st March.   Don't forget thread- good quality general sewing polyester thread like Gutermann Sew All or Coats Duet.  These are polyester and they have more strength than cotton and a little stretch.  If you plan to zig zag or finish your seams on your machine buy two spools, if you are using separate threads on a serger/overlocker, one will be fine.  Get your pattern taped together and either trace the size you need onto more paper or cut it out from the print out.
 I will answer any sew-a-long questions in the comments reply so others can see or you can email me direct kerrykit(at)yahoo(dot)co(dot)uk or on Twitter as @verykb I don't have all the answers but someone else in the sew-a-long might so dive in and reply to someone's comment if you can help!
sib blog

Friday, 10 February 2012

Spring Swoon

So yesterday was cold but sunny and my little pot of hope started to flower...
there is a little more light in the day.  This week I have been working on Swoon block 2 and I went for spring colours, fresh light prints. I used a mix of Amy Butler Soul Blossom voiles and Anna Maria Horner Little Folks.  The cream is Kona Snow.
I also bought a big A2 industrial cutting mat from Creative Grids.  I was a little nervous buying this online, I had one very badly mailed in the past but this one arrived well packaged and is excellent quality!  I also ordered the mini ruler you can see in the pic above, perfect for adding 1/4 seam to little pieces when freezer paper piecing.  I cannot recommend Creative Grids rulers more highly, they grip the fabric so reduce slippage when you cut, easily my favourite rulers.
Today, there is no sun just rain and cold but even late in the afternoon it is light enough to take photos .  Swoon is a bit of a palette cleanser for me, all I have to do is systematically follow instructions, arrange pieces into piles, chain pieces and make assembly lines.  It all fits together like magic
Half term next week so a week off work, time for us all to get over colds, coughs and laze around.  And whilst lazing, finish a quilt for my sister, make a dress for a wedding invitation and make a few bee blocks, plus a few other things to design and plan.
Enjoy your weekend!
sib blog

Friday, 20 January 2012

I Swoon, you Swoon, they Swoon, we all Swoon

At last I found a little window of time to make my first Swoon block.  All the support and inspiration you could even need is in Katy's Swoon Quilt A Long group on Flickr.  This project would never have started without it.
I have to be very disciplined to sew a big block like this successfully.  A series of assembly lines is needed, stacks of half square triangles waiting to be sewn.  I used a Frixion pen for all my lines and a walking foot for sewing the slippy sliding Little Folks voile
Pins are definitely needed with the voile.  Along the way I must have 'lost' a square here and a piece there a 100 times.
I enjoyed this a lot more than I ever imagined I would.  The block design is simple but very effective and is just what I was looking for with the Little Folks- I know many of you suggested Swoon when I asked what I should make with these fabrics.
Cutting does take ages but I am working only one block at a time so it is easily manageable.  It is a whopper, a mini quilt in itself, 24.5" x 24.5.  I am going for the full 9 blocks but slowly, slowly.

Pressing the seams open is worth the extra effort and made joining a lot easier.  The thiness of the voiles really helps and they have a lot of give, handy when I am trying to match up points.
I am actually bursting to make another but I I have promised my sister a quilt for her birthday, end of February so more Swooning will have to wait.
sib blog