Showing posts with label deer and doe. Show all posts

Thursday, 25 August 2016

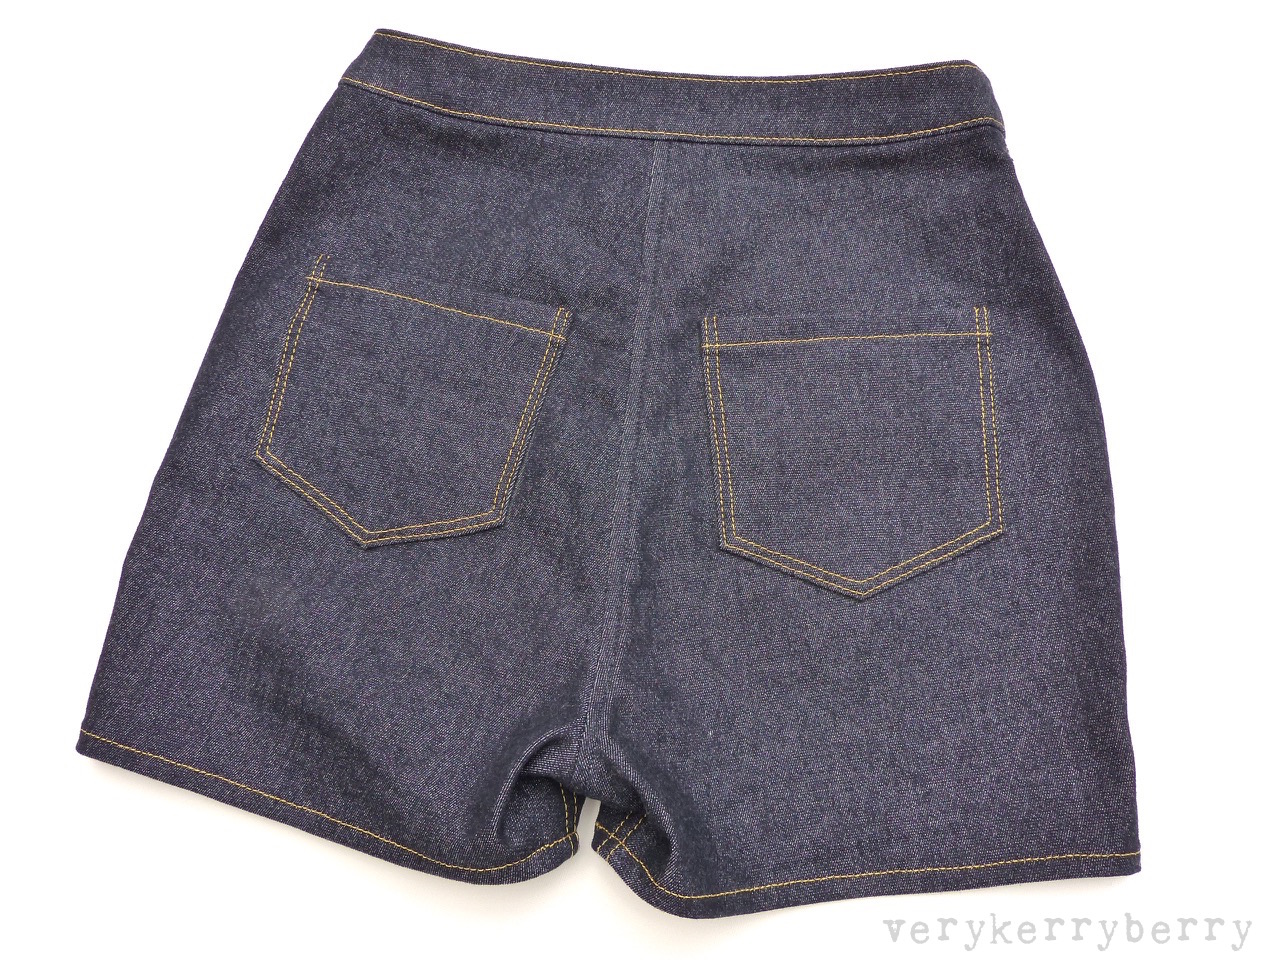
Deer and Doe Safran Shorts and Jeans in Stretch Denim

The keen dressmakers amongst you may have seen the new pattern from Deer and Doe.  The Safran is a high waisted skinny jean suitable for stretch  fabrics like twill and denim.  Camille, the development manager for D and D got in touch and asked if I'd like to review the pattern- it had already been through  detailed testing.  I'll confess, I don't usually wear jeans but I knew they would be very much my daughter's style so I leapt at the chance.


I knew I need to make a test version so when I went fabric shopping I bought 2 metres of 140cm stretch denim which was enough to make shorts and full length Safran jeans.  The right fabric is key to this pattern.  The fit is based on negative ease so the hips for example will be smaller than your actual hips.  Camille sent me extra info about the degree of stretch- 20-30% is the optimum.  This is tricky info to find out online, I feel most online shops have some way to go with the detail on their stretch fabrics- i.e. degree of stretch, direction, weight and detailed suitability rather than skirts, trousers, bags, dresses which feels too broad. 


 I found this locally, it was the only blue available and it's a blue black.  It's a medium weight and 25%  crossways stretch.  This means that if i hold a 10" width of it between my hands, I can stretch it to 12.5" relatively easily and it will bounce back to 10" when released.  I take a quilt ruler to fabric shops when buying fabric like this.

To help with the stretchiness of the fabric, I used a walking foot throughout for seams and topstitching and I also used three machines: one for seams, another for topstitching and an overlocker for finishing seams.     


It's an intermediate pattern and definitely needs some sewing experience but the details are achievable and accuracy is the key.  I use my old Bernina for topstitching and buttonholes as I find my stiching is a lot straighter with that. I used my Janome for seams because it had triple stretch stitch (used on the crotch and back seam) and I can lower the foot pressure to deal with the bulk.  I also found my Clover chalk pencils invaluable for mark making e.g. pocket placement and top stitching.


Adjustments

Based on L's 25.25" waist and 37" hips and from the Deer and Doe measurements, I traced size 36  (UK size 8) waist, grading to size 38 (UK size 10) at the high hip and below.  On the front piece you can't really grade on the seam which forms centre front and the fly so I  traced a size 36 there as L is very flat over the belly and 38 elsewhere.  On the first fitting, she needed more room at the side so I added a further ¼" at the widest parts adding 1" to the hip all round which on the front meant adjusting the pocket and all the corresponding pocket facings and linings to add width to match the back piece .  The high waist fitted without adjustment.  To get the shorts length, I used a pair of her favourites and added an extra inch to the length to allow for the hem when tracing the pattern.   You could flare the  short legs out at this point if you wanted.  I omitted belt loops; L usually has to wear a belt with jeans as to get the hip size she needs, the waist is usually too big so with these I was aiming for a perfect fit at the waist.   I repositioned the buttonhole slightly closer to the waist band side edge.  On the pattern instructions there is a detailed fit section with lots of diagrams describing common issues and how to solve them.


My essential equipment included:
  • Gütermann Sew-all polyester thread for seams and as a bobbin thread for topstitching and buttonhole
  • Gütermann topstitch thread for contrast details
  • Schmetz denim needles size 100
  • Clover chalk fabric marking pencils for all the fold and seam lines including topstitching

With all the fitting adjustments for the hips sorted I made her a full length pair.  I did need to fit the lower leg a little as the knees and calves were a little baggy.  The back leg is cut wider than the front especially in the lower part.  This works well if you have sizeable calves- I do and I tried these on and the calf area was fine for me- for my daughter's skinnier calves I reduced  the back legs by ¼" on each seam from 3 .5" above the lengthen and shorten line to the hem.  The front leg was not altered.


My other tips for sewing either shorts of full length version include:
  • Practice on scrap fabric and make a note of your favourite top stitch length settings so you can repeat where needed to finish your jeans and make them look professional.  I got the best top stitching tension using thick top stitch thread for the right side and standard sew all thread for the bobbin.
  • Weave in your topstitch threads.  Leave your thread ends long and then use a needle and weave these into seams on the wrong side by hand to avoid bits sticking out on the right side.
  • I didn't finish the back pockets.  Instead I trimmed with pinking shears after the first top stitching.  They are secured with two rows of stitching so I thought that was enough.
  • I used a pair of ready-to-wear jeans for some of my seam top stitching and kept it fairly minimal.
  • Stay stitch the waist edge pieces ¼" from the edge.  Denim frays easily and when it comes to fitting, pulling stretch jeans off and on before the waistband is added can be a bit of a strain, stay stitching helps keep everything from stretching out of shape.
  • Trim and grade seams when adding the waistband.  The inner waistband part of the seam is cut smaller than the outer to reduce bulk and lie flat.
  • Practice on scrap fabric  and make a note of your machine settings for a bar stitch so you can repeat it where needed.  I used it were the pattern suggests for the fly but also for the side seams where the pockets start. 
  • For the buttonhole,  most ready-to-wear jeans have a keyhole buttonhole to allow for the thick shank of a metal button and take the wear and tear of opening and closing.  I don't have that setting on my Bernina so I sewed a standard buttonhole, applies fray stop before cutting the hole itself.  I then resewed the buttonhole manually stitching around one end to create the curve.  Fiddly but worth it. 

I was thrilled with both versions of Safran.  The shape really suits L and the fit is wonderful.  Although I needed to fit them to her shape, it wasn't particularly hard to do so.  The pattern instructions are comparable to other Deer and Doe patterns.  They are to the point and accompanied by diagrams which inform the text.  They are not hand-holding and at times I was finding my way a little, the fly always confuses me a little despite having made them many times for the Fumeterre skirt.  I ended up with my crotch seam lying the wrong way in the shorts version and I found the second pair easier and everything is correct.


L is happy with these new additions to her wardrobe and at having jeans that fit exactly to her shape and I enjoyed the challenge of making jeans having not sewn any before.  I've made a lot of Deer and Doe patterns and they always deliver a lovely garment.  Thanks Camille for sending me the Safran pattern and asking me to review, it was a pleasure!
SaveSaveSaveSave

Wednesday, 16 September 2015

Deer and Doe Fumeterre Maxi Skirt: Review, Charcoal Chambray maxi

 September has brought a flurry of new sewing patterns including three releases from Deer and Doe.  I haven't bought a D&D pattern since Chaitagne as the styles hadn't really worked for me, maybe a bit young?  I digress, the new styles fill me with joy, especially the Fumeterre skirt. 


A maxi skirt is a signature garment for me.  it's the equivalent of jeans although I have at least 10 maxi skirts in my wardrobe and maybe one pair of jeans- they may have now been passed to my daughter!   I also had a longish length of chambray, an eBay bargain with a few faults but great as a first try on this pattern.  Deer and Doe patterns are very consistent size wise so I knew I would be a 38 and with the branding revamp I noticed that the finished garment measurements are included on the patterns which is very helpful.  


As a result I traced my pattern with a size 40 waist grading to 38" hip by the first triangle notch and I shortened the length by 4".  I knew I wanted my skirt to sit a little lower than my high waist.  I can't bear tightness around my high waist, it makes my belly bloat in minutes and is generally uncomfortable.  Adding this extra ease worked perfectly for me.  I also tapered the side edges of the waistband pieces so they are slightly diagonal rather than straight- similar to these trousers.  When it comes to shortening, I did try adding a shorten line just over half way down the panels so that I could use the original hem facing pattern pieces but the adjustment at the side seams is too big so I shortened from the hem measuring up 4" upwards  following the curve and redrafted the hem facing.  For reference I am 164cm tall, just under 5' 5".


Additions included:
  • Cutting the hem facing and fly shield plus pocket linings (the original pockets are not lined) from a contrast fabric.  I used Liberty lawn, it's perfect for this purpose. 
  • Addition of pocket linings.  I did this as I do use pockets and these are patch pockets that will bag out if I stuff my hands in them a lot.  The lining fabric needs to be thin to avoid adding bulk.
  • I added interfacing to the fly front that will be topstitched on the left front.  I used Perfect Fuse sheer.  


I had 235cm of 140 wide fabric and I just managed to fit the shortened pattern pieces out of it - as the fabric had a few faults I was slightly limited and the hem facings need an extra 50cm of fabric so remember to allow for that.  You readily need a fabric that either has no directional print or works both ways vertically otherwise you will need a lot more fabric!  It's always the way with panelled or A-line maxi skirts!


The sewing process was pretty straightforward.  I chose view B with a fly front which I have no experience of sewing.  The instructions are brief on Deer and Doe patterns and these were no exception.   The patter is rated as 4 out of 5 so it does need a little experience although view A would be easier than view B.  I did get my fly shield the wrong way round so the overlocked edge rather than a fabric folded edge was on the outside but the fly functions so this was a minor slip up by me. 

I used glue basting for the pockets and for the waistband.   It's a great little cheat and is so fast and effective. The waistband is fitted back to front with the lining first and the outer second so the finishing seam is on the outside of the waistband.  It makes for a very neat finish.  I used a hook and bar fastener rather than a button to finish the waistband off.


What can I say?  I love it.  The addition of a little elastic in the back waist means the waistband can sit higher on me than I can usually wear comfortably and it feels comfortable and the elastication is so minimal it does not have the look of an elasticated waist (I'm not usually a fan of these). 


It's swishy and flows as I walk.  I was lucky with the length: it is long enough to be a maxi but doesn't get a wet hem in the rain or make me trip up walking up stairs.  I thank my daughter as usual for these photos, she does such a great job.  I did take a phone snap to capture the tucked in version.  


With the right top tucked in it gives a great effect of length, especially to my legs which are in reality on the short side.  I feel like this pattern could've been designed for me!  I bought my patterns (I also bought Cardamome) direct from Deer and Doe and you can also buy them from Village Haberdashery- you need to email Annie to arrange this, they can't be sold by another retailer online, only by Deer and Doe themselves.  There are some tutorials coming from Elenore for the dress patterns including small and large bust adjustments and the sizing range has been increased for all the new patterns.  There's also new colour coding: all woven patterns are in Ochre packaging and are part of the Botany collection.  There's another colour for knits/jersey and they form the Meterology collection and there are designated hashtags for all designs #DDfumeterre.  

Edited to add:
A few people mentioned in emails and on IG have asked how this style compares with the Sewaholic Gabriola skirt.  Although they are both maxi skirts, there are some differences.  
  • I think Fumeterre uses a little less fabric. 
  • The Fumeterre has panels cut on the straight grain, the Gabriola makes more use of bias in it's  diagonal hip sections, hence it uses more fabric.
  • Fumetrre has pockets. 
  •  I found the fit easier on the Fumeterre.  Maybe because Deer and Doe patterns fit me with less alterations.  I found the hips needed a lot of reduction on the Gabriola even though I am slightly pear shaped.
  • Although I like yokes on skirts, the Gabriola one tends to emphasise my belly at the front rather than smooth over it!  There is a greater use of bias on the Gabriola style. 
  •  I like them both, they each have great flow when walking but I'm thinking about my second Fumeterre and I haven't made another Gabriola! 
I hope that helps! 

sib blog

Thursday, 26 June 2014

Liberty Pinks Datura

A quick make for the remains of the hot weather- you know summer comes fast and often briefly in the UK so we have to make the most of it! I bought these two Liberty prints, the pink is Capel and unsure what the ribbons is- from Shaukat at last years Fat Quarterly Retreat.  It was a memorable shopping trip; I was completely overwhelmed by the selection at Shaukat and it is all at competitive prices.


My daughter is really getting to grips with my camera and with the effects of different lighting so I get some lovely pics as a result.   I don't really like standing like this for photos and so doing it with her makes me feel more relaxed. 


 The pattern is Deer and Doe's Datura.  I've made one before here. All the size and modifications details are there too.


Beautiful fabric to work with- goes without saying.  Lined with white cotton lawn on the top bodice.  It is a handy pattern as it uses such a small amount of fabric.


I shall be making the most of any sun today; the rain is a-coming...

sib blog

Tuesday, 11 March 2014

Tips on hemming knits, a Chardon Skirt and a Plantain top.

These were sewn a few weeks ago now, I feel I am playing a little catch up with clothes and blogging.   After enjoying the warmth of my brushed cotton Chardon maxi, I found some lovely fine needle cord at this Etsy shop, paired it with a little Liberty lawn and made another along with a Plantain variation top.  I have covered the skirt process a few times so I will mention a few knit tips for the top.


I saw this variation on Flickr and found instructions and a PDF on her blog followed her PDF to adapt the neck of the top.  I used a 30cm rectangle for my neck piece.  I cut a size 36 and sewed ⅜" seams.  The result is pretty relaxed and slouchy.  I am not totally smitten; it's a little the wrong side of the Cagney and Lacey look, but it is soft and comfortable- the fabric is a cotton jersey knit.   Next time I make a Plantain I will make a straight size 36 with ⅝" seams and raise the scoop neck. For the hemming and the shoulders I used this great product- knit stay tape.   It is lightweight and has a fusible adhesive on one side. I use a strip in the hem of the back shoulders to stop the shoulders stretching out over time, and use it all round the edge of the sleeves and the top hem as it makes it stable and provides and easy way to fold the turn up when the hem is stitched.  It is not essential for creating a good hem and you could cut and use strips of knit interfacing- this is interfacing with a little stretch built in rather than fixed woven interfacing.  The knit tape is pressed all round the hem edge with a hot iron.  It is about ½" wide so provides a great guide for folding the hem.


I have made a few knit jersey tops now and each time my technique improves and I learn a little more.  These are my current tips and machine settings:


1.  Woolly nylon hand wound on the bobbin to provide elasticity to the back of the stitch.  I have one reel of this in light silver grey and use it for all my knit hems and neck lines.
2.  Size 75 4.0mm twin stretch needle
3.  Reduced the sewing foot pressure to 2
4.  Set my tension to 9 on my Janome Horizon to get a true zig zag on the reverse.
5.  Sew slowly, the twin needle places a little strain on the machine and the threads are more likely to snap.  Besides, you need to sew slow as you are guiding the hem and feeling the fold so that you can sew as close to the raw edge of the hem as possible.
6.  Leave long tails of thread at the beginning and end- you need to hand sew the ends in to secure.  Sewing forwards and backwards on the machine is not enough, the wooly nylon always works its way loose.  It is a faff but it is worth it as these edges get a lot of strain and stretching so need to be secure.
7.  Press the hem at the end.  Jersey knit benefits from pressing just like any other dressmaking.


It started to rain on our little garden photo shoot but you get the idea of the top and skirt!


And this does give a good view of the neck.  Not totally enamoured but worth trying out.


The skirt is squeezed out of 2 yards of fabric.  It is quite snug, the pile of the needle cord just adds a little bulk to the waist making it sit higher than I would like so I may change the waist inner facing for something a little finer.  


Pockets and hem are in Liberty tana lawn.


I grade my seams in al the bulky areas, one of my favourite dress making techniques.  


The patterns can be found here.  Plantain is a free download.  Deer and Doe have just released a new skirt pattern, Anemone.  It is a more formal style so I am still at the thinking stage on whether it will work for me- my life is rather informal, meanwhile I have more clothing on the go.

sib blog

Thursday, 27 February 2014

Annie Hall: Deer and Doe Chataigne meet Style 4167, I just know you'll get on

Unusual for me, but I made a pair of trousers.  I am not a trouser wearer outside of work but I had a notion of these from the moment I saw the Deer and Doe Chataigne pattern.


I spent a lot of time humming and hahhing over whether to make these at all.  They took up almost 3 metres of cotton flannel fabric and I didn't want to waste that on something I would rarely wear.  However last week, I wore these three times so I think their future is safe.  


I found the Style 4167 pattern thrifting at the car boot sale (left in photo below).  Sometimes, I can look at a pattern and have a pretty good idea that it will fit me straight off.  I could see that despite the high waist, they were going to work.  I did make a test pair in old sheeting and whilst they confirmed that although such a high waist (and no pockets!) was not for me, they were a nice fit.  I overlaid the Chataigne lower leg pattern pieces over the style trouser and traced off a new front  leg and back leg. Otherwise, all the Deer and Doe pieces were from the shorts pattern- yoke, waistband etc.  Don't get me wrong, there was a lengthy fitting process which I will cover in a separate blog post, mainly reducing the width of the leg, but it was straightforward.


The Style pattern came without instructions but all the pattern pieces were complete, including that rather rocking fitted shirt which is on my never ending list of clothes to make.


I had made the Chataigne shorts before I made the trousers, I think it was over Christmas.  They were a test piece really, made with some light pink twill I bought cheaply on ebay.  I never wear shorts, I am not a fan of tights and I would never bare so much skin in cold weather (or even hot weather) but I love the style, especially the front V yoke section and they were interesting to make.  The cotton flannel fabric gave a great wool trouser look without the itchiness and is soft and warm to wear- it does however attract ever single hair and stray thread and I have a lot of both.

Details:


Resources:
Deer and Doe Chataigne pattern.  Size 38 with ⅛" shaved off all side edges
Vintage Style 4167 size 12
Liberty Lawn, 'Peter Woodward' print

The best complement of all was my ta dah! moment in front Lula when she said they reminded her of an old film trailer she had watched on youtube, " I think it was called Annie Hall?".  Love her x  
And proof that vintage sensibilities are inherited.
sib blog

Monday, 27 January 2014

Plantain Challenge: Deer and Doe

I think Deer and Doe are my favourite indie pattern company.  I love others but I have had the most success with Deer and Doe. The fit and the aesthetic suits me so when they launched their free Plantain pattern I downloaded it tout de suite. 
Along with the pattern came a challenge so I thought I would set a challenge to myself and see if I could make some thick polar style fleece work in this style and prettify some of its less attractive manmade qualities.  I am usually a natural fibres obsessive so this sort of fabric is an anathema, but it was a weird ebay buy and I was curious to see how it sewed, plus I could not deny it was warm and I am perpetually cold.
I had a scrap of Liberty needle cord from Leila, large enough to make the elbow pads, cut a couple of shoulder plackets and trim the edges of a front pocket. I traced the pocket shape off an old hoody top.  A little scrap went a long way.  I like plackets and they are easier to sew than they look, especially on a shoulder where the top section finishes the neck and the bottom edges are sewn into the armhole.  The wooden buttons are decorative (no buttonhole required) and sewn through the layers. 
It is a cuddly soft top to wear, great for working from home days and pilates classes or wearing with PJ pants in the evening and an easy, quick make.  I made a size 36 but the limited stretch in the fleece made for a close fit so ¼" seams throughout.  I used the highest neckline and reduced the neck trim rectangle by 1" in total.  The length and neckline are flattering and work for my height; 5' 5".  I might go shorter for a jersey version. 

Fleece is a beast to sew.  Thick and bulky.  It wears out on pins, needles, scissors and the machine.  I cut it using a rotary cutter and old scissors.  I got through several 80 ballpoint needles until I realised that I needed a 90 and the overlocker/serger was not a success.  Instead I lowered the foot pressure on my machine to 1 (out of 7) and used a small shallow zig zag stitch.  On the plus side, no edges need neatening and the stitches bury in the fluff.
I always find photographing myself in clothes tricky, our house is small with no open blank wall space so I squeezed into our bedroom and tried the timer feature on my new camera.  I noticed I was photo bombed in this pic by the softie my daughter made for her dad.  In another pic you might possibly spot our cat Mindy and a big piece of Liberty lawn waiting to go in a box under the bed. C'est la vie.  The Deer and Doe 'Plantain' challenge is on until the end of January. 
sib blog