Monday, 28 February 2011

Little Green

Blocks for Lucinda in Ringo Pie flickr bee.  Lucinda's theme was Spring and beginnings,  little signs of life.  She wanted neutrals with splashes of colour, newspaper print (love that in fabric) and unusual sizes- especially small.  The bar had already bee set startlingly high by Lucinda, Lynne, Corey and Amber (and Amber's second one)- this seems to be pretty normal for this group, and I was feeling a little shaky.    I don't have many greens in my stash and I did not know where to start after seeing the other blocks.  I found this block called 'Formal Garden' from the very sadly out of print book, ABC Patchwork by Kumiko Fujita.  I go back to this book time and time again, it is a huge inspiration.
Only 4 inches square and deceptively hard to paper piece with all those Y seams, it reminded me of my spools block.
This little crocus was improvised piecing.  I kept starting it, putting it away, coming back, adding a bit more, reworking and fiddling until I got it to work.  I liked how it turned out, shoots, pointy and bright against the brown.  It finsihed at about 5 inches square
The final block was a little twisty pattern that I found here and whilst working it I discovered a great little paper piecing technique that really helps with accuracy.  UK readers, I buy my freezer paper from ebay, there are lots of UK sellers and a roll of Reynolds will last an age.
Often with freezer paper piecing (I iron the paper on the front of the fabric but this works either way) there is no wriggle room.  If your seams are out just a little it can throw the whole block.  I found with a little extra pressing you can increase your accuracy on straight edges a lot!   I iron the freezer paper on the front of the fabric, just  a personal preference, but this technique works either way.
Take the next piece to join the block,
Fold back the edge that is going to be the in the joining seam right to the edge of the freezer paper, press with a hot iron.
This is how it looks on the wrong side- a nice crease marking the line of your seam allowance!
I now pin the piece at the top and bottom of the seam and I use my normal presser foot- not the quareter inch foot.  This is because with paper piecing the seams can be a little less than a quarter inch and also the presser foot holds the fabric more evenly.  You sew along the crease so you won't need you quarter foot to guide you, the crease will do that.
Press the seam along the stitching line, flip the fabric back and press again right side- admire your accuracy!
Yes that does look neat! A perfect fit.
 I love this technique, I just wish I had worked it out sooner :)
More green for Muriel's block for Bee Europa, she wants a long, wide skinny block.  I think I am going to do something with geese.
By the way, Little Green is one of my favourite Joni Mitchell songs.  I remember playing this on a tape player during Lula's very long birth!  That was before it all went a bit pear shaped and the fluffy stuff like music disappeared to be replaced by doctors and medical equipment!  My surname is Green, Lula is my Little Green, with increasingly long legs x
sib blog

Saturday, 26 February 2011

GIVEAWAY!

I started my little blog one year ago (yesterday) so happy birthday blog!  Lets celebrate!
It has been a very creative year and I have learnt so much and made great online friends.  I didn't realise just how good having a blog would be and it has really suited me.  I am hopeless with diaries but online it just works and I can think in pictures much better than words, it works a lot better for me!
So here are the goodies, a fat quarter of a Japanese bag print from my stash, called 'Country Style'.
It has the cutest selvedge- just looks at all the buttons showing the colours, definitely a selvedge to incorporate into a design and the print is so cool, lots of bag shapes, outlines and words.  And in addition, a Moda charm pack has been generously provided by Liz of Quilty Pleasures, a recently opened bricks and mortar modern quilting shop in Brighton with a new and developing website, a blog and an ebay shop.  I found Liz randomly on ebay and bought an EZ dresden, she was so helpful and has a very promising selection of quilty stuff that I know I will be back to buy more from her.   She has a great background in printed textile design, perfect for running a specialist fabric shop.  A big thank you to Liz for providing a lovely charm pack, 'Sugar Pop' from a new Moda designer, a different Liz,  Liz Scott.   

I can't tell you how nice this is and I can't even enter my own competition!  I don't get free stuff sent to me personally(but hey I would be happy to receive it...) I endorse stuff because I like it and I love this!  The fabric is made in Japan and there is a lovely balance of colours and prints based on sweeties.  Liz Scott is a former Spoonflower fabric designer and this is a great modern graphic range!
So to enter, how about telling me something interesting or unusual that you carry in your bag?  Here's mine,   I always carry this little Swiss card with hand scissors, pen tweezers etc.  You can't see it but there is a pin and a ruler too!  Very handy.  
To enter:
tell me what you carry in your bag- one entry
if you follow- put an extra entry in telling me you follow-two entries!
Open internationally.
If I can't find your email I will let the random number thing chose another entry.
I will not respond to these comments as they are competition entries but you know I love you all x  
I found a great and easy gadget for comment numbering comments here
Good luck, competition closes midnight GMT 8th March
sib blog

Friday, 25 February 2011

Fabric Gifts- the best kind

I had two great fabric parcels yesterday, the best thing to get in the post and both form overseas. Firstly a parcel from Ayumi containing packets of goodness from Japan!  She put together a little parcel for each coaster make from Suzuko Koseki's gifts at the Tokyo Quilt Festival/
Ayumi also sent me the cutest stickers and postcard, I could seriously lose myself in a shop selling stuff like this.  Ayumi, you choose the best things!  The little jar of peanut butter jumped out at me straightaway, and the box of biscuits with the Bonne Maman style gingham box.  She has a great blog entry with some amazing pics of Zakka gifts and goodies here.
And this beautiful silky, shimmery pile is the Block party Prize for my spools block generously provided by Kim at Poppy Seed Fabrics.  She has a wonderful range of fabric but it was these Anna Maria Horner Little Folks Voiles that really stood out.  Kim has such a good selection and some lovely rainbow Little Folks bundles including the new pastry line with the scalloped stripe.  I got a big length of pastry voile  in 'water' (the blue) to make a Pochee tunic and the other FQs are to make a silky blanket/quilt of dresdens.  
A big thank you to Kim, Heather and Megan at Quiltstory and everyone who commented on my little block x  
Remember to visit here tomorrow- a fabric giveaway is sitting ready for someone to win!
sib blog

Thursday, 24 February 2011

The Kitchen, that's where You'll FInd Me...


I made this for a fun secret swap on Flickr- Favourite Little Quilt Swap, run by Kendra. There was a date to complete by and then all the mini quilts were anonymously displayed and the creators vote for their top 10 out of all the completed entries.   We are then secretly told who and where to send our quilts.  Then we must wait to see which one we will receive from our top ten list!
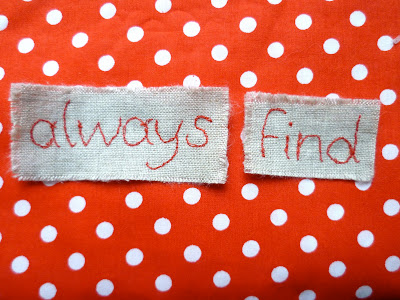
 As there is no one specific partner in mind, there is complete freedom to design any quilt you like.    This idea has been in my head for some time, inspired by some blocks in Kumkio Fujita's 318 Patchwork along with bright enamel vintage kitchen wear.  The piecing was surprisingly straightforward,   however the hand written note was nearly my undoing.  I felt like Goldilocks tasting the three bears' porridge...
Hand sewn, polyester thread- melted under the iron
Linen, machine sewn- too big
Hand sewn, embroidery floss- too bold and chunky
Stamped- too close together
 
Stamped with correct spacing- just right.  
 I can't even show you the stamping I did with red ink that I couldn't set on tiny scraps of linen- my little dog, Lottie kept finding them and eating them so they ended up in the bin!
Vintage large polka dot fabric on the back along with scraps from some of the front fabrics.
The prairie points on the shelf were adapted from Penny's great tutorial at Sew take a Hike.  The mini quilt was posted a few days ago and is on its way to its secret new home x
sib blog

Tuesday, 22 February 2011

Scrappy Pincushion Swap

I have been the most dreadful tease and posted a slow series of tempting pics to tantalise my swap partner at the Scrappy Pincushion swap.  Entree- linen, cashmere/wool, vintage cotton lace.
Entree- Scrappy pincushion materials
Main course: Denyse Schmidt Hope Valley- wall flowers and whatever the grey print is called, Yuwa text, American Jane Recess tape measures and Suzuko Koseki button print.
Main course- scrappy pincushion swap
Dessert: DMC embroidery thread, linen tape with bird stamp and partners initial on the reverse, linen measuring tape to finish.
Dessert- scrappy pincushion swap
Finished! The pinnie bit was based on a little block in Kumiko Fujita's book ABC Patchwork Lesson (now out of print), called St Johns Pavement, I like this  block a lot!  Stuffed with fibrefill as it has a way to travel and I don't want customs getting all touchy about walnut shells etc!


I can only just bear to part with it...x 
Come the weekend, this blog will be celebrating birthday number 1, you know what that means, giveaway time!
sib blog

Quilt-a-long Quilt Sandwich and Quilting

Now to make your quilt sandwich.  If you want to add a quilt label to the back before this, go ahead!  I always use basting spray, 505.  I lay the backing fabric (in the background of pic below) out on a Durabac board which is a big foldable fabric cutting board made of cardboard, good for fixing fabric on with pins. You could use a table of a clean floor or carpet.  I put some pins round the edges to make it taut.    I always spray the batting, not the fabric and I do this outside on a washing line as the glue smells and gets everywhere inside.  I lay the batting on to the backing fabric first.
 Then repeat the spraying process with the partial sandwich hanging on the washing line, spraying the batting side and then laying it backing side down on the durabac, the tacky basting surface is on the top.  I then pin out the edges and lay the quilt front on top.  As 505 is temporary you can do as many readjustments as you need and I stuck some safety pins in as well to be extra safe.

My quilting was simple, just a quarter inch echo around the star and stitch around the edge of the central squares. I don't want it to be too dense so I kept it simple. For the quilting thread- I am using Gutermann Sulky col.1071 which matches Kona snow perfectly.  I did try a contrast thread but I didn't like the look of it (you can see below), I'll use this in the binding instead.
The lighter colour is less dominant.
I used my walking foot and you can see how I lined up the foot with the star points to keep a regular quarter inch.
When I quilt I always position my needle start a quarter inch ahead of where I want to start, set the stitch length on the smallest setting, 1mm, and make sure the top thread tail is going right and the bobbin thread tail is going left- stops lumpy knots underneath.  I backstitch to the point where I really want to start, change the stitch length to 3.5mm and stitch away.  These longer stitches make for great quilting and cover up the tiny securing stitches at the beginning.
Before you stitch all the way round and back to the beginning, trim off the thread tails.  This is how it should now look, securing stitched are hidden, all nice and neat.
This is how it looks on the back.
At the end of the stitching I reverse about quarter inch again changing the stitch length from 3.5mm to 1mm.
And this is how it looks on the back.
For general help on making a quilt sandwich without basting spray see: Oh Fransson!
Quilt your Circle of Wonky Stars baby quilt any way you want and I'll see you back for the binding!
sib blog