Showing posts with label Meg McElwee. Show all posts

Thursday, 6 November 2014

Boat neck top: Winter wardrobe basics

You'd be forgiven for thinking that anyone who makes many of their own clothes spends their life in a series of dresses and beautiful shoes.  The reality is that my day job involves a work t shirt, hoodie and Nike air dry track pants and when I come home from work, especially in colder weather, I change into jersey tops and skirts or yoga pants.  I have a few Uniqlo tops with a boat neck shape that work well for me and I wanted to replicate the same neck line.  I think I've cracked it.


This is the much used and loved Meg McElwee scoop neck long sleeve T from her Cratsy Sewing with Knits Class  I've mentioned this class many times here.  It is frequently on offer in the Craftsy sales and promo emails and I love the fit.  The simple shape makes it a great base for other knit styles and I have the confidence now to play with it a little.   I redrew the pattern and redrew the neck on the front and back with a  ¼" seam allowance to turn for the neck edge.


 The fabric is a wonderfully easy- to-use interlock from The Village Haberdashery.  There are lots of colour options and if you are new to sewing with knits, this is a great fabric to start with as it lies flat when you are cutting out (unlike single jersey which curls up) and is straightforward to pin an sew.  You can read about different kinds of knit fabrics on Rachel's blog.


The back shoulders have knit stay tape pressed on to stop any stretching before the shoulder seams are overlocked.  I use my overlocker for all the seams and my usual sewing machine with a twin needle for all the hems.  I took a lot of care sewing the neck as I didn't want it to stretch out of shape.  The fabric is quite thick so I lowered my foot pressure to 1 (the highest is 7) when sewing the hem with the twin needle and used a long stitch.  I have some tips on hemming knits here.


I softened the lower hem with a little inward curve at the side seams.   The only way to match the stripes is to pin every stripe.  I use Prym ballpoint pins.


Hurrah for a winter basics!  Inevitably, more are planned.


sib blog

Monday, 3 June 2013

End of Me-Made-May 13

I have absolutely loved Me-Made-May-13 and I am so grateful to Zoe for organising this initiative.  I have found it encouraging and inspiring to see so many others make their own clothes- a huge range of locations too!  It gave me a sense of direction making my own clothes and althought the UK weather was rather chilly for much of May, I wore things that have been hiding neglected in my wardrobe and discovered again once more.  The self photography is challenging and everyone's least favourite aspect but I did give my daughter a chance to sharpen her photography skills whether she liked it or not.  
This outfit is a couple of favourites, old and new.
The skirt is Simplicity 2215, one of my favourite patterns ever, read more about it here.  The top is from Meg McElwee's Craftsy Sewing with Knits class and although a recent make, I wear this a lot.  
It was colder mid week so I wore a warmer corduroy skirt, Simplicity Amazing Fit 1717 with last years voile Tova- rather depressingly boots and socks had to come out for this day.  You might notice that Lottie doesn't like to miss a photo op.
On Thursday, sun shone so a return wear for vintage Simplicity 6789 wrap skirt.  This is skirt has had lots of wear already and it is only a few weeks old.  Although it is a vintage pattern, this one comes up a lot on Etsy and ebay.  The blouse is last years' 'Library' blouse (Christine Haynes pattern class on Craftsy).  I like the detail on this but it has always been big in the bust so I refitted the dart and made it a lot longer and also removed the bow.  The neck line is a 60s shape and is cute but not the most flattering cut for me.  The tucks are my favourite part of this top.  The bag is Me-Made too.
I finished Me-Made-May-13 with a new dress. 
This dress came about with a little detective work.   I found a homemade dress at a car boot sale last summer that was the perfect fit.  After hours, days, weeks  a little browse on Etsy, I found the pattern, Simplicity 6329 that matched the dress and in my size.  View1.  It is an economical pattern, omitting the ties meant I could fit it into 2 metres of fabric with a little to spare.  I knew a black floral worked so I chose a Shelburne Falls floral print bought from here.  I had some thrifted vintage cotton bias binding.  I find early 70s styles work well for me- fitted at the bust and flowing over the hips works well on my body shape.  I cut an inch longer than the original.

So far so good.  Fitted around the bust well, only a little extra fullness which is acceptable for me- if I fit too closely it can look a bit skinny.  I added a little button detail to highlight the bodice detail which is harder to see in darker fabric.  I took the sides in 1/2" each side.  
I took my time on the zip and consulted my sewing bible and followed every tedious stage of 'centred zip'.  It took a while but it did work.
You can see the 3 sewing stages here- hand basting, machine basting and then top sewing.  It was a pain to do but it is the best centred zip I have ever done and as this is a long and visible area all down the centre back, I wanted to nail it.  I did notice something else in this picture that I have learnt during May: I am round shouldered so my shoulders come forwards a little. I am stretching my back and shoulders a little more and trying to correct my posture (when I can be bothered).  It is something to consider for future pattern fitting.
All fine, fitted nicely- then I did the armholes, trimming and binding and found the sides were way to big and that I hadn't looked very objectively at the fitting stage.  So I pinned and took it in more graduating to the hip as you can see in the line of pins below (Me-Made PJ pants are in the pic too!).

I did end up with a perfect fit eventually.  A couple of lessons learnt.  If I had traced the pattern I could then have trimmed my pattern for next time- I will make this again.  As I used the master piece I took notes of all the changes in a book that I keep for this very purpose.  If you regularly  make clothes I would wholeheartedly recommend this- so helpful!
I fulfilled my original promise and wore Me-Made garments at least 3 days a week, often more.  I made more than my suggested 3 garments and there is more in the pipeline.  I chucked out old clothes that I no longer need to make space for new makes.  I put a lot more effort into my choices so my old faithful- a long denim skirt hardly got worn at all. My percentage of homemade clothing is a lot higher and now I feel more confident with sewing knits, I know that I will be making a lot of long sleeved and short sleeved Tee tops- these are the bedrock of my usual wardrobe.  I am planning another Bleuet dress- this time in Melody Miller 'Vinyl' floaty linen to wear at Fat Quarterly retreat and my original Bleuet is my top make for this month- I love it.  More PJ pants are needed to show construction details for teaching at Retreat.  And then I have a couple of quilts that need to be done so busy busy- I like being busy.
My other Me-Made posts can be found here:
The Flcikr group is full of inspiration if you need ideas for patterns and makes.
sib blog


Monday, 20 May 2013

Me Made May 13 Weeks 2 and 3:Knits

I have been crazily dressmaking inspired by Me Made May 13.  Moderation is a hard thing for me; it's all or nothing and although I constantly try to amend this it doesn't seem to happen.  Prepare yourself for a rather picture heavy post. I have been making a lot of tops because tops and skirts is what I wear when I am not at work. (work is jeans and work t shirt so I never wear jeans out of work).  This post is knit tops and another post will follow with other clothing .
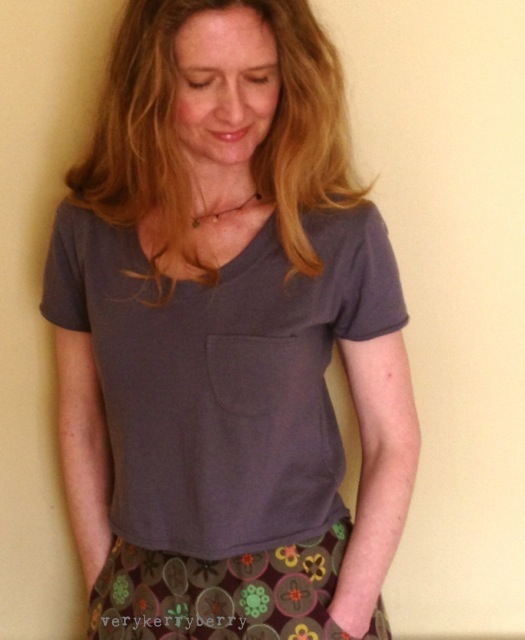
This T shirt is a free download from Kristin of Skirt as top.  It comes in one size which is small (around 10-12 UK sizing.  I made it a little narrower on the sides and added a self drafted pocket.  I also shortened the pattern all round by 1" as I am quite short in the body.
It makes a lovely T, lightly fitted at the top and loose at the hip with a dip hem lower at the back.   As the sleeves are part of the front/back it is very economical on fabric which made it perfect for the Nani Iro knit (this print is gone at Eternal Maker and Village Haberdashery) which is only 80cm wide.  This Nani Iro knit is double layered, a bit like double layer gauze, and is very soft.  Eternal Maker sell the same Nani Iro knit in a different print/colours here
I will definitely make more of these! Kristin has included all the making instructions on her blog and it can be made on a standard sewing machine.
I mentioned Meg McElwee's Craftsty knit class before- it is a great class.  Cotton jersey is the easiest knit to work with, especially if it is 100% cotton as the stretch is easy to control and the fabric behaves itself when pressing/cutting etc.  Viscose jersey (like the floral jersey top in this post) is much harder and slips and slides more.  This is organic cotton jersey from Eternal Maker and I managed to squeeze a long sleeved and a short sleeved T out of 1 1/2 metres.
This is size XS and fits really well. I gained a lot of confidence working with knits from Meg's class and it comes with a stack of knit patterns which made it an economical buy.  I wear long sleeve knit tops like this all through the year so this is a great basic.
This is the shorter T that I squeezed out of the left over jersey.
Megan Nielsen Briar pattern, in XS.  I went for the short style and cut straight across the front and left the back as the pattern with the dip hem.  Fit is just right, no alternations.  I underestimated this pattern.  I thought it was going to look like an 80s crop top but actually this ends up at the perfect length for the large collection of A line higher waisted skirts that I am currently creating.  Again, I see this as a wardrobe staple.  The hardest areas for me to fit are armscye/armhole and bust.  With knits, bust is not really something I have to think about (relief) and the shoulder line/armhole is perfect for me on this.
Having seen all the different versions all over different blogs I know it will work with lots of variation lengthened/long sleeves etc.  Maybe even as a cardigan or a woven?   I think it's worth a try- I love this one a lot!  I can't wait to make a version in the new Elk Grove knits! And the best thing about making it in this length is that it hardly takes any fabric.
I have found all the dress making highly therapeutic.  You have to look at yourself objectively when you make your own clothes, accept the lumps, (lack of lady lumps in my case) bumps, short bits, long bits and work with and around them.  I have had issues in the past, eating disorders in my very stressful early 20s, thankfully long behind me but body image is a toughie.  Making my own clothes helps.  They have to fit so sizing goes out of the window- one style like a dress might involve 3 different sizes at the bust waist and hip.  You also have to be prepared for a little failure- getting it right first time is the exception and sometimes you need to accept that you get it wrong.  Wrong fabric, wrong style, being swayed by what looks good on others but will never work on you- I've done them all and I still do it despite over 25 years of making my own clothes.  
My most recent failure was a Tova- not the style but the fabric choice.  Too busy, too small a print, too much going on.  At the moment it hangs in the sewing room so I can ponder it, and as a little reminder that not every fabric you love will make great clothing!  Reuse, recycle, I am guessing this will chop and end up in a quilt.
sib blog