Wednesday, 20 July 2016

Kielo Wrap Dress in Daisy Cotton Rayon Jersey

This post first appeared at the Girl Charlee  blog and as I've now made two more of these dresses I thought I'd post it here before following up with some more info about the pattern, plus a rather lovely giveaway is coming up shortly too.  Meanwhile, this is a Named Clothing Kielo wrap dress in some gorgeous ditsy floral cotton/rayon jersey from Girl Charlee.  since Girl Charlee UK was launched last June, I've collaborated regularly with Mark and the team.  They are a lovely company to partner up with- no pressure, lots of freedom and great service.  Mark got in touch recently to ask if I'd like to sew anything up fromtheir newer arrivals.  I like having a big range of different knit fabrics to choose from and I'm a sucker for ditsy florals whether in quilts or clothing so this mint/pink daisy on navy fabric was definitely calling my name so I said yes, I had a week off work and a pattern idea...


At Maddie's bra making workshop a few week's back I met the lovely Shiona and she was wearing a Kielo wrap dress by Named Clothing  in a Ponte grey/black wide stripe.  I recognised the design straightaway but it was the first time I'd seen it in person.  It looked so elegant and easy to wear, I was smitten.  It shows what a difference it can make to see something in real life.  I always like seeing Named Clothing's new season look-books and admire the freshness and modern look of their designs but from the original pattern picture, it was not a dress I imagined on myself.  It looked narrow and restrictive  in the skirt - not what I like in a dress.  And then when I saw Shiona's I realised that is was quite the opposite, fitted at the top, flowing elsewhere and a dress that I could happily sit sewing in, walking Lottie or wear going out in the evening for drinks (a rarity but you never know!).  Girl Charlee are currently expanding their pattern range and this will include stocking PDFs of Named Clothing designs.


Stats:
  • Named Clothing Kielo Wrap Dress.  Sewn in size EU 36/US size 4/UK size 8 size.  Length reduced by 6¼" measured upwards from the original hem to maintain the curved hem shape.  Mark for the top of the split moved upwards accordingly.
  • Fabric used: Pink mint daisy on navy blue cotton/rayon jersey blend, 142cm wide 2.5m.  Width is just under the required 150cm but pattern pieces fitted with a little room to spare. 
  • Because the pattern pieces are placed to fit together in opposite directions to make the most economic use of fabric length, this dress is  best sewn with non-directional prints, prints that work vertically in both directions or solid fabrics. This print is mildly directional but is so busy that you cannot tell the back is running the opposite way to the front.  Stripes would look good but require a lot of accurate pinning.  Drape and lightness works well with this style as it reduces bulk round the waist and hips.
  • Pattern: Needs to be traced.  Pattern is nested, two sizes at a time and for the front and back you  trace the top of the dress, make a matching mark, then switch the tracing 180 degrees to match up and trace the skirt section.  There are only three pieces so the tracing didn't take long and there are only 12 pages to print and join together so although it's not for everyone, I like this method a lot! (I hate printers and printing!)
  • It is a bit of a challenge to trace between sizes because of the way the PDF patterns is arranged on the page.  However on this style,  it's the bust measurement that is most critical as the waist hip area is very wide to allow for the wrap.  The lower skirt could be tapered out easily for extra width at the hem.  
  • As the fabric is quite slippy for marking dart lines with chalk, I used tailor tacks and soft pencil for the front and back darts.  I have a tailor's tack video here.
Handling and Sewing the Fabric
Prewash - Always prewash clothing fabric following any manufacturers instructions if you can find them!  Some knits benefit from a light press but this one was fine.  The fabric is very drapey so it will slide off surfaces easily.  I cut it on the floor, laid out on a Durabac board equivalent to this.  Take time to get the fabric flat and even and the selvedges together- this step can take a long time with knits.  This fabric does roll at the edges.
Sewing - Sewn on a mix of Bernina record 830 sewing machine with walking foot and size 75 stretch needle and using a small zig zag (length 1, width 1) for open seams/split and a Brother 1034d serger for closed seams and edging.  It could be sewn entirely on a sewing machine and edges do not need finishing as they won't unravel, it just looks neater. 


Instructions - The pattern instructions are quite brief as is the Named style.  There is a lot of detail in the first few pages covering methods which apply to most garment sewing, assembling PDFs etc.  There are only a few pieces to fit together so not a huge amount of instruction is needed.   There are a few diagrams which are most relevant to sewing up with a woven fabric.  There are no particular instructions for knit fabrics.  I sewed the neck and arm band edges using an excellent tutorial on Colette pattern's website.  using a zig zag stitch to catch the binding. A double needle hem would've been a struggle to sew with the layers.   I raised the armhole by approx. ¾" as the weight of the wrap was showing a lot of side bra!  I was careful at all times to support the fabric as I was sewing.  The drapey fabric has a bit of weight to it so use your knee, table or ironing board to help hold up different sections as you sew.
Stages in making the back split:

  • Applying stretch interfacing- ½" wide strips along length of split plus ½" above
  • Serging the split edges starting 2" above the split notch/mark on each side
  • Serving the centre back hem to the point where the separate serged edges begin
  • Stitching the spilt down using straight stitch- following pattern instructions, then turning hem
  • Adding hem using double needle, ¾"interfacing and sewing the hem approx. ⅝" from folded edge.


Extra techniques
Interfacing for knit fabrics (Perfect fuse sheer) used on split and hem.  For the hem, I cut the strip so the stretch is horizontal to create extra 'give' in the hem.
Interfacing tape (Vilene) used on back shoulders.  This has a line of stitching built into the interfacing to stop the shoulders stretching.
This seam can then be pressed to the back to prevent irritation.  You could also use woven tape or clear elastic.   
Binding tutorial: Colette's excellent 'How to Bind Knit Edges": 4 Complete Methods for neck and arm holes.  I used the 'clean finish' method and cut the bands cut according to their calculations and sewn using a ⅜" seam allowances (as is the rest of the dress).

How you hem jersey garments depends on three things:
  1. The fabric- how thick, how stretchy?  
  2. The hem function- does it need to be strong enough to stretch?  Straight stitches will pop one when stretched. 
  3. Appearance: how do you want it to look?  Zig zag?  Copying ready to wear garments with two lines of stitching, created by using a double needle for stretch fabrics?  I use Hemline (Klasse) size 75, 4.0mm (gap between the needles) twin stretch and a wooly nylon thread hand wound on to the bobbin to help with elasticity and stretch.  For more details on this technique, see here. 
I sewed up five different hem samples to show you the difference when adding stretch interfacing, using wooly nylon, how close to the raw edge the hem is stitched, cutting away excess, using a double needle, using a zig zag.  All samples were sewn using a walking foot and Gütermann thread on the thread spool and all were pressed- click to see extra large! 

Hem details
1. Double needle
Interfaced
Tension increased.  On my machine it is a +/- wheel (see below)  Most machines have 4.5 as their average tension setting, the increase would be to around 6 or 7 maybe higher.   On my Janome Horizon, my tension is set at 9 for a double needle knit hem.  The aim is to have the wooly thread forming a well-defined zig zag stitch on the back, not pulled too tight and two lines of straight stitching on the front
Stitch length 3.5
Wooly nylon in bobbin (hand wound)
Sewn at edge of 0.75" (three quarter inch) hem turn up
Note the tunnelling- the bumpy ridge between stitching line, even after pressing.


Tension- arrow shows wear the vertical line is usually positioned

2. Double needle
Interfaced
Tension increased
Stitch length 3.5
Wooly nylon in bobbin (hand wound)
Sewn edge at approx. 0.5" (half inch) of 0.75" hem turn up
Excess hem then trimmed off
No tunnelling!  This method used on the dress,

3. Zig zag stitch
Stitch width 3, length 1.5
Interfaced
Extra thread on surface for tension whilst sewing- the zigzags sew over the top of this whilst you are holding it tautly,  pulls out for easy removal afterwards (this idea came from my  1974 Bernina 830 record handbook)
Normal tension setting
Sewn edge at 0.5" (half inch) of 0.75" hem turn up
Excess hem then trimmed off

Sewing zig zag using a surface thread for tension, removed afterwards

4. Zig zag stitch
Stitch width 3, length 1.5
No interfacing, no extra thread tension as in example 3
Normal tension setting
Sewn edge at 0.5" (half inch) of 0.75" hem turn up
Excess hem then trimmed off

5. 4. Zig zag stitch
Stitch width 3, length 1.5
Interfaced
No extra thread tension as in example 3
Normal tension setting
Sewn edge at 0.5" (half inch) of 0.75" hem turn up
Excess hem then trimmed off

It's a great summer dress, flowing because of the width of fabric at the wrap area but elegant and column shaped from the tapering side seams.  I raised the split to compensate for shortening the hem and it is easy to walk in- I am a strider!  The dress can be bundled in a ball and thrown into a case- perfect for holidays so I know it will be going to the beach with me in a few weekend's time.  I've worn it for dog walking, hitching up my skirt to scoot up a hill with no problems and in hot weather it is light and airy and benefits from the cool-to-feel touch of rayon in the blend.  It's a dress to store in a drawer or on a shelf rather than hang as the weight of the fabric could stretch it out of shape.


I would definitely sew another knit version- potentially suitable fabrics from Girl Charlee would be:
Mint coral daisy on grey- watch out for the placement of the larger flower over the chest!
sherbet stripes (lots of stripe pinning) 
Sunrise Stripe (lots of stripe pinning)
These all chosen because they are lighter in weight, have a cotton component, and some have rayon in the blend. I've avoided lycra as I didn't feel this dress needed it but maybe it would work?  A lighter Ponte might be good too.  It's a versatile pattern as I've seen woven versions as well as knit and for stretch fabrics, different amounts of stretch seem to work as well as the lower stretch fabrics.  It's a flattering and forgiving fit- the ties can also work wrapping to the back or just loosely fastened for a tent-like fit on sultry days. 

Thankyou to Mark for sending me the fabric and Laura from Named Clothing for supplying the pattern PDF.    Fabric and pattern provided for free, all opinions are my own. 
SaveSaveSaveSaveSaveSave

Monday, 18 July 2016

Farmer's Wife Quilt-Along, blocks 85 and 86, Primrose and Priscilla

Welcome back to another Monday in the Farmer's Wife quilt-along.   I've just had a very busy work week and I'm coming into family birthday season with my husband and my daughter so time for blocks has been a little limited.  I made block 85, Primrose (p.244, letter p.26) as a half-block for the quilt layout (Queen or Twin) that I'm following from the book.  Jo Greene of Life in Lists is back with a guest post on this block so see a full size version of Priscilla here.


Fabric Credits
Kona Bahama Blue
Unknown repro feedback print

I made the next block, 86, Priscilla (p.245, letter 44) last year when I first reviewed The Farmer's Wife 1930s Sampler Quilt book .  I simplified the block slightly taking out the extra half square triangles in the centre square - although you could leave these in and make more of a feature with them using different colours.  There are Y-seams in this block but as the sections are larger they are more manageable than many of the other Y-seam blocks.  I have a this detailed Y-seam tutorial here.  The  majority of pieces are best cut out using the freezer paper template method.


Fabric Credits
Ayumi Takahashi for Kokka, Lighthearted Circles
Unknown 1930s repro purple floral

{For both blocks, I link to sponsor shops for fabric bought from them and elsewhere for other fabrics}

The yellow lines show where I removed lines so instead of A1, A2, As there was just A1 and A2, (same for B).  the rest of the block is sewn together as described on the CD and I've marked the Y seam points with stars.  This is actually a great block to gain confidence with Y seams.  Sew the A1 to C2 seam together first before sewing the long seams either side and then repeat when joining section D.

Rotary Cutting 
These are for foundation piecing so are cut larger than needed with any exceptions noted below.
  • A1, B1: cut (1) 2 ¼" square; sub-cut square in half along the diagonal to yield 2HSTs
For all other shapes, I used the freezer paper template method. 

Top Tips for Foundation Piecing this Block
  • Pre cut all pieces
  • Use a water based glue stick e.g. Sewline, to stick the first piece of fabric on each section
  • Chain piece where possible
  • Follow the Y seam method here, including marking where the Y seam intersections are
Here are a further two nine-patch blocks to add to my seventeen so far.  I've got a layout in mind now inspired by a 1930s quilt, I'll share soon.


  • You can share your farmer's wife quilt blocks with the hashtags #fw1930sqal and for these blocks either #Primroseblock or #Priscillablock as well as #fw85Primrose, #fw86Priscilla
  • If you want me to take a look at your blocks, tag me on Instagram, I'm @verykerryberry or comment here and paste in a link to your blog
  • There's a Flickr group you can add to here.  All my Farmer's Wife 1930s blocks can be seen in this album and my 9-patch blocks in this album. 
Charise is back as guest blogger next week and I know she has a Y-seams tutorial planned as block 87 is a tricky one!  
SaveSave
SaveSave
SaveSaveSaveSaveSaveSave
SaveSave
SaveSave

Monday, 11 July 2016

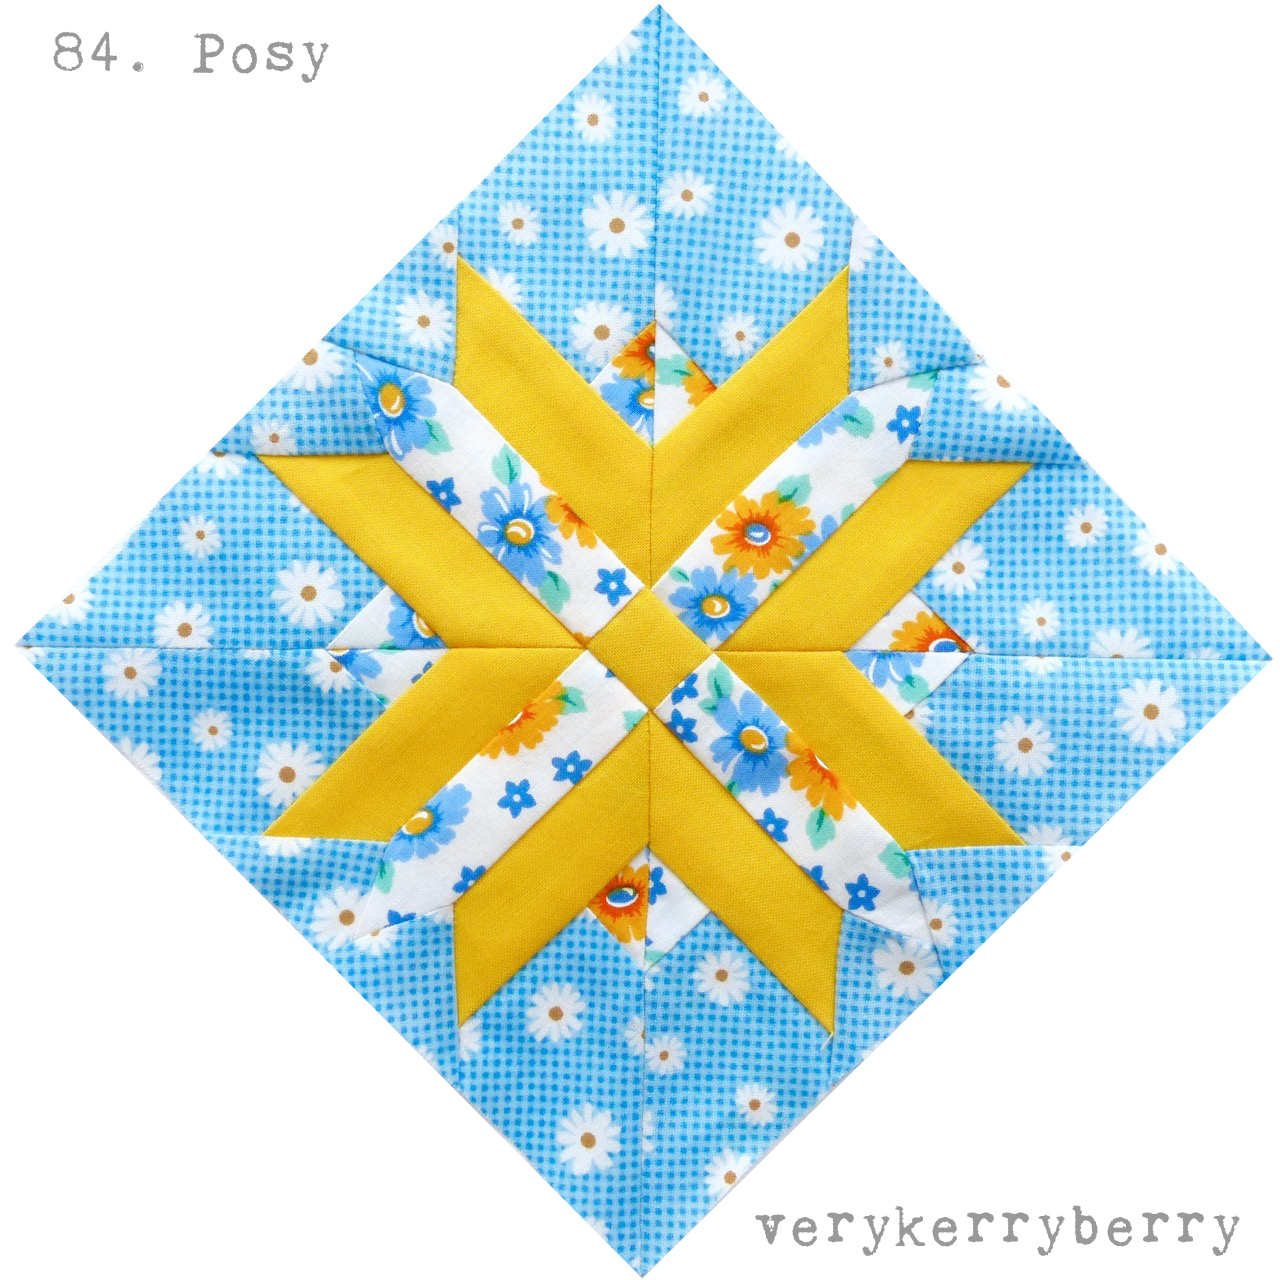
The Farmer's Wife QAL blocks 83 and 84, Poppy and Posy

Welcome back to two more blocks in the Farmer's Wife quilt-along.  I keep feeling that the end is in sight and I've nearly finished and then a block like 83, Poppy (p.242, letter p.122) gives me a reality check, kicks my sewing butt and reminds me how long a single block can take to complete- about 4 hours in this case!  Sarah Edgar is guest blogging on this block, read about her experience here.


Fabric Credits
Gracie's School House Classics Dotty Blue Blossoms (Judie Rothermel for Marcus Brothers)
Moda solids Betty's Green
Pink bubble repro print
Unknown repro feedback print (for the fussy cut kettle)

Block 84, Posy (p.243, letter 115) is another block featuring Y seams which take hours to sew- I hope I'm selling it to you; both these blocks take time but they are rather impressive once finished.  The rest of the block is straightforwards if a little fiddly but the little triangle background pieces  are all inset and need a Y seam.   I've done a few Y seam posts now so I recommend you check this detailed tutorial out here.


Fabric Credits
Kona Corn
Robert Kaufmann Morningside Farm, Daisies Lake, Darlene Zimmerman
Unknown blue grid floral

{For both blocks, I link to sponsor shops for fabric bought from them and elsewhere for other fabrics}


Rotary Cutting 
These are for foundation piecing so are cut larger than needed with any exceptions noted below.
  • Small half-square triangles: cut 4 (1 ¾") squares; sub-cut each square in half along the diagonal to yield 8 HSTs
  • Centre square: Cut (1) 1 ⅜" square
  • I1, I3,R1, S1: cut (4) 1 ⅜" x 3 ½"rectangles
For all other shapes, I used the freezer paper template method. 

Top Tips for Foundation Piecing this Block
  • Pre cut all pieces
  • Use a water based glue stick e.g. Sewline, to stick the first piece of fabric on each section
  • Chain piece where possible
  • Follow the Y seam method here, including marking where the Y seam intersections are

Here are some more nine-patch blocks to add to my collection, 15 in total so far.


  • You can share your farmer's wife quilt blocks with the hashtags #fw1930sqal and for these blocks either #Poppyblock or #Posyblock as well as #fw83Poppy, #fw84Posy
  • If you want me to take a look at your blocks, tag me on Instagram, I'm @verykerryberry or comment here and paste in a link to your blog
  • There's a Flickr group you can add to here.  All my Farmer's Wife 1930s blocks can be seen in this album and my 9-patch blocks in this album. 
Jo Green returns as a guest blogger next Monday!  I'm hoping she has a layout plan that we can see with her blocks.  See you next week x 
SaveSave
SaveSave
SaveSaveSaveSaveSaveSave
SaveSave
SaveSave

Sunday, 10 July 2016

July at Village Haberdashery

A bright and colourful selection from Village Haberdashery for this month's sponsor post.  There have been so many glorious fabrics arriving  in the last few weeks.  I've picked my usual mix of dressmaking/quilting and fabrics which will work for both!  I do enjoy putting these together and getting the hit of c


From, row by row and left to right:
  1. Carolina Gingham 1" in coral. Yarn dyed large check from Robert Kaufman.  I've been using this fabric in my Nine Patch quilt blocks and it has a soft drapey feel.  I'm going to be ordering some more for a top- it would suit a Tova or an Alder Dress.  It takes gathers nicely and has a flow to it.  Works very nicely for quilting too!
  2.  Cotton Lawn in Artisan Splash.  Lightweight dressmaking cotton, wide width and gorgeous colours.
  3. Kona Matching Brush Strokes: the most incredible selection of Kona solids to co-ordinate with Brush Strokes.  Annie regularly matches up new ranges with co-ordinating Kona colours but this selection is so incredible either with the prints or on it's own.
  4. Megan Nielsen Reef Camisole and Shorts I love this new cute two piece pattern from Megan and it has potential to move beyond summer wear to casual shorts and a vest style woven top.
  5. Boardwalk Delight- I scream, You scream.  Art Gallery limited edition collection from Dana Willard.  Art Gallery cotton is exceptionally soft and smooth, more like a poplin than a quilting cotton so it's versatile works for quilting and clothing.
  6. Fen Dress/Top by Fancy Tiger.  Boxy dress and top pattern with sleeve and hem variations, pull over-style (no fastenings) which suits soft fabrics like double gauze, soft chambray, yarn dyed checks, knits and the dress features  pockets- always a winner.  Suitable for beginners and beyond. 
  7. Nani Iro Double Gauze Fuccra in Mauken Mallorca.  I feel like I can always include a Nani Iro double gauze in these posts.  There are so many around at the moment but many prints are popular and quick to sell and they are all so gorgeous!  Good for soft unstructured clothing styles e.g. Fen dress and for quilts or as a whole cloth scarf or blanket.
  8. Brush Strokes.  A painterly first collection of blooms and graphic prints from Holly DeGroot for Cloud9.  Organic cottons for quilting or dressmaking.
  9. Dapper Wovens: Check is in the Mail in Sky and Ocean.  Another yarn dyed woven check- this one is ½" squares and from Luke Haynes from Moda.  Apparently these are very soft indeed- I fancy this fabric for PJ pants or shorts. The Reef set would be ideal for warmer weather.   Check out her testers' version blog post to see how they sew up and look on real women. 
SaveSave

Saturday, 9 July 2016

Thursday, 7 July 2016

Hit, Miss or Maybe?

Congrats if you get the reference, even I wasn't sure where I'd dredged it up from the depths of my memory although this clip brings it all back (with a bonus early Mel and Sue) from late 90s  Saturday morning show Alive and Kicking.  I was going through my photos and found some unblogged less successful makes and thought I'd share and talk about what went wrong.


Miss:  Starting with a basic woven T-top.  This  is Lisette for Butterick B6128 and like many sewists, I was looking for a good woven T style.  Matching my measurements to the chart, I made a size 10 out of some very thin cotton- car boot sale find I think.  It came out big and a little shapeless, probably due to the amount of ease added to an already boxy style.


The front darts are interesting and weren't too far off- they needed to be higher (maybe 1" ?) and a small bust adjustment would've helped reduce some fullness at the front.  I wasn't sure how to do this with this dart style andI thought it wasn't worth it as the style wasn't doing much for me.    


Miss: Next up, Tilly & The Buttons Agnes top.  I am a real sucker for a puffy gathered shoulder and I loved the elastic detail too, it's easy to sew but sadly I found this  styledid not work on me.


There were some other issues- the neck line was too low, the pattern sleeves were  narrow- these were I adjusted the pattern when I traced it.  The fabric was 100% cotton jersey and not very stretchy and as the Agnes is fitted throughout, it definitely benefits from lycra.  I also tried adding a 100% cotton ribbing band on the neck and it stretched out of shape.


Maybe it's a proportions issue with this style, I'm not totally sure but it just doesn't seem to balance on me.  I swiftly cut this up to try something else out.   I sold the Butterick and the Agnes patterns and bias skirt I was wearing then has gone on to someone else too!


This last one is a Maybe.  The pattern is Natalie top by Liola patterns.  I had a big crush on this style but I think I made the mistake of seeing it made up in drapey rayon and persuading myself that it was going to look like that in Liberty lawn.  It's not particularly fun to sew for a relatively simple shape and it's a little boxy sewn up but it comes together as you would expect  The front pleat details is quite fiddly- it needs to be very accurately sewn.  Liberty lawn is not good for a loose drapey style, it seems better suited to a little more formality- a fitted shape, tailored shirt and sharper details.  I do love the fabric so I have kept this one but it always make me feel a little wistful that I didn't make something else with it. 

 I do find that there are a few things to watch out for when pondering clothing patterns on dressmaking blogs:
  1. Be cautious if the blogger is wearing a lovely tan leather belt around the waistband area.  Yes, maybe she just likes to accessorise or maybe the waist isn't meant to be a fitted style and the belt is helping it along but I hate wearing belts so I am not able to pull-off the belted look and maybe the dress/skirt if not as fitted as it looks.
  2.  Dresses and tops made with rayon or viscose fabric.  I've fallen victim to this many times, a dress or a top looks so drapey and elegant,  it's made with  an amazing rayon challis fabric.   I make the same pattern in lawn and it just doesn't hang the same.
  3. Styles that just don't suit me-  very puffy shoulders, boxy, lots of pleats around the waist, high straight waistbands.  I'm sure there's more, that's just for starters.
How about you?  Are there styles that you fall for despite the fact they don't suit you?  Guilty of the wrong fabric choice?  Do share!

Monday, 4 July 2016

The Farmer's Wife 1930s Quilt Along, blocks 81 and 82, Peony and Pharlemia

Back for another week in the Farmer's Wife quilt-along and it's time to rise to the challenge of Y seams (block 81, Peony p. 240, letter p. 145)- or redesign blocks to avoid them (block 82, Pharlemia, p.241, letter p.38).    Peony caught me out a little bit, I was short on time and rushed in just expecting the partial seams around the middle square, but no, there's Y seams galore!  Jo Avery is guest posting on this block and she has English Paper Pieced this block which makes the construction a little easier- see her post here.   For those of you who are foundation paper piecing, it is possible to reduce the number of pieces slightly- I made the very small half square triangles E3/4, F3/4, G3/4, H3/4 each into a single triangle as it in no way affects the construction and makes more sense.  Otherwise, it is a question of sewing slowly and marking seam allowances on any pieces that you remove the paper from so that you can pin together accurately.  For a detailed post on Y-seams see here.  McCall's Quilting have a handy video on partial seams.


Fabric Credits
Penny Rose Hope Chest in Blossom Yellow and Teal
Kona White
Riley Blake, Ardently Austen text print.

By the time I got to Pharlemia block, I decided to redraw it to avoid the Y seams. You can chose to follow the original block in the book or download the Y seam free version for foundation paper piecing here.  As usual, ensure printing is at 100% and not to scale.  Sometimes PDFs are marginally smaller or bigger due to different computers/printers etc.  The pattern should be 6" square. 


Fabric Credits
Moda Solids Peacock (I think!)
Moda Garden Project, Vintage floral pear yellow
Unknown feedback repro floral.

{For both blocks, I link to sponsor shops for fabric bought from them and elsewhere for other fabrics}

If you do want to follow the book version, Amanda Weatherill on IG(@thepatchsmith) had some  great tips on joining the sections, she made the block back in January so you'll have to go back in her feed.

If you are using the no Y seams version, you need to separate your pattern into 11 sections by cutting along the blue lines.  No seam allowances are included as I don't have that sort of design software so you will have to allow for these on the outer edge of each section when adding the fabrics.

Rotary Cutting - based on no Y seams pattern
These are for foundation piecing so are cut larger than needed with any exceptions noted below.
  • Yellow large half-square triangles: cut (2) 3" squares; sub-cut each square in half along the diagonal to yield 4 HSTs
  • Violet Centre sq: Cut (1) 3 ½" square
  • Violet small HSTs: cut (8) 1 ¾" squares; sub-cut each square in half along the diagonal to yield 16 HSTs
  • Violet medium HSTs: cut (4) 2" squares; sub-cut each square in half along the diagonal to yield 8 HSTs
  • Green large HSTs (these are cut ACTUAL SIZE): cut (2) 2 1/4" squares; sub-cut each square in half along the diagonal to yield 4 HSTs.  Draw ¼" seam allowances on reverse side
  • Green diamonds: use templates and cut 8 in each direction (16 in total).  Template technique is detailed here and here.


Construction of the block is detailed on the pattern download.  When the outer half square triangles (I1, J1, K1, L1) are added use the stab pin method to match the seam points- the pin is placed perpendicular to the fabric,(see photos above) another pin is used to keep this in place  for sewing and the first pin can be removed. 

Top Tips for Foundation Piecing this Block
  • Pre cut all pieces
  • Use a water based glue stick e.g. Sewline, to stick the first piece of fabric on each section
  • Chain piece where possible
  • Press section seams open apart from the last two, they sit easiest to one side
I put together two more nine-patch blocks to add to my collection, these are 12 and 13.  I love pairing the fabrics to go with the 1 inch checks.


  • You can share your farmer's wife quilt blocks with the hashtags #fw1930sqal and for these blocks either #Peonyblock or #Pharlemiablock as well as #fw81Peony, #fw82Pharlemia
  • If you want me to take a look at your blocks, tag me on Instagram, I'm @verykerryberry or comment here and paste in a link to your blog
  • There's a Flickr group you can add to here.  All my Farmer's Wife 1930s blocks can be seen in this album and my 9-patch blocks in this album. 
Sarah Edgar of Pretty Fabrics and Trims is back as a guest blogger next Monday!
See you next week x 
SaveSave
SaveSave
SaveSaveSaveSaveSaveSave