Showing posts with label #aliceblock #annblock. Show all posts

Monday, 25 February 2019

Kansas City Star Sampler Book Review

As a fan of 1930s quilt blocks, I've been tracking the publication date of The Kansas City Star Quilts Sampler and jumped at the chance to review it!  It's a mix of archive patterns from the Kansas City Star newspaper with modernised instructions and a history lesson.  In the 1920s American newspapers started to regularly feature quilt patterns.  This was popular with readers and the Kansas Star column started in 1928 and lasted until 1961 when they were replaced with TV listings- a sign of changing times.  The blocks featured in this book are a range of sizes just like the originals, although the sizes have been standardised a little, and there's an option in the last few pages to combine them all in a sampler.


The blocks are presented in decade order from a few 1920s blocks, a large selection of 1930s and 40s blocks during the height of the quilt revival, a smaller range from the 1950s and three blocks from the 1960s.  It's a detailed book with 64 blocks and 263 pages in all.


Throughout the book, there are regular profile pages compiled by quilt historian, Barbara Brackman and these are a fascinating read.   They are largely stories of the women, like Edna Marie Dunn, who helped to shape the quilting industry as we know it today: developing illustration aesthetics and quilt block design, creating businesses and methods of producing patterns like mail order and syndicating content to reach more customers.


Each block includes a snippet of the original pattern illustration and instructions alongside the 21st-century version.   Construction is largely through full-size templates which can be found just after each block instructions so you do need to be happy to use this method to make the majority of the blocks. Many designs are 12" x 12" blocks. The sampler at the back of the book is made by changing the sizes of many of the blocks enlarging and reducing when you print off template copies.  


There are a few blocks which have rotary cutting instructions or combine templates and rotary cutting.  Only one block is foundation paper pieced (Carnival Time) and there were some other blocks that would've benefited from FPP rather than individual templates ( Crazy Anne #2 for example) but that's a subjective viewpoint!   The templates could also be traced without seam allowances for English Paper Piecing.  There's one appliqued block (1955 Rose Cross) and one other block with an appliqued element (1936 White Lily).


I chose a couple of blocks, starting with 1941 Radio Windmill.  I still have a stack of 1920s Farmer's Wife 6" blocks from 2011 and want to add these together to make a small quilt so I opted for similar colours.  I used a scanner to copy the templates and then printed at 50% to produce a 6" x 6" finished block.   I made templates from plastic, drew on the reverse of the fabric and add seam allowances when I cut the fabric pieces. 


This block uses partial seams and brief instructions are given.  All the book instructions assume prior quilting knowledge.  You can find a beginner tutorial for partial seams here.  This block needs careful seam point alignment so I use vertical pinning to match the points and then just a single pin at the end of each seam. 


 I did make a slight error not realising that there were two mini block layouts needed to create the final layout so my food fussy cutting which was all in one direction has had a bit of spin but I love the final 6" block.  Japanese prints throughout and the strips and the food print were from Rosegarden Patchwork.


The second block is 1953 Eight-Point Snowflake and I have sewn this design before but many years ago and in a bigger size.  Again, I reduced the templates by 50% for a 6" finished block.  This block is all about the Y seams which is a technical challenge I really enjoy!  The instructions show the direction of each seam but otherwise, you need to be familiar with inset seams (I wrote a blog post on Y seams here) and these could also be hand sewn which is a great way to familiarise yourself with this sort of precision sewing.  A couple of the fabrics I used were from a few years ago when I started to my original 1920s blocks- the garden print, Denyse Schmidt floral and centre line print.  The gingham is from Rosegarden Patchwork

Here are the Kansas City Star blocks mixed in with my other blocks.  I do feel like adding to this so I think I will keep dipping into the book and sew up some other designs from across the decades.


 Thank you to Search Press UK for sending me a free copy to review.  This is definitely my kind of quilting book.  I love the history additions and there are some quirky block choices in with the more familiar selections.

Monday, 21 September 2015

Farmer's Wife 1930s QAL Blocks 3 & 4: Alice and Ann

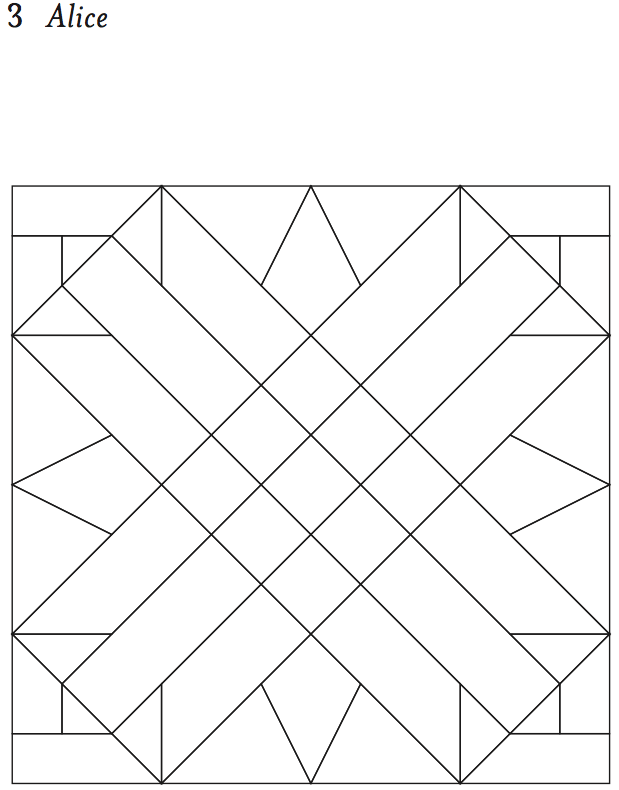
Welcome to the week two post in the year long Farmer's Wife 1930s Quilt Along.   I've been enjoying seeing your blocks, especially on Instagram.  Look at the hashtag #fw1930sqal and you'll see what I mean.  I had a brilliant suggestion from Amanda of @thepatchsmith who came up with a hashtag formula for each block #name block so this week's blocks are Alice and Ann and will be #aliceblock and #annblock.  This allows you to see not just what's going on in the quilt along but also how other pople have interpreted specific blocks.  Block 3 is Alice (p.162, letter p.85) and she's a tricky one!


Fabric credits:

Do check the errata page for this block.  The foundation paper pieced pattern is fine (although the labelling needs revising on J and K sections see errata), as is the block diagram but there are issues with the templates and you will need to use a different version than the one currently on the CD.  There are alot of small pieces in this block which is what makes it so challenging.   If you would like to English Paper Piece this block like Jo Avery of Bearpaw, do go and read this excellent post about how she is going about this.  For EPP,  I would also suggest using the block diagram for your paper pieces.  It prints out at 6" square and will provide all the pieces you need for a block in one printed sheet of paper.  This is just a screen shot so you know what to look for, it is not the correct size!


I did have to starch (I use Soak as a final spray for all my #fw1930sqal blocks) and press this block into submission after removing the paper, it was a little wavy!  As with last week's block, here are my cutting suggestions which allow around ⅜" to ½" around the seam lines for each piece so that the piece of fabric is always bigger than needed:

Foundation Paper Piecing Fabric Cutting
A2, A3, A4, B3, B4, B5, C3, C4, C5: cut (9) 1 ½"squares
A1, A5, B2, B6, C2, C6, G1, F1, H1, I1: cut (12) 1 ½" x3"
B1, B7, C1, C7, G2, F2, H2, I2: cut (2) 2 ½"squares, sub-cut each square twice diagonally to make 4 quarter square triangles, 
J1, K1, L1, M1: cut (2) 2" squares, sub-cut each square once diagonally to make 2 half square triangles
J3, K3, L3, M3: cut (4) 1 ¼" x 2 ½"
N1,O1, P1, Q1: cut (4) 1 ¾" x 2 ½"
O2,O3, N2, N3, P2,P3, Q2, Q3: I used freezer paper templates and this technique.

The order of sewing on foundation paper piecing blocks varies between having to be in numerical order to work and being up for interpretation so you may find that you would rather sew some sections in a different order.  For example on sections B and C, I would add the end triangle pieces last but it still works as it is on the pattern.  You can download a free guide to foundation paper piecing here.  For the N,O,P,Q sections I used freezer paper templates for the pieces that sit either side of the points.  First I prepare the points N1,O1, P1, Q1 by sticking the rectangle to the back of the section with a Sewline glue stick.  I then fold the pattern along the pre-creased lines and trim off the excess fabric leaving a ½" seam allowance.


I then prepare the side pieces using a freezer paper template (no seam allowances on the templates) I add ½" all round as I cut it out.


 Here's a finished section!


The message to take away from the letter this week is for mother's to not worry about cooking and cleaning but instead take time to play with the children.  My daughter is past the play stage but I do take every opportunity to share time with her- today's activity might be watching a YouTube comedy clip or baking together but I'm well away that she'll be off to uni in no time at all!  She's already bagged this quilt for when she goes.

Block four is Ann (p.163, letter p.24), Charise is guest posting on this block so scoot on over to Charise Creates to see her creation and pick up her top tips!  Here's my version.


Fabric credits:
Robert Kaufman Penny and Friends- Plaid Aloe
Kokka Lighthearted: Kitchen floral in turquoise
Kona Buttercup

  • Use the hashtags  Don't forget to use #fw1930sqal on Instagram and the Flickr group if you like to share there.  
  • You can also copy and paste links to any blog posts you do on these blocks in the comments and I'd love to visit and take a look. 
  • I'll be introducing this post on periscope.tv/@verykb with a short broadcast  around 2.30pm GMT today and it'll be available for 24 hours to replay before it disappears! Link will be in my twitter feed @verykb and I'll post on Instagram and twitter about 15 minutes before it does out.
Please note:  I have linked to my sponsors on anything that I have bought through them and elsewhere for anything that has come from elsewhere.

And an extra bonus, I had an email from Kam of Needle Plus Thread who, with permission from the publisher, has created a free colouring sheet you can download featuring the first five blocks.  Go to her  blog for details.   I know I could've done with this for block 6, I'm on my third version!

Back next Monday with Jo and blocks 5 and 6.

sib blog