Showing posts with label 318 patchwork. Show all posts

Thursday, 13 November 2014

318 Patchwork Patterns Quilt-along: Dog and Bone

The release of 318 Patchwork Patterns in English has brought a flurry of block making from the book making and in addition to the blog hop that I was part of a few weeks ago, Al at A Thousand Needles is hosting a 318QAL.  For each week of the quilt-along, she's making 4 blocks which will be part of a 318 Patchwork Patterns mini quilt.  She's choosing most of the blocks and having special guests- so far  Brenda from Pink Castle Fabrics and Penny from Sew take a hike and this week it's me! I love the animal blocks in this book, so I chose #136 dog and bone block.  I was so enamoured with the design that I didn't notice the million Y seams involved!  Apologies to Al who is making this block too!


I've marked the Y seams and some of the sections below.  I tried to plan this but I ended up being a very careful slow sewer and using the techniques covered here- precision is everything with so many Y seams! I did the ears, feet and tail actions first.  Then the head and bone.  Next the body and the final part was joining everything together.  The Y seams are marked in blue- there were so many and I had not think about how I was doing this too much and rely on instinct as it did get a bit confusing!  You could always add extra lines in to simplify the shape and construction as Penny did with her block.


I made the 6" block into a quilt as you go hot water bottle cover for our dog Lottie.  As the weather gets cooler, she loves a hottie to cuddle up with overnight.


It's a simple pattern adapted from Suzuko Koseki's Patchwork Style.  I lined it on the inside too with some cotton lawn to make it a thick cover that would insulate well and survive a lot of washes. 


Let's just say it was well received!


You can find the 318QAL schedule here, week one here, and week two here.  You can link up with Al by posting picks of at least 2 blocks you've made from the book and win a prize- see her posts for details.
sib blog

Monday, 20 October 2014

318 Patchwork Patterns: How to Freezer Paper Piece

Welcome to the first stop on the  318 Patchwork Patterns: Original Patchwork & Applique Designs blog hop.  I have been a fan of this book for so long, first the original Japanese publication by Kumiko Fujita and the reissue and translated version reprinted by Zakka Workshop/World Book Media.  At the end of this post, there is a giveaway to win a copy of 318 Patchwork Patterns and all are welcome to enter, the winning copy will be sent anywhere in the world!


It is a book of few words but now I can actually read the brief text in the book!  More than anything else, it is a book to inspire!  It is a mix of paper pieced and appliqué designs. This blog post is going to cover two themes: firstly how to prepare and reproduce the small image in the book to make a 6" x 6" finished block; and secondly, how to sew the block using freezer paper piecing.  I am concentrating on block, #160, House on a hill and my 6" square block ended up as a small wall hanging.


The main construction method described  in the book for the pieced blocks is hand piecing but it is possible to machine piece the blocks using freezer paper piecing and even foundation paper piecing although some adaptations may need to be made on some designs.  If you want to follow the hand piecing method, Wynn has lots of hand piecing advice at Zakka Art.  You could even adapt some blocks for English paper piecing- the pin cushion block #15 from 'Sewing Goods' section would be a good example of a pattern that would work well using EPP- see Jessie's blog series English Paper Piecing Basics for this technique.

Preparing the Image
1. Enlarge: Method One, Photocopy
The majority of blocks in 318 Patchwork Patterns are 2 ⅜" x 2 ⅜" .  You can either use a photocopier to increase the size of the block by enlarging by 250%.  Technically- this will make the block slightly under 6" so if you want precisely 6", enlarge by 253%.  Now your block is enlarged.  If you want your finished block to face the same way as the drawing, the image needs to be flipped or mirror images in some way- we'll do this when we transfer the drawing to freezer paper.

2.  Enlarge: Method Two, Scan
I use a desktop scanner rather than a photocopier to reproduce the blocks and then some basic tools on my iMac to increase the image size.  I will also mention a method for a PC.  Firstly I scan the page I need.  My canon scanner scans at actual size and loads it to my desktop.  Alternatively, you could use a scanner app- I tried Cam Scanner on my iPhone and it worked fine.   Next, I use a programme called Preview that came with my iMac to isolate the design I want to use.  The scanned image will automatically open in Preview.  I choose Rectangular Selection from the selection tools.  This tool allows you to draw a border around the image that you want to select and it will show the size of the box so you can draw an accurate square or rectangle.


Once the square is drawn (shown as a dotted line around the chosen image) go to Tools and select Crop.


The image is now isolated and ready for you to 'Select All' and once it is selected, choose Copy.


You now have a picture that can be saved and is ready to paste into a document and resize.  I use a blank Microsoft Word document, paste it in and change the picture size to exactly 6" square using the right button on the mouse and choosing Format Picture and then the Size option.  I chose  6.01" to allow for the line around the block.  The advantage of using this method rather than photocopying is that there is now an option to 'flip' the image so that the design is reversed ready for piecing and the finished block will come out facing the same way as the original drawing.  In the Formatting Palette tools, you can then choose Rotation and Flip Horizontal.  


If you are using Windows, the equivalent to Preview is Windows Photo Viewer.  Choose Open from the menu bar and then Paint and you will see  rotation and flip options.

3. Trace and Number
The design is ready to number the pieces and then trace on to freezer paper.  There is no definitive method to number the pieces.  The designs in this book are too complex to be pieced in a single section, instead I usually eyeball the picture to work out how many sections there will be, give each section a letter, A,B,C etc and number the pieces.  There is likely to be a Y seam in most blocks so I keep an eye out for these too.  You can see my sections in this picture and I have numbered the top section and marked the Y seams on the chimneys/roof/sky.  You can also add tick marks to help match up tricky areas like diagonals- see section C where I have added them in blue.  There are no hard and fast rules here.  I could have sectioned the design a different way but the three horizontal sections seemed the easiest.


If the image has been flipped, you can lay freezer paper over the top so that the dull papery side is facing you and trace  transferring all the information.  If the image hasn't been flipped, lay the freezer paper on top with the waxy side facing you and use a sharp hard pencil to trace the image- then turn the paper over and write the piece numbers/sections information on the paper side- the image is now flipped.

4. Freezer Paper Piecing
i.  Once the pattern has been traced, I work on one section at a time and only cut out that section- so I don't lose any small pieces.  Each piece is cut out along the traced lined using a scalpel knife and quilt ruler.  Press the waxy side of the paper to the wrong side of your fabric using a hot iron and cut out allowing 1/4" eam allowance all round.  I use a generous 1/4" to allow for the space of the stitches, the important thing is to be consistent on all pieces.  This is all of section A prepared with seam allowances.


ii.   The first seam is straightforward. Pieces A1 and A2 are placed right sides together, I align the corners of the freezer paper templates on both pieces precisely using a vertical pin and this method, hold the pieces together and the stitch the seam from end to end.  I use a very small stitch, usually 1.5mm so that the stitches are secure and I don't need to secure the seam at the beginning and end.  Piece A3 is added in the same way.  The chimney area above the roof is complete.
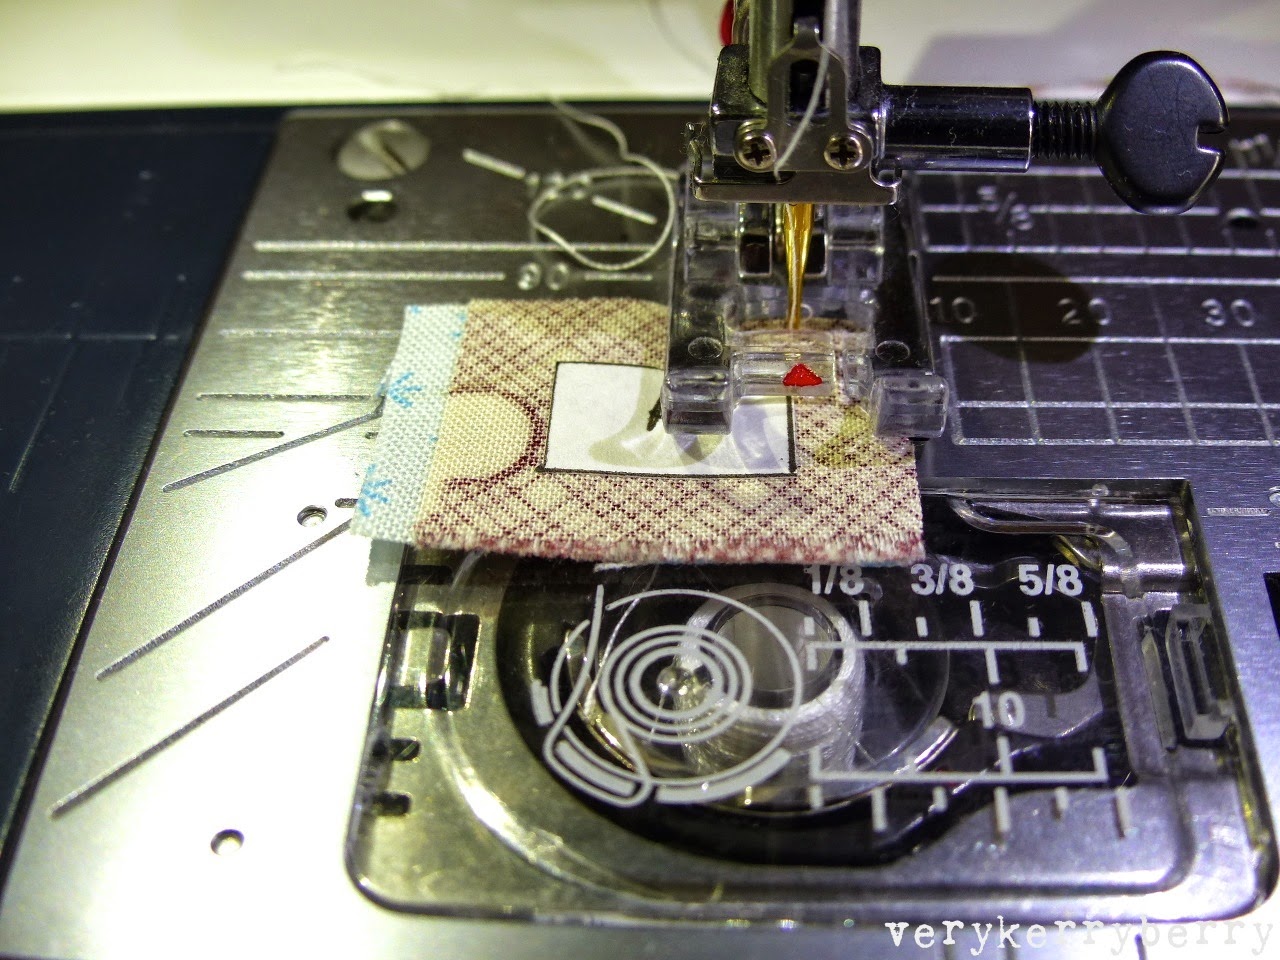

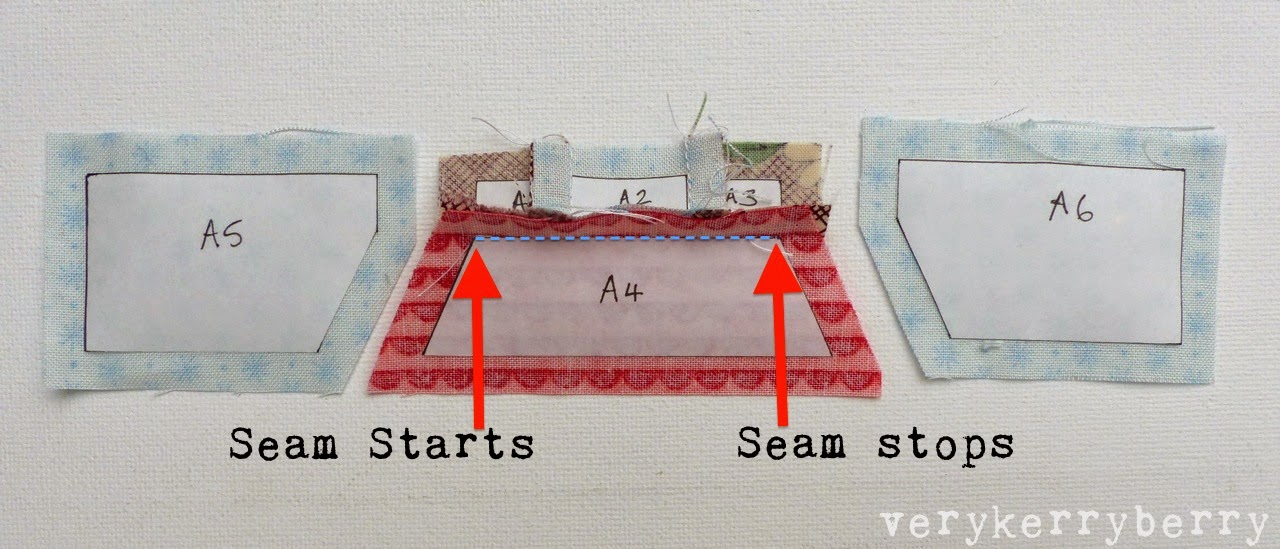
iii.  The next piece involves sewing a partial seam in preparation for the Y seams when pieces A5 and A6 are joined.  When piece A4 is added,  the seam starts where the pieces of freezer paper meet together- see the photo below- and finishes where the freezer paper ends.  The seam allowances are left unstitched. For this type of seam you will need to secure each end of the seam.  Precision sewing is required!  Start by sinking the needle into the precise position by hand or using 'needle down' button, then lowering the foot .  Then sew slowly, three stitches forwards and three stitches back- counting each stitch!   If you prefer, you can hand crank this step. Then, sew forwards stopping exactly where the freezer paper ends and reversing to secure the seam.  It may help to mark the stopping point using a  pencil to give yourself a target to aim for.  If you go over by one stitch when you start or stop the seam you will need to unpick that stitch and sew it again.

iv.  Now, to sew the first part of the Y seam.   I like to sew from the intersection outwards as I find it gives better results and I have chosen to sew the shorter seam first between pieces A1 and A5.  As in the picture below, arrange the fabrics so that A4 is lying away from the seam and the needle is sunk where the intersection between pieces A1 and A5 starts.  As in step iii  above, sink the needle, lower the foot and sew forwards three stitches, backwards three stitches, and then sewing to the end of the seam.


 Repeat the same process starting at the intersection between A4 and A5 (see pic below) and sewing the seam outwards.


The completed Y seam can be seen in the picture below. You can press the seams how you wish.   When I trim the threads from each seam, I like to leave 1/2" of thread tails which discourages any unravelling and stop little bits of thread poking through.


Repeat with piece A6 for the other side of the roof using the Y seam technique in step iv.  That completes section A.  The remainder of the block is sewn by sewing the remaining sections B and C adding the pieces in numerical order using standard seams.   The sections are then sewn together to match the picture.  With freezer paper piecing, aligning the sections precisely when you stitch them together makes for a much better looking block so use the pin technique as before when matching the roof to the house, house to the hill and trunks to the trees. You can even use a little glue basting to get the alignment spot on!


 I added 2 ½" wide sashing around the block and then I hand quilted the block onto wadding.


I added backing and hanging corners and stitched in the ditch around the block.


I used a wide single binding, 2 ¼" wide and sewn on with a ½" seam allowance for a picture frame effect.  You can find my single binding tutorial  here
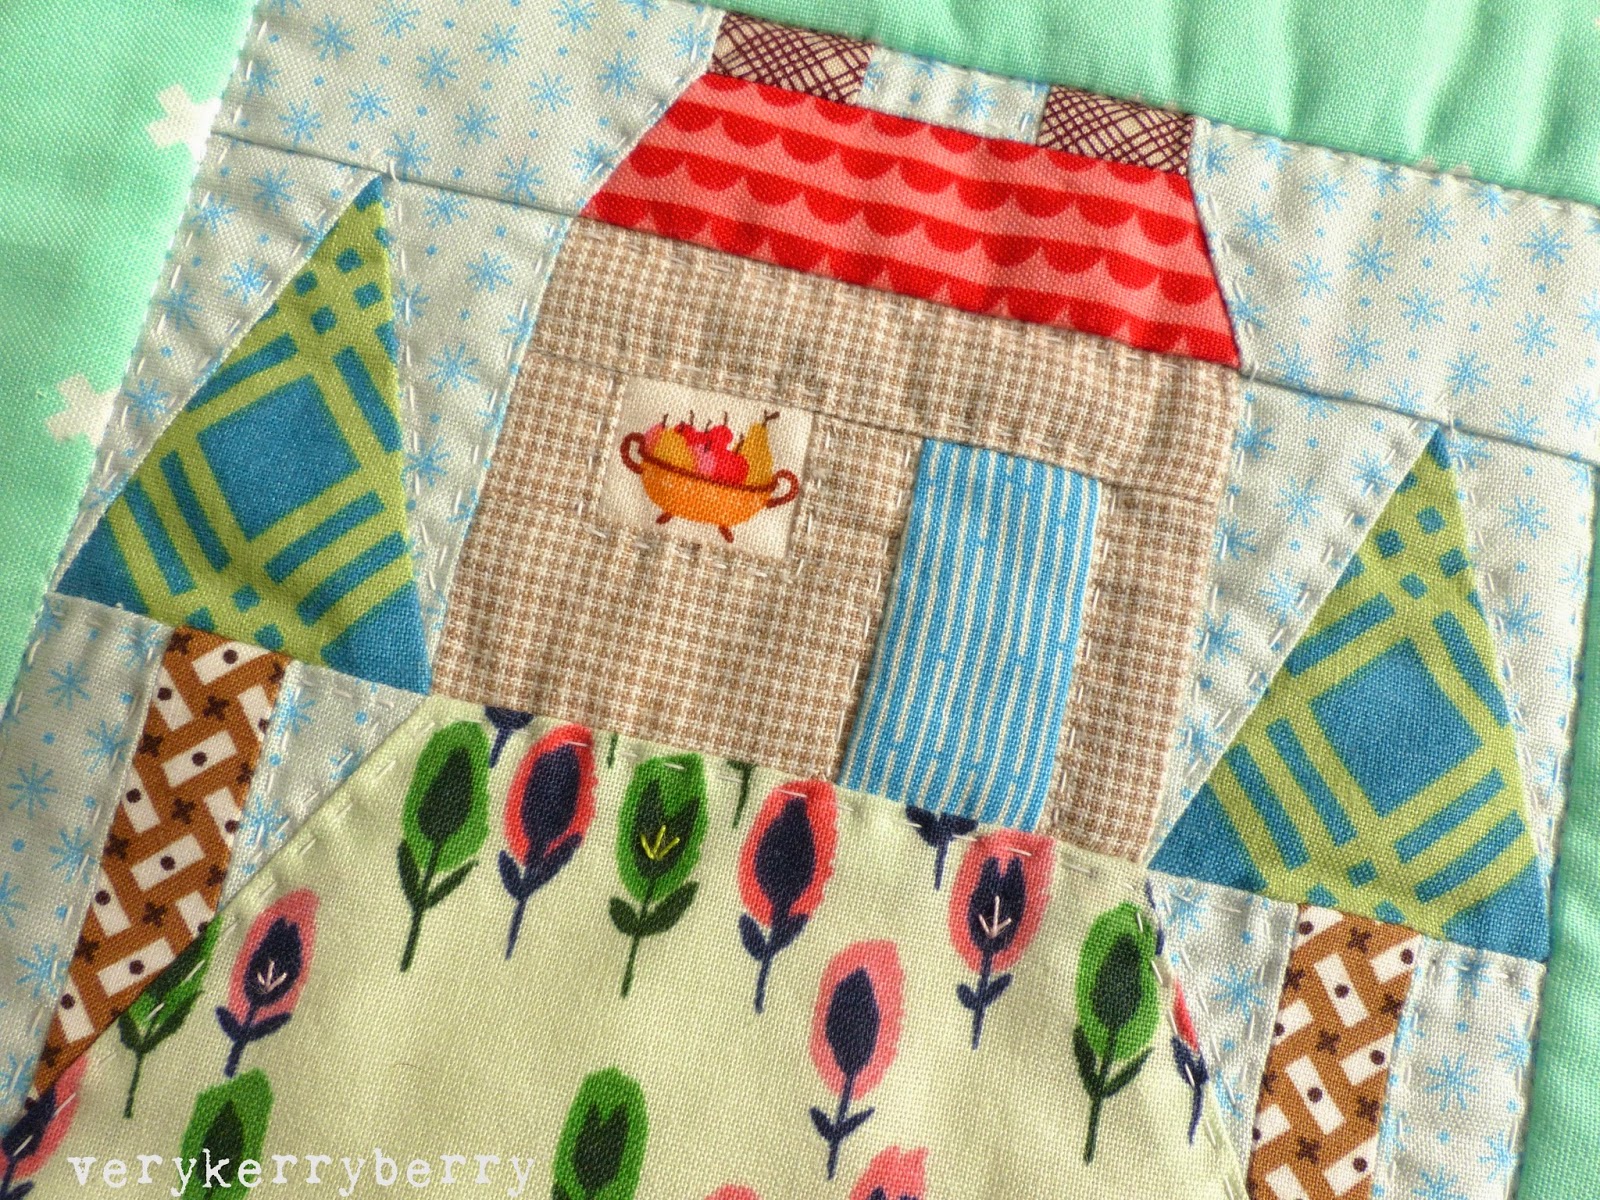

If you have any questions about freezer paper piecing, email me and I will do my best to answer!  Meanwhile, enjoy the beautiful makes on the blog hop!  You can find the blog hop details below and for those who like to sew along, Al is hosting a 318 quilt-along here.
GIVEAWAY TIME!  To win a copy of 318 Patchwork patterns, comment below saying what you would like to see featured in a paper piece design?  A cat? A hair dryer? A steam train?  Anything you like!  If you are a blog follower you can have an extra entry- just state how you follow in your second comment.  I will need to be able to contact you by email.  I will announce the winner on Friday 24th October.   Giveaway is now closed.
Here are the other hop dates:

318 Patchwork Patterns Blog Hop

·      October 22nd  Penny Layman from http://sewtakeahike.typepad.com
o   Project: Gardening apron with blocks from Vegetables collection
·      October 24th Angela Pingel from http://cuttopieces.blogspot.com
o   Project: Wall hanging or bunting from Halloween collection
·      October 27th Amy Sinibaldi from http://nanacompany.typepad.com
o   Project: Tote bag with appliqué blocks
·      October 29th Amber Carrillo from http://oneshabbychick.typepad.com
o   Project: Blocks from Christmas collection
·      October 31st Latifah Saafir from www.thequiltengineer.com
o   Project: Baby blanket from At the Circus collection
·      November 3rd Charise Randell from http://charisecreates.blogspot.com
o   Project: Make up kit and shoe bag from Girls’ Night Out collection
·      November 7th Amy Friend from http://duringquiettime.com
o   Project: Table runner with blocks from Fruits collection
·      November 5th Leila from http://wheretheorchidsgrow.blogspot.com
o   Project: Tea Cozy from Tea Time Collection
·      November 12th Caroline from www.sewcanshe.com
o   Project: Tote or pouch with appliqué block
·      November 10th Faith Jones from www.freshlemonquilts.com
o   Project: Mini quilt from Vehicle Collection
·      November 14th Rashida Coleman-Hale from http://iheartlinen.typepad.com

sib blog

Tuesday, 12 June 2012

318 Bee Table Runner

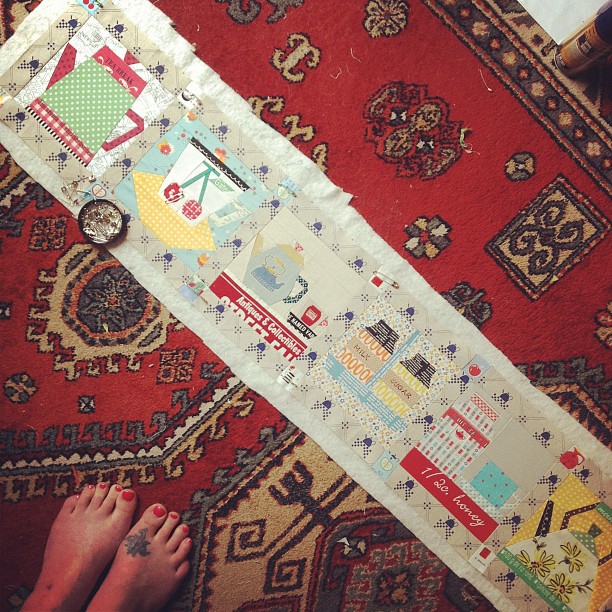
I have had a little mini stack of bee blocks waiting patiently to become a table runner,  I was in 318 Patchwork Bee a little while back and my theme was "Afternoon Tea".  I always had these blocks in mind for this purpose and now it is sitting on my table it makes me smile and think about all the people who made a block or two- Ayumi, Tamiko, Charise and Leila.  Simple construction, sashed with Kokka teapot print linen and mini fussy cut squares, I quilted it without backing...
Then added the backing to make a combined backing/binding blanket style edge.  It is an easy finish so her is a quick tutorial if it is new to you!   After the quilting, attache to a backing at least 1 inch bigger all round.  I use 505 spray and a few safety pins.  For a finished 1/4 inch bound edge, trim backing over hang to just over 1/2 inch from the edge of the runner all round.  At the corners, pencil a 1/4 border from edge of runner and then draw a  45 degree diagonal across the corner- just like the pic!  Trim this off with scissors.  
Fold the freshly cut edge in so it fits behind the corner of the runner.  Press the long unfinished backing edges  firstly towards the runner, and then turn the folded edge so it forms the binding around the runner.
Pin the binding on the front at each corner.  Hand stitch the mitred corners using ladder stitch- (Search on youtube if you are not sure what this is! It is a very useful stitch).  You can then stitch the rest of the binding down, by hand or machine- up to you!  I chose a small zig zag to add a bit of zing!

We have a smallish table so this is a narrow runner- it now lives along the back edge by the wall with my radio and cup of tea permanently on it!
And it constantly lifts my heart, thankyou to the block makers...loving your work! Left to right, tea pot- Tamiko, Cherry cup-Ayumi; Teapot/cup- Leila; Milk/Sugar- Tamiko; Tea/cup- Charise; Kettle-Ayumi.
If you like a bit of paper piecing, Leila's new house pattern can be found here, and Charise's Spool Starburst is here.
sib blog

Monday, 9 April 2012

Best in Show

Country Fair for Megan-the rabbits won "Best in Show"
This block was for Megan in Cocorico bee. Her theme was 'Country Fair'.  I dallied with the idea of pigs but they started to look more like dogs in my sketches so I chose rabbits.  I had to do two, I think of rabbits in multiples, it must be their breeding habits!  And the "Best in Show" idea was rattling around my overcooked imagination from the start.  The sitting rabbit as from 318 Patchwork, Kumiko Fujita-(you know already that it is, of course, out of print).  I played around with that pattern for the standing rabbit and pushed myself to fit a  total of 5 inset Y seams just into that one rabbit- that was fun!  Both bunnies are freezer paper pieced and the ribbon was foundation pieced. The ribbon was adapted from  Carol Doak's free Pink Ribbon pattern.
Rabbits close up
The tails were needle turn appliqued on with the straight edge sewn into the seam.  The noses and eyes were wool felt cut with a paper hole puncher and hand stitched on.  For the stamping, I always use Versacraft ink.  I like to live life on the edge, the stamping was added at the very end of the block.
Fabrics
Green- Sweet on NYC for Timeless Treasures
Ripple Ribbon-Anna Griffin
Pink large polkas-Lecien
Pink tiny dot-my stash
Yellow prints- Picnics and Fairgrounds, Denyse Schmidt
Aurifil thread for piecing and Superior needles- my new favourite piecing needle, love them!

Sunday, 12 February 2012

Basket

Charise has the last month in 318 Patchwork Bee and she chose baskets.  I restrained myself from making the sewing basket, I am designing a sewing basket block for Sew Out Loud quilt-a long so I went for knitting, just in case Charise feels she wishes to take up a new hobby.
This is 6.5" with tricksy Y seams to make the handle at the top.  I used my new favourite tiny ruler to add a generous 1/4 inch to my freezer paper pieces, the block is template style piecing rather than foundation.  
I do love the designs in this book, the simplicity and boldness of them is a constant reminder to me to keep it simple, less is more.  The basket is made with Kumiko Fujita fabric, possibly my favourite all time text fabric as there are so many great words and motifs to fussy cut.
The blue yarn is Suzuko Koseki fabric- currently available at Kit's shop The Happy Elephant on Etsy, an excellent source of text, Japanese fabrics and general loveliness.  The needles were bias strips and the tops are buttons cut from a Kaufman print 'Vintage Couturier' all sewn on with needle turn applique.  I used to be a ferocious knitter.  When Lula was born I made her cardigans, hats, jumpers all from beautiful yarns.  Moderation is not in my vocabulary, all or nothing and I did way too much!  My hands and wrists can't take that any more and I sold all my knitting supplies a few years ago but I do love seeing yarn projects pop up over Flickr and Twitter and a small part of me aches just a little to be able to knit again.
Now, back to completing a quilt, I am trying a quilt-as-you-go technique and will share next week.   At the moment it is proving to be tedious but effective.
 Meanwhile the Sew Out Loud QAL starts tomorrow at Julianna's blog!  Details of the final block competition can be found here- start preparing now, the judge is Suzuko Koseki, yes I know, I can't believe it either!
sib blog

Sunday, 8 January 2012

New Year, new projects

In 318 Patchwork Bee, Tamiko asked for Gardening blocks, a nice theme for this dark time of year, it made me think of spring this made.  This block is from the out of print book, 318 Patchwork by Kumiko Fujita.
The background print was such a good match from my vintage stash, I had to use it!  The greys are Sweetwater, the wood print is Joel Dewberry's  Aviary range and the green is a Kumiko print that I've had a while.
Maybe the gardening theme influenced me into making this little fabric pull for a private swap between Amy and myself.  The top and bottom prints are soft, washed Japanese linens and the middle two are Japanese cottons.  I am not bound to this stack although they do look rather inviting with their soft colours, I'll see what Amy's reaction is like, I am quite prepared to pull something else.  I have an interesting piecing idea for whatever I end up using, sneaky peeks coming soon...
I twisted Lula's arm just a little to spend approx £7/$10 for membership to The Frosted Pumpkin Stitchery's Dessert of the Month club.  That single payment delivers 12 cross stitch PDFs to your email account and features Kawaii cute desserts that make a sampler like this lovely January truffle by Smoochee
Dessert of the Month - The Champagne Truffle
The low price is a limited offer, ending 10th January.  I dusted off my old DMC threads, tea dyed some 14 count aida canvas and stitched a grid to get her going.
And I couldn't resist Katy's Swoon quilt a long on Flickr.   I don't need more projects, no siree but my long awaiting voile collection has finally found a pattern big enough to show its print and not needing to much cutting and stitching.  The Camille Roskelley's pattern is available as a PDF, and is a clever and economical use of fabric.  Playing with dark and light fabrics makes this pattern twist and turn. 
swoon-along button
What really appealed is that the block looks straightforward, I can just cut the fabric needed for one block at a time and the pattern is perfect for quilt as you go as there is sashing between blocks.  I will be going slow, but there are only 9 blocks and it makes a whopping 8o inch square quilt.  I'll share my quilt as you go methods here if any of you want to do the same.  Meanwhile I am cutting my voiles and Kona snow ready for the first block. 
sib blog