Pages

Tuesday, 31 December 2019

Happy New Year

 I thought I'd sneak back to the blog to wish you all a happy new year!  I've been busy catching up with family, working (extra commission work that fell over late December) and creating presents for the festive period.  I thought I'd share my makes now they've been gifted- click on any photo to see larger:

Firstly a quilt-as-you-go gentle crazy cat lady cushion for my sister.  All the prints were chosen for sentiment as well as colours and it elicited a shared understanding of why they were selected as it was opened which gave me an inner glow of happiness.  This is a large cushion, 22" square with soft and squishy cushion form. This method takes a long time but the texture and end effect are worth it.  There's an invisible zip across the top seam.


Next, a requested cushion for my nephew.  He likes one each year so has quite the collection and my design task is to include his name/initials otherwise, I have free rein. He is adventurous with colour which is tremendously helpful.  This cushion started with the Cotton+Steel pop bottles and flowed from there using stash fabrics.  The letters are from a fabulous Japanese alphabet patchwork book, 'Moji Patchwork' by Kumiko Fujita and Kazue Nakaima.  Amazon Japan, Yesasia or Etsy are the most likely places to find this title.


Finally, my brother requested a denim apron.  I've made quite a few aprons like Japanese cross-back designs and children's aprons so I really enjoyed this challenge. It's good quality denim in blue/black. The tape is cotton webbing traditionally used for finishing carpets.  I found a series of apron designs that I liked online and fused my favourite elements to make a one-of-a-kind design. The top pocket is large enough for a phone and pen, the lower pockets can fit hands or a tea towel and the cross back ties threaded through bronze grommets give an adjustable fit. 


When it's been dry we've headed to the beach for breezy walks which is always my happy place.  It's been a hard year, saying goodbye to our sweet dog Lottie, welcoming gorgeous Joni but also finding she had many complex needs- I am so grateful to our vet who is amazing.  There have been other challenges as ever to deal with but ultimately I am grateful we are here with each other to start a new year. 

Monday, 25 November 2019

November at Plush Addict


A bumper post for pre-Christmas sewing for my November sponsor post for Plush Addict, plus you can save 15% on advent calendars and Christmaas panels before 30th Nov.


  1. Hand Dyed Shibori Cotton Vertical Blocks on Blue.  This is the real deal so this fabric needs to be washed on cool and will run if washed on a warm wash or higher.  Also best to wash separately.  Artisan hand dyed lightweight cotton.  There's a lot of Shibori patterns and colours to choose from!  
  2. Digital Cotton Print - Dinosaurs (140cm wide). Perfect for dinosaur fans!
  3. Stretch Cotton Jersey Knit- Space Travel on Teal. 150cm wide, 95% cotton 5% elastane.  This would be ideal for basic shapes like T-shirts.
  4. Dashwood Merry & Bright Draw String Bag Advent Calendar.  I made one of these last year, don't forget you'll need a lot of ribbon!  I hang mine on our stair banisters.
  5. Hand Dyed Shibori Cotton -Pink
  6. Makower Scandi 2019 Stocking Panel
  7. Stretch Cotton Jersey knit - Sea Birds on Aqua150cm wide, 95% cotton 5% elastane.  This also comes in grey.
  8. Digital Cotton Print-Toy Story (140cm wide).  For lovers of Toy Story!
  9. Hand Dyed Shibori Cotton Vertical Lines in Blue

Tuesday, 12 November 2019

Simple Folk Sun

I'm still plodding away on my Simple Folk quilt (Sarah Fielke's Block of the month 2018) and the end is most definitely in sight, although on the journey I do make the odd error...


This is the correct sun, the one below was the wrong way up on the background!  Fortunately, all the facial features were sewn to the text fabric only so a quick unpick, reposition and the mistake was remedied.  


I changed the face on this design, the rays are Sarah's original pattern.  The appliqué features are all lawn fabric- they had to be for my sanity, those skinny seams!  I'm now using Aurifil 80wt thread for all my appliqué now that I've got a good range of colours, the stitches really do disappear.  I have two more animal border blocks and the corners to complete before all the blocks are sewn.  I've started joining some sections so I can see it coming together!  I'm aiming for a January finish...I'm just searching out a longarmer!

Monday, 4 November 2019

Sew Over It Cocoon Coat review : Teddy Bear Style

I always have a mental wishlist of unbought patterns that I'm saving for when inspiration strikes.  The Sew Over It Cocoon Coat has been on this list for a long while now and after starting work running the social media feeds at Clothspot I found the perfect teddy bear fur fabric (now sold out), the pattern was in a Sew Over It sale and a plan came together!  


I've only sewn one coat, The Raw Edge Coat from The Maker's Atelier book and it has been one of my favourite makes.  It gets lots of wear and receives so many positive comments.  The Cocoon coat is a similar silhouette, I really like the higher neck and I don't have a stylish winter coat- there's a lot of rain in the Southwest so last time I bought a coat I prioritised waterproofing and a hood!


I made a toile to check shoulder fit and pocket placement but the only alteration I needed made was adding a high round back adjustment, a standard change for me.  Otherwise, I cut UK size 10, I'm between size 8 and 10 in Sew Over It so I went for the larger size to fit lots of warm layers underneath!  The instructions are detailed, this coat started as a class at Sew Over It so it was well tested before becoming a pattern as part of Lisa Comfort's first magazine.  The welt pockets are an extra addition and you do need to email Sew Over It to receive the instructions and pattern pieces. 


Working with such a thick fabric was a challenge at times, especially on the collar and pockets.  I spent a lot of time with spring-scissors clipping the pile back in seam allowances - so.  The construction is best with a slow and steady approach. The collar for example needs careful sewing at the points, seam edges need to be rolled and coaxed into position and there is a fair bit of hand sewing required- to complete the collar, the hem and adding the lining.  The sleeves are in two parts and there are lots of notches to match up and ease to fit in.  I did find it slightly confusing as some of the notches are also marking important places like the top of the shoulder (I think a circle is often used for this on many commercial patterns) and working  out where each notch matched up did take a while.  Start with the double notch and the rest will fit with other notches and seam points.
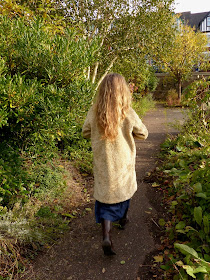

Working with teddy fur and a satin lining was quite a contrast!  I completed the lining first, cutting out with a rotary cutter, using a 70 microtex needle, lots of fine pins, a slow speed and a curved tailors awl (my new favourite tool!).   I finsihed the seams and hems with pinking shears to reduce fraying. For the coat outer, I cut out with scissors on the floor, switched to a walking foot and 90 needle and tailor's awl to help with the bulk.  For some seams (setting the sleeve for example) Wonderclips were more easier than pins.  I used a pressing cloth (silk organza or thin cotton) and steam for both fabrics as they are sensitive to heat and with the fur I also used a Tailor's Clapper.  The fur needed a gentle approach though, too much steam makes the pile frizzy!


The pockets are a challenge with the fur, although the pile also camouflages any imperfections.  After a little research I discovered pocketing fabric which is a densely woven cotton or cotton/poly blend that's especially hardwearing.  I have an old waterproof coat of my husbands that I've harvested various fittings and fabrics from so I used the lining from that for my pockets and it made construciton so much easier than satin lining would've been!


I did find the outer edges of the coat needed some extra help to stay in place and stop the facing rolling to the outside, especially as I couldn't press as I would with a wool coat.  I ended up sewing tiny hand stitches (like a stabby running stitch) along the outer edges up to the collar point.  Not the best solution I suspect, but the stitches are hidden under the fur and it did the job.  I have now also added a fancy large snap as a front closure.

The Cocoon Coat is now available as a standalone PDF pattern at Sew Over It. 

Sunday, 27 October 2019

October at Plush Addict

It's time for my monthly visit to sponsor Plush Addict and I've spotted some beauties to share, particularly for quilters!  I have noticed that someone has been taking some particularly gorgeous photos of the new arrivals and the colours really shine through.


  1. FQ Bundle Kona New Colours for 2019.  A must-have for solid colour lovers, a fat quarter for each of the 25 new colours!
  2. FQ Bundle Dashwood Under the Stars.  A bundle of eight night-time forest animal party-themed prints designed by Sarah Knight,  A lovely, warm winter colour palette.
  3. FQ Bundle Very Hungry Caterpillar Bundle. 11 Fabrics. A timeless story and the perfect bundle to welcome a baby
  4. FQ Bundle Andover Royal Blue 24 Fabrics.  Designed by Edytar Sitar of Laundry Basket Quilts, a stunning selection of the most beautiful prints with a blue theme. There's a free Norway quilt pattern to go with these beauties too.
I'd also like to give a mention to the Alison Glass Handiwork Collection- the FQ bundle is already out of stock but there is yardage of most fabrics, Decoupage is my pick of the prints!  

Saturday, 26 October 2019

Catching Up

It's been a busy few weeks, I'm just catching up with everything after the half-term break from my day job.  This month has been dominated by a complicated health diagnosis for Joni.  She has renal dysplasia.  This means her kidneys are not properly formed and are only 30% of the size they should be.  It was a massive shock and we spent the first three weeks trying to establish a prescription diet and encourage her to eat. After a lot of stress, we've found a food she can eat and her most recent blood test has shown some improvement and a couple of things that need closer monitoring.  It does impact heavily on looking after her- we can't use food treats with her so on longer walks, it's rare that we let her off the lead, she needs lots of water so more toilet breaks, she rarely sleeps through the night as a result.  She is the most loving and lively of dogs and it can be hard to comprehend how complicated things are inside her.  Our vet has been amazing, incredibly supportive and giving us positivity when we have needed it. At the moment she's happy and active, we're doing all we can for her.  It has taken up a lot of time so whilst I have been sewing, I don't have much I can share here at the moment so I'll leave you with a few recent pics of her, she is a total joy.


Sunday, 6 October 2019

The Make Stuff Zip Pouch

At a recent guild meeting, I got talking to the lovely Saira of Olive & Flo Handcraft who came to run a pop-up shop.  We were chatting about solids and she was selling the Art Gallery Pure Elements solids among the many prints on her stall.  Sarah Ashford and I offered to make something from Pure  Elements to showcase to how beautiful they are to work with as we all thought they were a range that can easily get looked over.  As with all Art Gallery woven cotton, they are lighter weight than solids like Kona and have a silkier feel.  We each chose four colours, Saira sent us a fat quarter of each and we got to work.  This is what I came up with, The Make Stuff Zip Pouch.


The colours I worked with were: Cozumel blue, Banana Cream, Crystal Pink and White Linen.  I thought these made a summery happy combination, the sort of colours I like to look at all year round and especially when it's not summer!  I recently had a birthday and my husband bought me lots of Aurifil appliqué threads and I knew I wanted a zip pouch like this to put them in.  I drafted the letters as a starting point and then turned to a beautiful Courthouse Steps Sewing Bag that Penny (Sewtakeahike) made me a from some amazing embroidered silk.  I treasure it and use to keep my small 50wt Aurifil spools neatly organised and all in one place.  The pattern she used was from Natural Patchwork by Suzuko Koseki.  I remembered a similar one in Patchwork Style, the first of her books that I bought many years ago and still love to look through.  I adapted the pattern diagrams with a combination of instinct and fudging and made it work with the foundation paper pieced text, double zip and the thread spools. The big bonus of Pure Elements is that even with the tiny piecing where 1/4" seams end up layered upon each other, the bulk is reduced and there's no lumpiness. The front and back bag panels are layered with batting and lining and quilted.   I also used Pure Elements for the top and side sections(with a single layer of fusible interfacing), as well as the handles panel lining.  

I'm so pleased with the pouch, it's just how I imagined.  I didn't sketch it out, instead, I relied on the image in my mind's eye and kept on going until it worked!  The prints were from a scrap bag I bought from Saira and my own scraps.  The inside seam was finished with some vintage pre-made bias binding and sewn on in one pass.  It could be neater- the corners are so tricky with this shape- but it passes even my critical eye.  The double pull zip was in my stash, you can find similar at Rose Garden Patchwork, it helps with the opening and access on a project like this.  Thank you Saira for providing the fabrics for this project, I'm very happy that I get to keep this one!  Keep a lookout for what Sarah does with hers too, I'm looking forward to seeing...

Tuesday, 24 September 2019

September at Plush Addict

I've got some wonderful prints, a snuggly knit and some fantastic canvas at a bargain price in this month's post for sponsors Plush Addict.  I never struggle when I put together my monthly selection, Kellie Rose always has something new to capture my attention:


Clockwise from top left:


  1. Dashwood 'Elinor' 8 FQ Bundle, I love this collection from Ali Brooks, I think she's my favourite Dashwood designer.  So much to like with these print: sisters,  houses, strawberries- I know I can't resist the 'Wild Berries' print!  All prints are available as yardage.
  2. Art Gallery, 'Keeping Watch Dim Knit' jersey.  This print is from Bonnie Christine's 'Lambkin' collection from a few years back.  It was aimed at makes for children but many of the prints cross over- I have some of this waiting to become the cosiest jersey pyjamas like these.  I totally recommend using the Grainline Linden with cotton spandex jersey for a comfy PJ top, I have worn these so much and they always make me feel snuggly!  There's not much left of this one so if you fancy it, don't delay!
  3. Dashwood 'Laska'8 FQ Bundle.  Jilly P draws the best animal prints!  The Laska collection has so many popular motifs, bears , polar bears , whales , wolves 
  4. Cotton Fabric Linen Look Canvas- Kitchen Jars in Natural.  Love this, it looks like an expensive Scandi inspired Japanese fabric, and yet it's a cotton canvas bargain at £7.80/metre.  I would be making kitchen chair cushions and a cross-back apron with this fabric.  Check these Robins out for another outstanding print at a great price.  

Sunday, 22 September 2019

Simple Folk Quilt: Rabbit & Horse

I've been trying to keep up with my Simple Folk quilt (Sarah Fielke's Block of the month 2018) whilst returning to my term-time work schedule, sorting out family stuff like the daughter returning to Uni and a new role doing some social media work for Clothspot, a gem of an online garment-making fabric shop.  Much of my sewing for this has been rather repetitive (the centre circles and leaves of the spacer blocks) as well as the eight leaf garland border blocks, but for a treat, I work on the animals as well!


Sarah's drafting of the animals really is excellent and I just love finding fabrics for them all. I'm digging deep into my lawn scraps and I was recently given a lovely lawn bundle of pieces by Valerie from my local Modern Quilt Guild which I'll be using wherever I can on the remaining animals.  Lawn really does make a huge difference in reducing fraying and bulk and making the little zigs and zags of the horse's mane and the rabbit's tail.   The end is some way off but definitely in view!

Wednesday, 18 September 2019

Wiksten Shift Dress: Long Length in Double Gauze

I tried to resist the Wiksten Shift Dress pattern, it was all over social media a few months ago and I wait to see if it's just a passing fancy or a style I think will suit me as well as a style I would actually make, wear and enjoy.   I recently updated my desktop computer and as I saved files and swapped data over, I could see many PDF patterns that I've bought and never sewn.  In the end,  I'd seen so many people on Instagram looking great in the midi dress version that I bought it as a PDF.  It is pricey (another reason I was resisting) but now I've made two, I can see why.  It is deceptively simple, but carefully and thoughtfully designed.  


I made a size 0.  I ummed and ahhed between sizes 0 and 2 and as soon as I cut the PDF pattern out and did some measuring, I could see that the smallest size would be the best match.  I'm 5'5" and my measurements fell between sizes 0 and 2.   There are detailed size recommendations and examples here.  On the dress, the back section under the yoke is gathered to create the extra volume- that gives the dress it's movement and ease when walking so there's no sense of restriction.  The dress front is much narrower so creates more of a column effect when viewed from the front.  I made a couple of changes- I did the forward 1/2" shoulder adjustment from the Wiksten journal (on my second, I also made a small high round back adjustment of a scant 3/8" which stopped the neckline falling back at all).  My sleeves are about 1/2" too as I accidentally lopped 1/2" off the paper pattern when sorting the shoulder adjustment out!  I corrected this for the next dress!   I also added some interfacing to the waist tie, just a small section along the centre back- it adds a little more body to the area that lies against that part of your body (see pic below)...


Top sewing tip coming up:  I added a bar (from small hook and bar fastenings) on the inside of each split, right at the top (example below is on dress two).  This adds some strength to a vulnerable area and it has worked well as I've worn both dresses a lot with no wear on the splits.


Otherwise, everything else is as the pattern stated.  I used a double gauze that I bought from Stitch at a show.  This had a standard gauze front layer and a loose weave underlayer which meant it frayed like crazy!  But it is soft, opaque and quite drapey so it suits the style well.  


Seeing the dress without the belt shows a little more of the shape- the straight front and the fuller back. I sometimes wear it unbelted if I'm working from home or it's the latter part of the day and I want to relax. 


Like Jenny's other patterns, the design is timeless and there is a top option (the back narrower) which I can see myself making too.  I have worn this version and the second (in Nani Iro Bird's Eye double gauze) so many times that buying the pattern has definitely paid off.  I took both dresses to London for a weekend away last month and they were perfect for travel.  I could roll them up in a holdall on the train and then happily wear them for a day of sightseeing or with a close-fitting cardigan for meals out in the evening.  A classic summer into sunny autumn dress!

Wednesday, 11 September 2019

Liesl+Co Gelato Dress in Tula Pink Sateen

I liked the look of the Liesl+Co Gelato dress since it first came out a couple of months ago.  There are a number of simple, shift style dress patterns that have been released recently: Gelato Blouse and Dress, Wiksten Shift Dress and Top,  and Closet Case Cielo top/dress.   I was very tempted by the Wiksten but I think it's too boxy for my frame and will look shapeless unless tightly sashed.  I liked the neckline on the Gelato and the welt pocket detail, as well as the long sleeve top option and Liesl always writes impeccable instructions, plus the closer fitting shoulders tend to look better on me.  


I found a paper pattern on eBay and made a toile- a top with a long sleeve, short sleeve and frill to test fit.  I made size 2 which matched my chest measurement.  The fit was a tiny bit tight across the chest and back just next to the armscye, a pulling and restrictive feeling.  So, I consulted Fit for Real People and also found a couple of Threads videos; How to Modify Sleeves for Better Arm Mobility and Correct a Pattern for Foward Shoulder.  I didn't remake my toile although I wished I had in hindsight, but I did make some changes.   I altered the sleeve cap pattern to make it a shallower curve (as in the first Threads video).  This added extra material on either side and raised the lower curve of armseye on the dress front and back by 3/8" at the  I also reshaped the cap for a forward shoulder following the second video and adjusted the shoulder seams adding 1/4" to the back and subtracting the same at the back.


The result is nearly but not quite right as you can see on some of the pictures- there's some lines and folds around the sleeve head/arm hole that indicate the fit is a little off.  But I have worn the dress a lot and some features like the pocket and the overall shape, I love.  I just need to really nail the sleeves!  The bust days and length are without alteration so do consider that the cup size is small on this dress (I'm an A/B cup at most).  The pocket construction needs to be slow and methodical as it needs to be symmetrical and balanced.

I used a Tula Pink cotton sateen that was originally designed as a quilt backing so was super wide at 108".  I only had a short length so the grain was rotated 90 degrees to fit the pattern pieces and I had to work the best I could to balance the birds across my body.  Sateen can be a little tricky to work with- all those floating threads which snag really easily- but it is soft and silky to wear.   I had similar fit niggles after I made my Liesl+Co Cinema dress which I only realised when I was wearing it, so I'm thinking that the block Liesl uses isn't quite right for my upper body. I've got a couple of other shift style dresses (Closet Case Ceilo and Maven patterns French Dart) so I'll be interested to see how those sleeves compare.