I've found using acrylic templates has sped up my Glitter Block making no end so I thought I'd share how I use them. It is a simple process but I know everyone does things a little differently so this is how I do it, if you have any further tips, comment and share! The Glitter block is designed by Jen Kingwell and can be found in her Quilt Lovely book. The templates are available from Pretty Little Fabrics and Trims (currently sold out) and also from Jen's Amitie shop in Australia.
Starting with the small square as it is the easiest shape to work with, I place the template on the reverse of the fabric and use a Sewline ceramic pencil to place a dot through each of the corner holes- these are ¼" in from the outside edge. These dots act as an anchor if the template slips around at all. I then use a small rotary cutter, 28mm or even 18mm if you find that easier, and cut along the straight edges of the template until the square is cut out.
Next, I then use the template to add the seamlines to the reverse of the fabric piece just cut out. In hand piecing, the pencil lines are added for accuracy so you don;t need to constantly check your ¼" seam allowance. You could just join the dots but as there's a little room in the holes, the dots can be a little out of line. Instead, I use the acrylic template and line up the edge of the shapen so it almost touches with the ¼" line on the template. This allows for the space your pencil line will take up. Drawn the line extending beyond the dots. Repeat for each side until all the lines are drawn.
For the shapes with angles under 90 degrees which which are shaped on the templates to avoid dog ears and bulk, I draw around these points, rotary cut the longer straight edges and then use small scissors to trim around the points.
The templates are flipped over to provide the mirror image shapes on this block. I am using a fussy cut centre for each of my blocks and I've found it much quicker to spend a bit of time with suitable fabrics and cut multiple centre squares; I match up the coordinating fabrics with each centre another time.
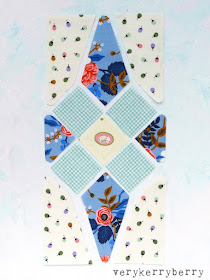
As with all quilt blocks. I think about contrast, scale and variety when I choose the fabrics and a little story telling too around the fussy cut centre. Here's the block, prepped and ready to be pieced. I'll share how I organise the pre-cut blocks for travel tomorrow!


I haven't tried acrylic templates yet, but this tutorial easily shows how much they could help. Thank you for sharing it. x
ReplyDeleteVery nicely done! Love how you describe the 'story-telling' around each fussy-cut centre! Such a pretty block!
ReplyDeleteI put my fabric on a piece of sandpaper when tracing stitching lines, it stops the fabric skidding
ReplyDeleteGood point Pippa, I do that when I've used template plastic, I didn't need it with these but I think I would with larger or more complex shapes.
DeleteWhat a lovely post, Kerry! In addition to giving useful information to people who already hand piece, I'm sure it will give some others the courage to try hand piecing.
ReplyDelete