Pages

Tuesday, 31 January 2012

Gone Paper Piecing

Amy and I tested each others patterns in preparation for their publication in Fat Quarterly Issue 8 Paper Piecing Issue (available today!).  I smiled so much when I saw her wonderful vintage skate design.  I loved the shaping and I knew just what I was going to make with it. 
This was my friend Kathy's Christmas present.  Kathy grew up in Michigan and skating on the lakes was a regular winter pursuit.  Now this hoop hangs on on a little gallery that I have got going on in there kitchen along with the man mat and a mini teeny tiny pieced mug rug quilt.  What you can't see is the pretty dusky pink Sevenberry flower print on the back- Kathy is not one for flowers but I got some in there, she even confessed to liking it.  And of course she has turned the vintage ribbon round to the back, too fussy for her!  But I know she and the family love it!
I stitched little eyelets from the presets on my machine and threaded a little pearl cotton through for laces.  Amy added cute brads to hers and we both picked the same boot fabric without knowing it!  You can find this pattern plus my teapot block and heaps of other paper pieced blocks and projects in issue 8.  There are 126 jam packed pages!  Not had enough paper piecing?  A new sew a long/ quilt a long is starting, 11 designers (including me) with 11 sewing themed paper pieced blocks combining sewing and words.  I have seen a few previews and am sworn to secrecy but it is seriously good stuff!  Texty fabrics, word play, intrigued? Find out more here and you could be designer for block 12.  Blog posts, giveaways and introductions kick off tomorrow at Joanna's and Julianna's blogs
sib blog

Sunday, 29 January 2012

The Good, the Bad and the Ugly

The good...
 a surprise present from Penny and a card that made me cry- in a good way!   Penny and I Skype, we plot and plan, we show and tell and our animals misbehave in the background desperate for
our attention.  Love ya Penny x
The bad...
making a quilt for my sister, there have been casualties along the way.  Quilt making is not my strongest sewing skill, it always feels like war- me versus a big mound of batting and fabric, wrestling it through the machine.
The Ugly...
this weekend's sewing time lost to a practice skirt that is the most unflattering garment.  The dual length shows my internal style narrative, "shall I go short or keep it maxi as per usual?"  As it turned out, short or long wasn't relevant, nothing about this skirt was going to make it look good.  A learning experience I guess and proof that it is always best to have a trial run when making clothes and that not everything I sew works out well, we all have failures from time to time.  Nothing wearable or useable was sewn this weekend, sometimes it is just like that! It does make me a little grumpy and then I look at Penny's card on my pinboard close to my sewing machine and smile :)

sib blog

Friday, 27 January 2012

Teapot Fancy Cozy Tutorial

*25TH OCT 2020 EDITED TO ADD: My Teapot Fancy foundation paper piecing pattern will soon be available in my Payhip shop.  Once it's ready, I'll add the link here!  Meanwhile, the cozy template is available for free at Payhip and you can make it with a block of your choice or a favourite cotton fabric.

 This is a very exciting week, I have a pattern published in Fat Quarterly Magazine.  This issue is all about piecing and there is a huge range of piecing patterns from simple to advanced.  My pattern is for a teapot block and I have written two ways to piece it- freezer paper template style and foundation.  It is a great pattern if you are new to piecing as I take you through both methods step by step.  I have designed a simple tea cozy for the finished blocks but you could make it with a different block or just out of patchwork fabrics.  This cozy should be big enough for a 4 cup teapot. 
Finished size 9" tall, 12" wide.  
You will need:
2 blocks/fabric pieces  14" x 10" wide for back and front.  If you use the FQ teapot blocks you will need to add sashing to make your block up to this size
Fabric for lining- 2 pieces each measuring 14" x 10" wide
Batting/Wadding 4 pieces  each measuring 14" x 10" wide
Fabric scrap for hanging loop
Binding strip 1.25" x 26" wide cut across width of fabric
Basting Spray- I use 505
Usual Sewing Supplies
Pattern template (free) here

1. Making the  Cozy Front and Back
 Make your quilt sandwich with 1 piece of batting and your quilt block.  Spray the batting and lay your quilt block on top, repeat for the other block.  Quilt blocks as desired. Find centre point along the top and bottom edge of each block and mark with pins.  Place pattern on the centre pins and using a pencil or erasable marker, draw round pattern piece, flip over the centre and draw round again. You should have a semi-circle type shape.
I added a little had hand sewn detail around the spout for steam after I had drawn round the template to make sure it would fit.  Cut out the semi circle and zig zag round the edge of front and back.

2. Making the Cozy Lining
Repeat the process in step one for the lining.  I kept my quilting simple and wide so there would be lots of space in the batting to trap heat and keep the tea warm!  Use the template, cut out and zig-zag as in step 1.  You should now have a front and back outer and front and back lining pieces, 4 pieces in all.
3. Making the Hanging Loop
From a scrap cut a bias strip 1.25"x4".  Fold in half lengthways so the long edges meet, press.  Open out, bring the long raw edges into the centre and press along the folds so your strip looks like the picture below.
Bring the folded edges together, press again and stitch along the edge.
On one of the outer cozy pieces, find the top centre point, loop the bias strip and place either side of the centre point with the loop facing inwards.  You can adjust the size of the loop to whatever works for you!  Stitch the loop to the top of the cozy stitching within the quarter inch seam allowance.  

4.  Completing the Cozy
Taking the two cozy outer pieces, place right sides together, pin around the edge and sew using a quarter inch seam all around.  Repeat with the lining but sew a scant 3/8"seam.  This will make the lining a little smaller so it fits nicely inside the cozy.  Clip curves on the outer and lining seam.  If you are nervous about cutting into your seam, place a pin just in front of the stitches to stop your scissors snipping your stitches.  Press open the last 2 inches of the seam at the bottom edge of the cozy on the outer and on the lining (see picture below).    Turn outer cozy the right way out and lining so the wrong side is out.
Place the lining inside the cozy outer, wrong sides together.  Pin at the pressed open side seams.  Stitch all around the bottom edge within the quarter inch seam allowance, about eight-inch from the bottom.  
5. Adding the Binding
Follow my Single Binding Tutorial to add binding around the bottom edge and to complete your cozy!
The teapot beside my cozy was my original inspiration for the teapot block!

Wednesday, 25 January 2012

Swapsies

I meet so many lovely people in the online sewing world and every now and again I meet someone I really click with and I can imagine having a cup of tea with whilst swapping ideas and talking fabrics.  Amy is one of those people and we conspired a little swap to follow the rush of Christmas- we have both received our packages so now its show and tell.  Look what I have to show- the cutest little Dresden bag and matching coin purse adapted from Amy's free pattern.
This is a bag with a purpose.  When I teach music in school, I have a little bag with remote control, throat sweets and other vital bits and pieces.   My current bag is a sad and sorry denim patch pocket, well worn so Amy made a replacement.  It needed a strap large enough to cross my body- we move around a lot in music!  You can see me in my work clothes below- the bag is perfect and its little coin pouch partner fits inside!  Both have just the right amount of grey to fit in with my sober serious Mrs Green attire ( gotta have some sort of authority) and the pops of colour make me smile and my eyes glint each time I look at it!
The tiny pouch is the cutest thing with its mini dresden petals!  I can only imagine how fiddly this was for Amy to make.
And Amy included some of her screen printed My Happy Place print (available in her shop)  Such a crisp and neat print on the softest linen.
And a cathedral windows card- this shape really makes me think of Amy!
And I think it was the cathedral windows that lead to me using the petal design on a frame purse in my makes for her.  The flower pattern was from Suzuko Koseki's book Natural Patchwork
It is a tricksy pattern to do with all those curves and I did it the worng way roung and the texts weren't reading how I wanted them to read so the quick unpic came out- but all worked out!  We both added a personal touch with initials!  Fabrics are Japanese linen, Yuwa print and vintage flowery fabric scraps.
The lining is a Suzko Koseki print.   I drafted the purse pattern myself using Lisa's helpful hints at U- handbag and the frame is from Cotton and Cloud.
I found an interesting fabric panel just before I started this swap that I thought would suit Amy.  It is a fine cotton with a lovely text print- I have no idea what it was for, emboridery maybe, but the print stayed on after I washed it.  It was a large rectangle, big enough to make a decent size lined drawstring bag.  The ties are vintage bias binding.
It is hard to photograph white on white, but you get the idea
A very nice swap and a great friendship, makes the world seem a little smaller x
sib blog

Monday, 23 January 2012

Man Mini

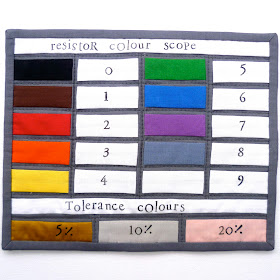
A little while ago, maybe a year or so, a friend bought an old Ladybird book, Making a Transistor Radio.  Inside were the usual evocative illustrations including a great colour block image of radio resistors, an idea hatched but it has taken till now and a big birthday for my friend James for me to realise it.
The design is straight from the book, I love radio but have no idea what it means beyond a colour coding system.  That doesn't matter, James knows what it means and I like the way it looks.  A mini quilt, mug rug, man mat- whatever, it is on the wall in their family kitchen with some other makes from me in a mini gallery.
The colours are from a Kona rainbow charm pack, the gold and salmon 'Tolerance Colours" are from vintage scraps.  I have no % symbol in my stamps so I improvised, need often makes for inventive moments.  Versacraft ink as usual for the stamping.

The back is a funny Japanese text print all about String theory and other rather weird references.  The whole thing is only 9" x 7".  Fun to make and well received.  The same book had this , what a great little source of inspiration.
sib blog

Sunday, 22 January 2012

Resolved to Sew...

You must have seen the mega giveaway at Ali's blog, the similarly named but unrelated Veryberryhandmade.  There is a Blogger's Draw with a huge pile of UK fabric shop prizes, all you need to do is share your 2012 sewing resolutions so here goes my entry...
I have plans rather than resolutions and the first is to put my new machine to good use and make more quilts.  I have already done the little Round the World- A Walk down the Road quilt, started my Swoon- a slow burn long term commitment project and also started a quickie simple quilt for my sister- her birthday is end of February

It is an easy design from Jane Brockett's Gentle Art of Quilt Making, squares, rectangles and all about the fabrics.  These are very Gemma!
 Also planned- lots of clothes.  At least 1-2 dresses- we have a wedding to go to in April so one or both of those voiles has got to become something and there are a couple of skirts in those bolder prints below.  I decided to make all skirts rather than buy, that way I get the details I really want, like pockets.
There are more clothes planned, no idea when I am going to get the chance but one day , this year, hopefully.

Also have a few paper piecing projects in the pipeline, some very close to reveal-the photo is the tiniest peek, and the Fat Quarterly retreat to go to and teach at- it is going to be a great year although having seen the other teachers I am more than a little nervous.
And if I won...that would be lucky, I think I would choose as my favourite and my best the Fancy Moon voucher, they have some great fabrics and the delectable Merchant and Mills accessories.   You can still enter the draw up to Thursday 26th Jan, gotta be worth a try.  It's been a while since I put any music links on, so a current obsession, James Blake's cover of an old and beautiful Joni Mitchell song x
sib blog

Friday, 20 January 2012

I Swoon, you Swoon, they Swoon, we all Swoon

At last I found a little window of time to make my first Swoon block.  All the support and inspiration you could even need is in Katy's Swoon Quilt A Long group on Flickr.  This project would never have started without it.
I have to be very disciplined to sew a big block like this successfully.  A series of assembly lines is needed, stacks of half square triangles waiting to be sewn.  I used a Frixion pen for all my lines and a walking foot for sewing the slippy sliding Little Folks voile
Pins are definitely needed with the voile.  Along the way I must have 'lost' a square here and a piece there a 100 times.
I enjoyed this a lot more than I ever imagined I would.  The block design is simple but very effective and is just what I was looking for with the Little Folks- I know many of you suggested Swoon when I asked what I should make with these fabrics.
Cutting does take ages but I am working only one block at a time so it is easily manageable.  It is a whopper, a mini quilt in itself, 24.5" x 24.5.  I am going for the full 9 blocks but slowly, slowly.

Pressing the seams open is worth the extra effort and made joining a lot easier.  The thiness of the voiles really helps and they have a lot of give, handy when I am trying to match up points.
I am actually bursting to make another but I I have promised my sister a quilt for her birthday, end of February so more Swooning will have to wait.
sib blog

Tuesday, 17 January 2012

Guesting

Today I am a guest at Sew we Quilt, sharing my thoughts on tools. I would appreciate anyone dropping by and having a read!
I went for the little inexpensive gadgets that make my life a little easier and a few unsung heroes

Making this traditional basket block was a good tester for all of them- the bias strip handle hand sewn on especially!  This block is a Kumiko Fujita design from a magazine she contributes to but the Farmer's Wife sampler quilt has the same basket on point.
The background is Denyse Schmidt, the basket is Japanese linen print  and a little Suzuko Koseki print and the headscarf girl in the corner is a Kei fabric.  The gingham is vintage.  
It is a chilly week, considering the headscarf as an option to keep me warm :)

sib blog