Pages

Saturday, 26 November 2011

A Walk in the Woods- Mini Tote Tutorial

Aneela, Moda fabric designer extraordinaire kindly sent me and some other UK bloggers generously filled parcels full of scraps from her forth coming line A Walk in the Woods, released Spring 2012, what a treat!  I knew the first thing I was going to make, and here it is.
This is an easy adaptation of my mini tote tutorial.  I made this one for my niece's Christmas present, you know how young children love bags for carrying their treasures and the fabric is perfect for fussy cuts. A multi-functional gift ready for a game of eye spy as well as filling with goodies.   This bag is 7" square finished size not including the handles.  Wanna make one? read on.
You will need:
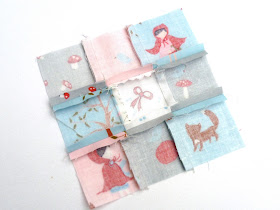
For the front and back- Fussycut eighteen 2" Squares 
Sashing strips for the front blocks- Cut two strips 1 3/4" x 5" and two strips 1 3/4"x 7 ½  from a light solid e.g. Essex linen
For the Straps- Cut two strip 3"x 8" from co-ordinating fabric
Lining-Cut two 7 1/2" squares from co-ordinating fabric
Fusible Fleece- Cut two 7 1/2"squares  e.g. Vilene 630 fleece interlining (supplied by Julia at Gone to Earth).  You could also use cotton batting or interfacing.
Letter stamps and Versa craft ink pad
Embroidery thread for the running stitch detail- I used Sashiko thread
Sewing supplies

Seams are 1/4" throughout.


Step 1: Making the Front and Back
Stitch your squares together in rows of 3. On the top and bottom row press the seams to the left and on  the centre row press seams to the right.


Join your  3 rows of squares matching up the points at the seams.

I stamp my sashing before I stitch it on.  I use Hero Arts Clear design rubber stamps and Versacraft ink.  This is heat set with an iron. Let the stamps dry for a few minutes, cover with a bit of scrap cotton and press for 15 seconds with a medium hot iron.  Remove the scrap cotton and repeat two more times and press on the reverse as well.  Then, add your sashing.


The rest of the bag follows the tutorial here from Step 2.   The only addition you will need to make is to add the running stitch detail.  I add this at the beginning of step 3, after I have added the fusible fleece but before I add the handles.  


Hadley did a lovely version of Ayumi's wristlet pattern with the same fabric and more fussy cut squares see here


 Thankyou Aneela, I think everyone was thrilled with their fabric parcel x

sib blog

Thursday, 24 November 2011

save the date!


save the date!, originally uploaded by ImAGingerMonkey.

Be there or regret it!

Wednesday, 23 November 2011

Once upon a time...

...there was a little house block, built for Leila as part of her Home Sweet Home month in 318 Patchwork Bee.  A house of sewing and Dutch decor, but it didn't look quite right. There was a tear in the side of the grass path- I blame the rotary cutter-and it just didn't make me smile as much as it should.
So I set to work with a seam ripper and some vintage feedsack, kindy sent by Charise and did a little DIY.  As usual this doesn't always go according to plan.  The plus side was the little lady waving goodbye from the door way, the minus was a little damage to a tiny bit of fabric patched up with a door plate number.   The grass was relaid...
And now I am smiling.  Marginally too small- only by 1/4 inch, sorry Leila, I am sure it'll stretch with a bit of steam!   The measuring fabric and the washing instructions are Kumiko Fujita, the roof is Alexander Henry Heath, the Sky is Lecien from Mrs March collection and the chimneys are Suzuko Koseki.  The other prints are vintage and the house is Kona stone.
Wishing an early happy thanksgiving to all of you stateside peeps. We all have much to be thankful for,  it is just hard to remember to take a little time out to think of it but when you do, it is worth it (that's my lecture finished for today)oh and special thanks to Aneela and scrappy loveliness of this yet to be released fabric line she sent me and many other UK bloggers- now there is a generous spirit!
sib blog

Monday, 21 November 2011

A Little Dumpling

I had a lovely surprise this week.  Charise sent me her bee block for my month in Patchwork 318 Bee which uses designs from Kumiko Fujita's wonderful OOP book.  My theme is Afternoon Tea, and my plan is a table runner for my kitchen.  Now her block was a beauty- witness below
Afternoon Tea for Kerry - Tea Caddy and Cup
I love the mix of vintage and new fabrics and the texty tea time words, and if this wasn't enough she popped this in too
I feel totally spoiled!  I had already admired the dumpling here, I didn't realise it was coming to me.  The shape is a free tutorial from Keykalou.  It is the perfect size for my thread snips, might even stop me losing them all the time.

The fabrics she included with it are special too-  a new Suzuko Koseki print (and my favourite of her new ones) and a sublime piece of vintage kitchen fabric- you will see more of it shortly as I am including it in some quilt blocks.

Hugs to Charise xxx A very generous and talented lady xxx
Want to see how good she is?  Click here and check out her incredible Swiss ski chalet.
See what I mean!
sib blog

Saturday, 19 November 2011

Candy Cane Love Pot Holder

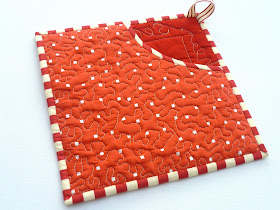
Thankyou for so many supportive comments for my new Candy Cane Love pattern and for the sales too!  I thought I would show you a bit more of the pot holder which uses the square Candy cane block.  

The finished block in the pattern is 6" square, the perfect size for the pot holder pattern on Oh Fransson quilted pot holder Tutorial.  This is an excellent pattern and has a great pocket feature on the reverse.
I used Florence, my new machine, to practice a bit of free motion quilting.  Lynne has been trying FMQ and asked for advice here and the comments include a lot of useful tips.  I have done a little free motion before- it makes my arms ache so I only do small areas.  I keep the feed dogs up, use a darning foot, machinger gloves, adjust the tension wheel to 7 and have a thinner bobbin thread e.g. YLI soft touch or Aurifil 50.  I think it varies hugely according to sewer and machine. The most useful thing for me was practicing drawing out the patterns over and over again on scrap paper.  Getting the doodling loose and free prepares my brain for the same patterns with the needle.
I can get a reasonable front and back tension balance and fairly even stitches.
My patterns always end up a bit smaller than I anticipated.  I think if I did more free motion quilting it would loosen up a bit. 
Or maybe if I drank more...and then quilted.

I hope to put another post up soon showing how I use the pattern alignment marks to match up the different sections.  Can you just about make up the free motion writing around the edge?  t'is the season to be jolly
Would you like a little music?  Last weekend I watched a great documentary looking at 20 years of Pearl Jam on BBC4.  I was a massive fan in the early 90s, it made me feel a little old as it captured a time that I didn't realise was so far behind me.   Saying that I am much happier person now than I was then, so I leave you with a bit of Eddie Vedder
Happy weekend x
sib blog

Wednesday, 16 November 2011

Candy Cane Mini Tote Bag Tutorial

My new Candy Cane Love pattern pdf includes two canes in mirror image which join together to make a candy cane heart.  The block is perfect for a mini tote bag.

A little bag perfect for putting filling with treats or a present in itself!  The finished tote bag is 7.5" Square.  There is a gadget at the bottom of the post for printing this pattern with and without the photos.
To make a Mini Tote you will need:
For the front- 7"x7" Square Candy Cane heart block (pattern available to buy here).  You could use any quilt block 7" square. 
Sashing strips for the front blocks-2 strips 1" x 7" and 2 strips 1"x 8"from a co-ordinating fabric
For the back-8"x8"Square from the same co-ordinating fabric as the strips
For the Straps- Cut 2 strips 3"x 8" from same co-ordinating fabric
Lining-Cut 2 squares 8"x8", contrasting fabric
Fusible Fleece- 2 squares  8"x8".  I used Vilene 630 fleece interlining (supplied by Julia at Gone to Earth).  You could also use cotton batting or interfacing.
Sewing supplies-thread, rotary cutter etc.
Step 1- Sashing the front
Stitch sashing strips to the top and bottom of the 7" square block.  Press seams away from the block.  Repeat adding sashing strips to the left and right sides.  Block should now be 8 x 8".  
Step 2- Making the Handles
Take the 3" x 8" handle strips and fold length ways so the long edges meet and press.  Open out and bring both long outer edges in towards the centre fold.  Leave a small gap, less than 1/8 inch between them, press again creating fold on the outer long edges. Bring the folds together and stitch as close as you can to the outer edge.  Repeat for the other handle.
Step 3- Adding the Handles
Fuse fleece/interfacing to the wrong side of the front and back bag pieces.  If you are using batting you could use basting spray or tack/baste your batting to the front and back pieces.  Mark the centre of the top front and back bag pieces (right side facing) with a pin.  Place handles an inch either side of the pin so that each handle loop is lying downwards on the bag.  Stitch along the top edge to secure the handles 1/8 inch from the outer edge.   
Step 4- Making Bag Outer and Lining
Take the front and back bag pieces with handles attached, with right sides together, stitch 1/4" seam along side, bottom and side edge.  Use very small stitches around the bottom corners and trim the corners.  Turn through to the right side.  Press side seams open at the top of the bag-this is to make seam matching easier when you stitch the bag outer and lining together.  Place the lining squares right sides together and stitch from the top edge, down the side and a little way accross the bottom, securing the seam at this point.  Leave a 4" gap at the bottom to turn the bag through in the next stage.  Repeat on the other side seam.  Trim corners.  Press seams open at the top of the lining side seams.  Leave the lining with the wrong side outwards.
Step 5- Joining Outer bag and Lining
Place the outer bag inside the lining so the right sides are facing each other.  Use the open side seams to match up the outer and lining as in the picture, use pins to hold in place.  The handles should be lying downwards.
Stitch all around the top edges sewing through the lining and bag outer with a 1/4" seam.  Turn the bag through the 4"opening in the lining.  Press.  Close the opening with ladder stitch or by machine.  Top stitch around the top edge of the tote bag.  Fill with goodies and get ready to give- you weren't keeping it for yourself were you?
sib blog

Candy Cane Love

Today I nervously put my next foundation paper piecing pattern on sale now at Etsy- Candy Cane Love. This is unashamedly Christmassy.  I love red and white, especially at Christmas and the candy cane stood out for me as the pattern I wanted to make for Christmas sewing.  
This pattern is intermediate level- it is a little harder than Winter Woolies which is a beginner level pattern.  There are some very small pieces to make the cane curve and enlarging the blocks would make them easier to work with if you find little bits a challenge. You get a 15 page PDF document to download,  pattern pieces and instructions to make 3 candy cane blocks as well as pattern maps to show how all the pieces fit together, photos, pictures and general paper piecing guidelines and helpful hints. There are two rectangle mirror image canes that can be sewn together to make the candy cane heart in the mini tote bag.  You could also use these separately- I think they would work well in a line of three, maybe on a table runner.  I used my tomato reds to make the canes for the candy cane heart and stamped with versacraft ink in the centre.  I have posted a free tutorial to make the mini tote bag here!
In addition to the two rectangle cane blocks, there is a square cane block.  I used cherry reds for this cane-there is a lot of red in my stash!  Amy has been invaluable in her pattern testing for me for the second time- I owe her big time!  She used one of the rectangle cane blocks for her beautiful Christmas linen stocking here!  The sweetie fabric is the most perfect match.
Now I can draw in photoshop, I made some improvements to my pattern formats.  All the pattern pieces for each cane are on a single page so that you can enlarge them all in one go to make bigger blocks.  The blocks I made up are 6"(square block) and 6.5" (rectangle) tall- finished size.  Photocopying by 200% would produce quilt size blocks of 12" and 13" and there is room around the canes to trim the blocks if required.  I also put in alignment marks to match the sections up- I found this really helpful.  I have put in a cropped pic below so you can see how the marks work.    You can see how the pattern pieces have a little colour too so to help you know which bit is which!  They are pastel shades on the pattern pieces and will print equally well in black and white- that is how I use them, or colour without using all your printing ink up!
This is the square block in a potholder, perfect for all the Christmas cooking.  I 'll post more about this one tomorrow.
I hope you like it!
sib blog

Tuesday, 15 November 2011

Skirt Hem Pleat Tutorial

I just added a very nice pleat hem to my new skirt, see here.  It was the first time I had used this finish and I liked it a lot so I thought I would share the process.  The idea is not mine, it was part of the Simplicity 2215 pattern but their directions were a little sparse as is often the case with commercial patterns so I have expanded on them and added photos to help.  This detail works best on a full skirt with gathers or pleats.
To make the hem bands:
Measure round the hem of the skirt that you are adding this detail to.  Divide the measurement in half and add 1 1/4 inches to the measurement.  This will be the length.  The width will be 3 3/4"
From the extra hem fabric, cut two strips across the width of the fabric- selvedge to selvedge using your measurements above. Take the two hem bands and  using a 5/8" seam join together at the short ends to make a long continuous band.  Press the seams open, you can neaten the seam edges if required. 
Press the hem 1 3/4" from the bottom.  You need a good crease here.
To add the bands to the skirt:
Open out the hem.  Take the two additional hem bands and join together at the short ends to make a long continuous band.  Press the seams open, you can neaten the seam edges if required.  Place the band onto the bottom of the hem right sides together.  If you are using the directional fabric the band fabric print will be upside down pointing to the bottom of the hem.  Stitch a 1/4" seam.  
Open out the additional hem band- see how the directional prints are both facing the same way?  Turn the skirt inside out.  Press the 1/4 seam upwards away from the hem.
Take the bottom of the hem and fold towards the skit along the original 1 3/4 crease line.  Press along the crease line again but this time you will also be pressing the seam you just sewed which will now be pointing downwards towards the hem.
Take the raw edge of the hem band and using the seam as the fold line, bring the hem downwards- in this photo it will move to the right.  The 1/4 seam is tucked in behind the fold which you can see to the bottom of the picture where I have left a bit poking out!
At this point I baste/tack through the layers along the fold line just to make sure it all holds in place.  Using a longer stitch length e.g.3, stitch as close as you can to the fold.  I stitch on the wrong side to ensure I stitch through the fold.
Remove basting/tacking stitches and press.  You can see the wrong side below.
And here is the right side.  I left a raw edge for the bottom hem to and fringed the fabric but you could also stitch a narrow 1/4 hem here to finish off.  The fraying was done with a pin picking out the cross threadsI also stitched an additional line of stitching to control how far it went
I also stitched an additional line of stitching approx 1/8" above the fringing to control how far it went.
sib blog