Pages

Monday, 30 August 2010

Last of the holidays


The last bank holiday weekend before Christmas and beautiful weather.  I worked on a Bee (a little bit) Japanese bee block yesterday- theme of "Wonky Town" and finished it this morning before 10.  I played with the fabrics first, what goes with what- they are pretty small pieces so I needed to be careful


 drew out a design, added some extra fabric


I use photo mount squares- double sided stickies to hold the paper whilst I rotary cut these out with seam allowances


I look at this point and have a few doubts- too late.  It stitched up OK, I added a bird although it looks like the house has two chimneys!  Hmm...


On the second block there will be a lot of veggie garden, a self sufficient house as there is lots of solid green left.  I like the house bit in the middle, unsure about the rest.  

I needed sea today.  We are less than 30mins from a lovely pebbly beach, even on bank holidays it is  quiet and the colours are very calming.


Can you spot a small dog's nose in this pic?

Despite the warmth, Lottie did not settle the whole time, she wants a constant game of fetch the stone- we throw one, she brings it or a completely different one back; repeat


You can see the crazed look in her eyes!

Enjoy the late summer sun x
sib blog

Saturday, 28 August 2010

Modern Swappers Parcel

Modern swappers has been a 3 month swap where you share your tastes/likes etc and your secret partner matches them up with fabric and crafted goodies.   I have sent mine to Joan and she was very happy with it.   The person sending a parcel to me turned out to be Amy (her blog is here) and I am over the moon with its lovely contents!  Just the wrapping took my breath away.  I am not the best at wrapping so I am very appreciative to get such pretty wrappings.


More than anything else I appreciated the time and care she put into her selection.  I can trace everything back to the likes/dislikes bit on the Flickr discussion and how she matched up my love of vintage and modern.  I am so impressed!  In the little parcels I found great texty fabrics, Anna Maria Horner Good Folks and Kona Charm squares (never even seen these before, the UK is a hard place to find Kona apart from online).  


I think I will use the black/white courier font fabric first, love it!


She made a really pretty linen and hexies cover for my Singer Featherweight.  It fits beautifully.  I left a comment on this in the Flickr pool as I thought it was cute.  I also noticed it was small and yet still didn't guess it was for me!  She sent the vintage pitcher- hand blown glass!  It has my tall skinny sewing bits in but it may travel to the kitchen for flowers when needed.   It will look stunning with Narcissi in spring.   The book behind the pitcher is a delight of vintage projects, like a Singer wall hanging


 and soft cubes, I especially like the house and ketchup designs


These Norman Rockwell lithographs are such a thoughtful thing to include and the fabric repro mini print is incredibly sweet!  I love the Americana of these, something I could never find in the UK.


I cannot say enough thankyous to Amy!  thank you thank you thank you

If you fancy taking part in Modern Swappers the next round of signups are coming up on Flickr.  I have really enjoyed this swap, the admins run it so well- it must be such hard work- and I have enjoyed looking at all the sneaky peek pics of what might be sent.  I will have great memories of this swap x

sib blog

Applique Needlecase Swap

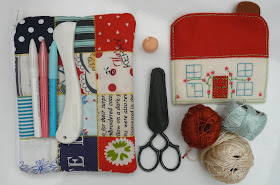
I know for many crafters it has been a summer of bees and swaps.  I have been involved in two swaps and both my parcels came today!  I had this sweet little applique needlecase from Wendy


Nice ice cream colours on the flower petals- a big thank you to Wendy!   Having made one of these for my partner I can appreciate the work gone into this.   She has also has a blog and makes very cute keyrings, take a look!
sib blog

Friday, 27 August 2010

Fabric Friday

It is always good to be back home, especially when there is a big pile of post and not all of it work related but filled with fabric!  These Yuwa lovelies were bought with the great help of Ayumi


and she included some extra bits- thank you again Ayumi, I know you liked these as much as me!  I can see myself using these in some bee blocks, they are very useable.  

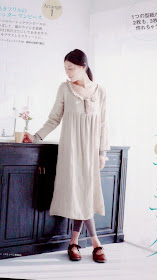
Whilst  I was away, as well as watching the crowd of grandparents, aunties and uncles and young children singing "Sex on Fire" by the Kings of Leon (surprise 60th birthday party for Damian's uncle and a live band at the party) I also got a chance to go to Abakhans.  The fabric is cheap, especially for the UK, plentiful and mainly sold by weight.  There are large, labelled remnant baskets and I knew I wanted linen to make this from Pochee vol 7


I recommend a visit to this shop- I found 3 metres of linen just as the dress above and the price was £7.40!  You need to see the fabrics in the flesh, quality varies and some things are faded/marked, but there are great bargains to be had.  I have made a tunic using a related pattern to this dress and I am going to act without originality and slavishly make the dress as it looks in the pic above.  I also have plans for these


Fresh from Kate at M is for Make, Alexander Henry's In the Kitchen range.  Great colours- grey and orange is one of my favourite combinations, and the yellow- not my usual choice- lifts the whole thing.   
I have sewed all day, I have to reclaim the machine in the same way Lula reclaims her toys and bedroom.  Whilst away we also had a Sylvanian Families wedding, all Damian's extended family attended, his father officiated, I daren't show how he looked as a priest!   Lula arranged...Enjoy!


sib blog

Friday, 20 August 2010

Visiting

We are off visiting relatives for a few days tomorrow and as ever I like to push it to the wire and squeeze as much in as possible before we go.  I have been sewing endless circles to get this baby quilt top finished


It was windy, rainy and getting dark when I took this but you get the idea.  All circles sewn in on the machine and the very smallest using the same method but by hand.  I am taking  some anchor perle and I am goings analog- (sewing by hand)- so I have a bit of crafty stuff to keep me going over the week.


I also thought I would do a last minute dye job on a horrible colour/style cashmere jumper so I could make wrist warmers and slipper socks for the winter.  Started off like this- such a bad colour!

and transformed into this

which I love and it is lightly felted for cutting up and sewing.  Unfortunately the seal on our elderly washing machine is the same colour despite bleach, hot wash and scrubbing.  Hmmm.  Just to squeeze more fun into today alongside working, packing and sorting out pets, I had a new piano delivered and our old one taken away- not an easy job in a small house, but the professional piano movers did a great job.  Here is the beauty- I know it isn't crafty or sewing but I do love her and she was a bargain, her previous owner did not really play her and she has a shiny bright sound!


A few days away so see you on my return.  I'll have access to my emails not online so much. 
Packing still to do ... x
sib blog

Vintage Book

I have been very lucky with giveaways recently.   I won this lovely vintage book from a group of quilters called Quilting Corner based in Israel. 


 Inside there are inspiring designs patterns and projects relating to prize winning entries in the Progressive Farmer quilt block competition


Handy inspiration for quilting bees!  Thank you to all at Quilting Corner
sib blog

Wednesday, 18 August 2010

ABC

I am a big fan of typography.  My mum studied it at art school and I was taught calligraphy at primary school and loved it.   Now I still love it in fabrics, on screen or printed.  I  found this great children's book from 1946 at the carboot sale a few weeks ago, ahead of its time with its wonderful typography and bold photos.


The source material for the images was the London Museum- and it is an odd  and eclectic selection.


Many of the new fabric ranges feature alphabets- I have this Yuwa print, amongst others, flying on its from Japan via USA and to the UK.  I will post more when it arrives!

sib blog

Sunday, 15 August 2010

Pieced Circles Tutorial

I am making a baby quilt for a new niece/nephew due in September and this has involved circles, circles and more circles.  


Over this week I have - with a lot of unpicking and muttering under my breath- perfected a way of insetting a circle into  a fabric background.  The circle is pieced using a seam and sewn on the machine rather than appliques and sewn on top.  I have tried lots of different sizes- too small is too difficult and I ended up sewing these by hand, but from about 3 1/2 inch diameter upwards (the bigger they are, the easier it gets) I have taken a method briefly described in Compendium of Quilting and expanded it, done a few things differently and made it into a tutorial -  so here goes...

1. Draw a circle on your chosen fabric- at least 3.5" diameter/ 1.75", your finished circle diameter will be half an inch smaller than this because of seam allowances.   You will need to have the this circle matching the grain of the framing fabric so if you are fussy cutting bear this in mind.   Draw a circle the same size on a piece of paper.  The paper is to help put guide marks on the fabric- it is not a template.   On your framing fabric, draw a circle which has a finished diameter 1 inch smaller and do the same on the piece of paper.  

Cut  circle out of framing fabric, be as accurate as you can it makes a big difference when seaming the inner and outer together.  You need the frame, this circle is for scraps


Cut the other larger fabric circle.


2.  You can see faint marks on the pics above like compass points.  I use blue chalk pencil for North, East, South, West and Pink for NE, SE, SW, NW.  You need to mark these points on the right sides of the circle and the circle frame.  Using the paper as a guide for this is much easier.  Keep the marks small so they will disappear in the seam allowance.  You can see this best on this pic again.


3.  Place circle right side up and place  fabric frame on top, also right side up- the grain should match- it makes sewing much easier and gives a more even circle when finished.  


4.  Fold the wrong side of the backing fabric over at the top, North,- right sides will now be together and there should be a mark to match up- pin with the pin point facing outwards.  You will now see some different fabrics showing how to seam the circle, I hope it is not too confusing!


5. Repeat for South, then East and West.  


Then pin the points between- NE, SE, SW, NW.  Pins work best for me, I tried tacking and it was a disaster!


6.  You need a 1/4 foot or guide on your machine.  Place the fabric under the machine presser foot. so the frame fabric is on top (wrong side up) and the circle fabric is underneath.


and the circle fabric is underneath.


Using the slowest speed on your machine , 1/4 inch seam and a small stitch- 2mm, sew slowly around the edge of the circle- the smaller the circle the more you will need to stop and ease the fabrics to fit.  I take the pins out just before they go under the foot and use a seam ripper to hold the fabric together as they go under.  

7.  With smaller circles- e.g. under 4 inches- you may need to clip the circle frame- the top layer -as you sew to ease it in.  Only a tiny snip is needed!


I confess to unpicking and re-seaming where there were wrinkles and puckers that shouldn't have been there, but on bigger circles- e.g 6 inch diameter and larger, they can come out perfect first time!

8.  Press the reverse with the seam towards the centre of the circle, it should press nice and flat.
  You can press the other way(outwards) and the finished circle will appear to recede.


and when you turn over there should be a circle set into the fabric frame.  This one is 3.25 inches diameter.


Once you get the hang of the technique, you can do circles in circles.  I am setting a whole load of circles in to a big backing square of Kona snow- floating around like bubbles!

Here is a big one- over 9 inches diameter


I hope it works for you.  I tried freezer paper applique and Anna Maria Horner's excellent super circle foil method but I like crispness of this method, no stitching is visible on the right side- and the fact I can sew it all on the machine.  If you have any questions or problems do let me know!

Happy sewing x
sib blog